- More Vintage Variety -
- A turn–of-the-century Dean Passenger Luggage Van -
AND SEVERAL FURTHER BUILDS……
Photograph with many thanks to Rob [RosiesBoss] RMWeb.
The Dean 40’ Passenger Brake Van, one of the first [mostly] plastic coach kits on the market, is probably the most sought-after and [relatively] expensive of all of N&C Keyser’s carriage and wagon kits. The reason for this is simply that no manufacturer has made one in ready-to-run format and the only other kits available are more expensive and complex affairs in etched brass. An unmade Dean PBV could easily sell for £30 and even poorly-made examples [which occur frequently on eBay] can easily top £20. Made properly, with care given to added detail and livery, this is also an attractive and unusual vehicle: another factor which impacts on price.
I had been hunting for an affordable example for a couple of years until, rather like buses, two appeared within weeks of each other. Each cost around £15 each when other parts of the multiple-orders had been stripped out. Both will require dismantling, cleaning-up and repairing before rebuilding but each has potential and one will be GWR brown overall whilst the other will be ‘chocolate and cream’.
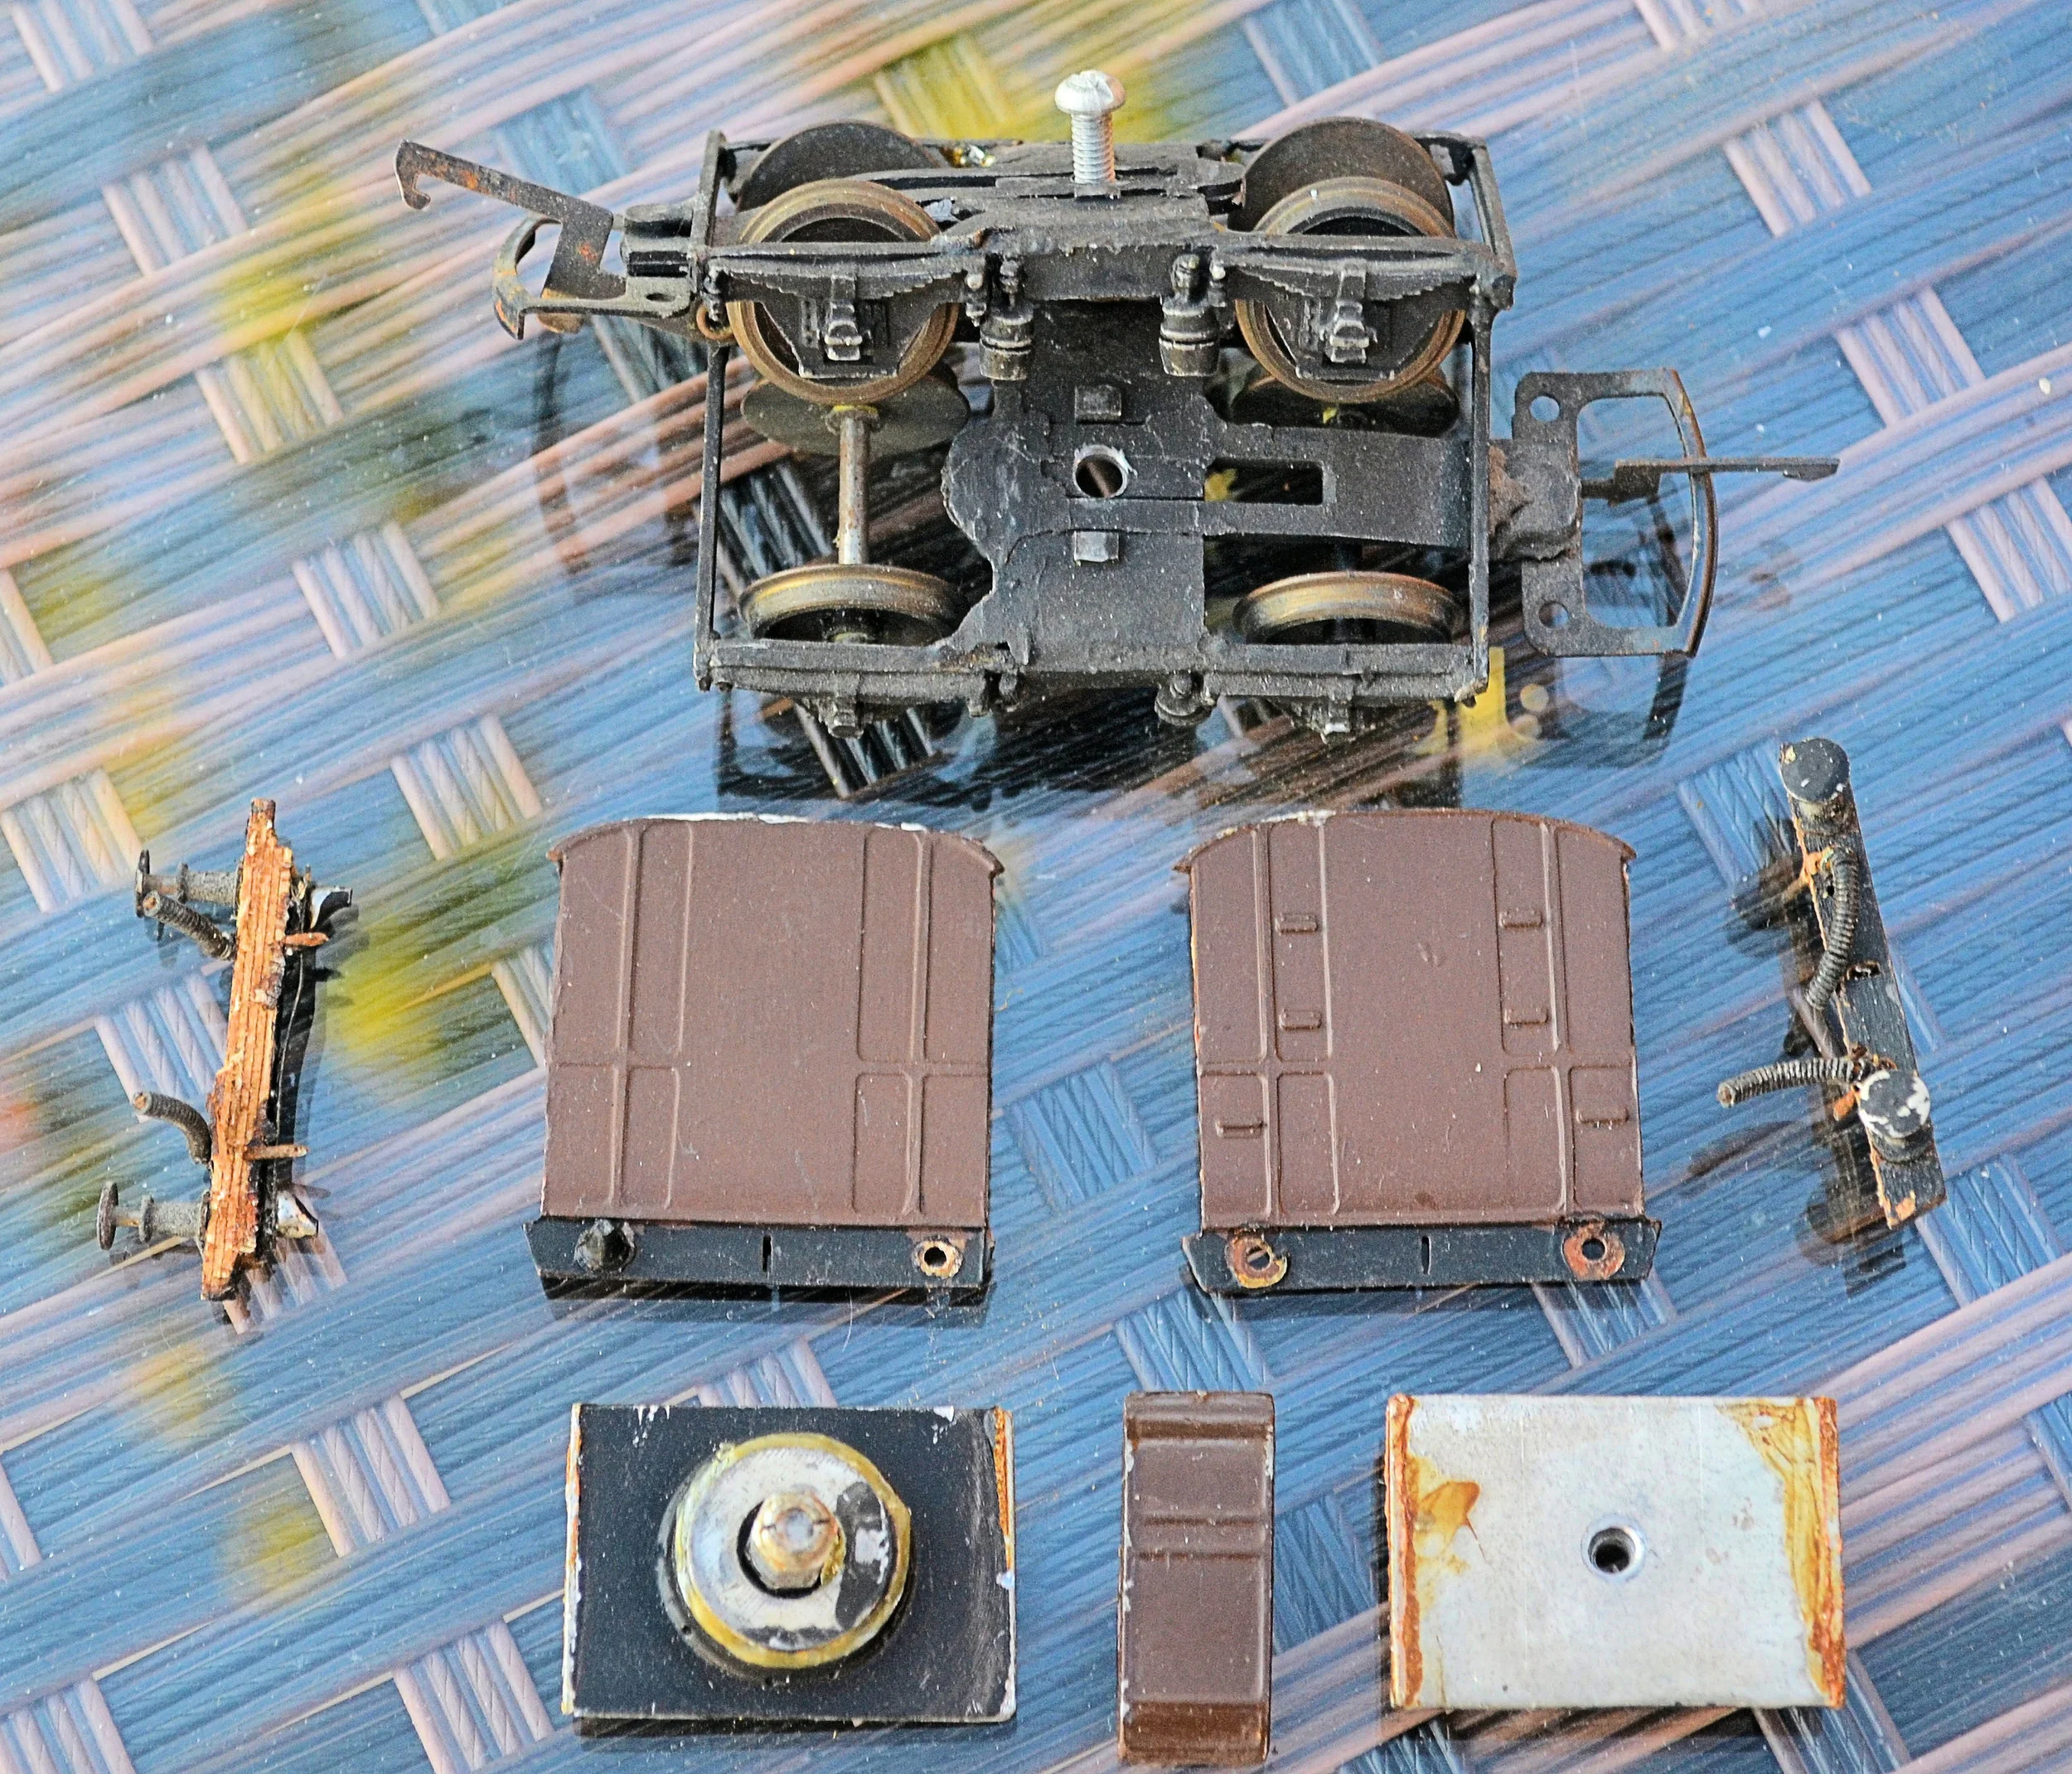
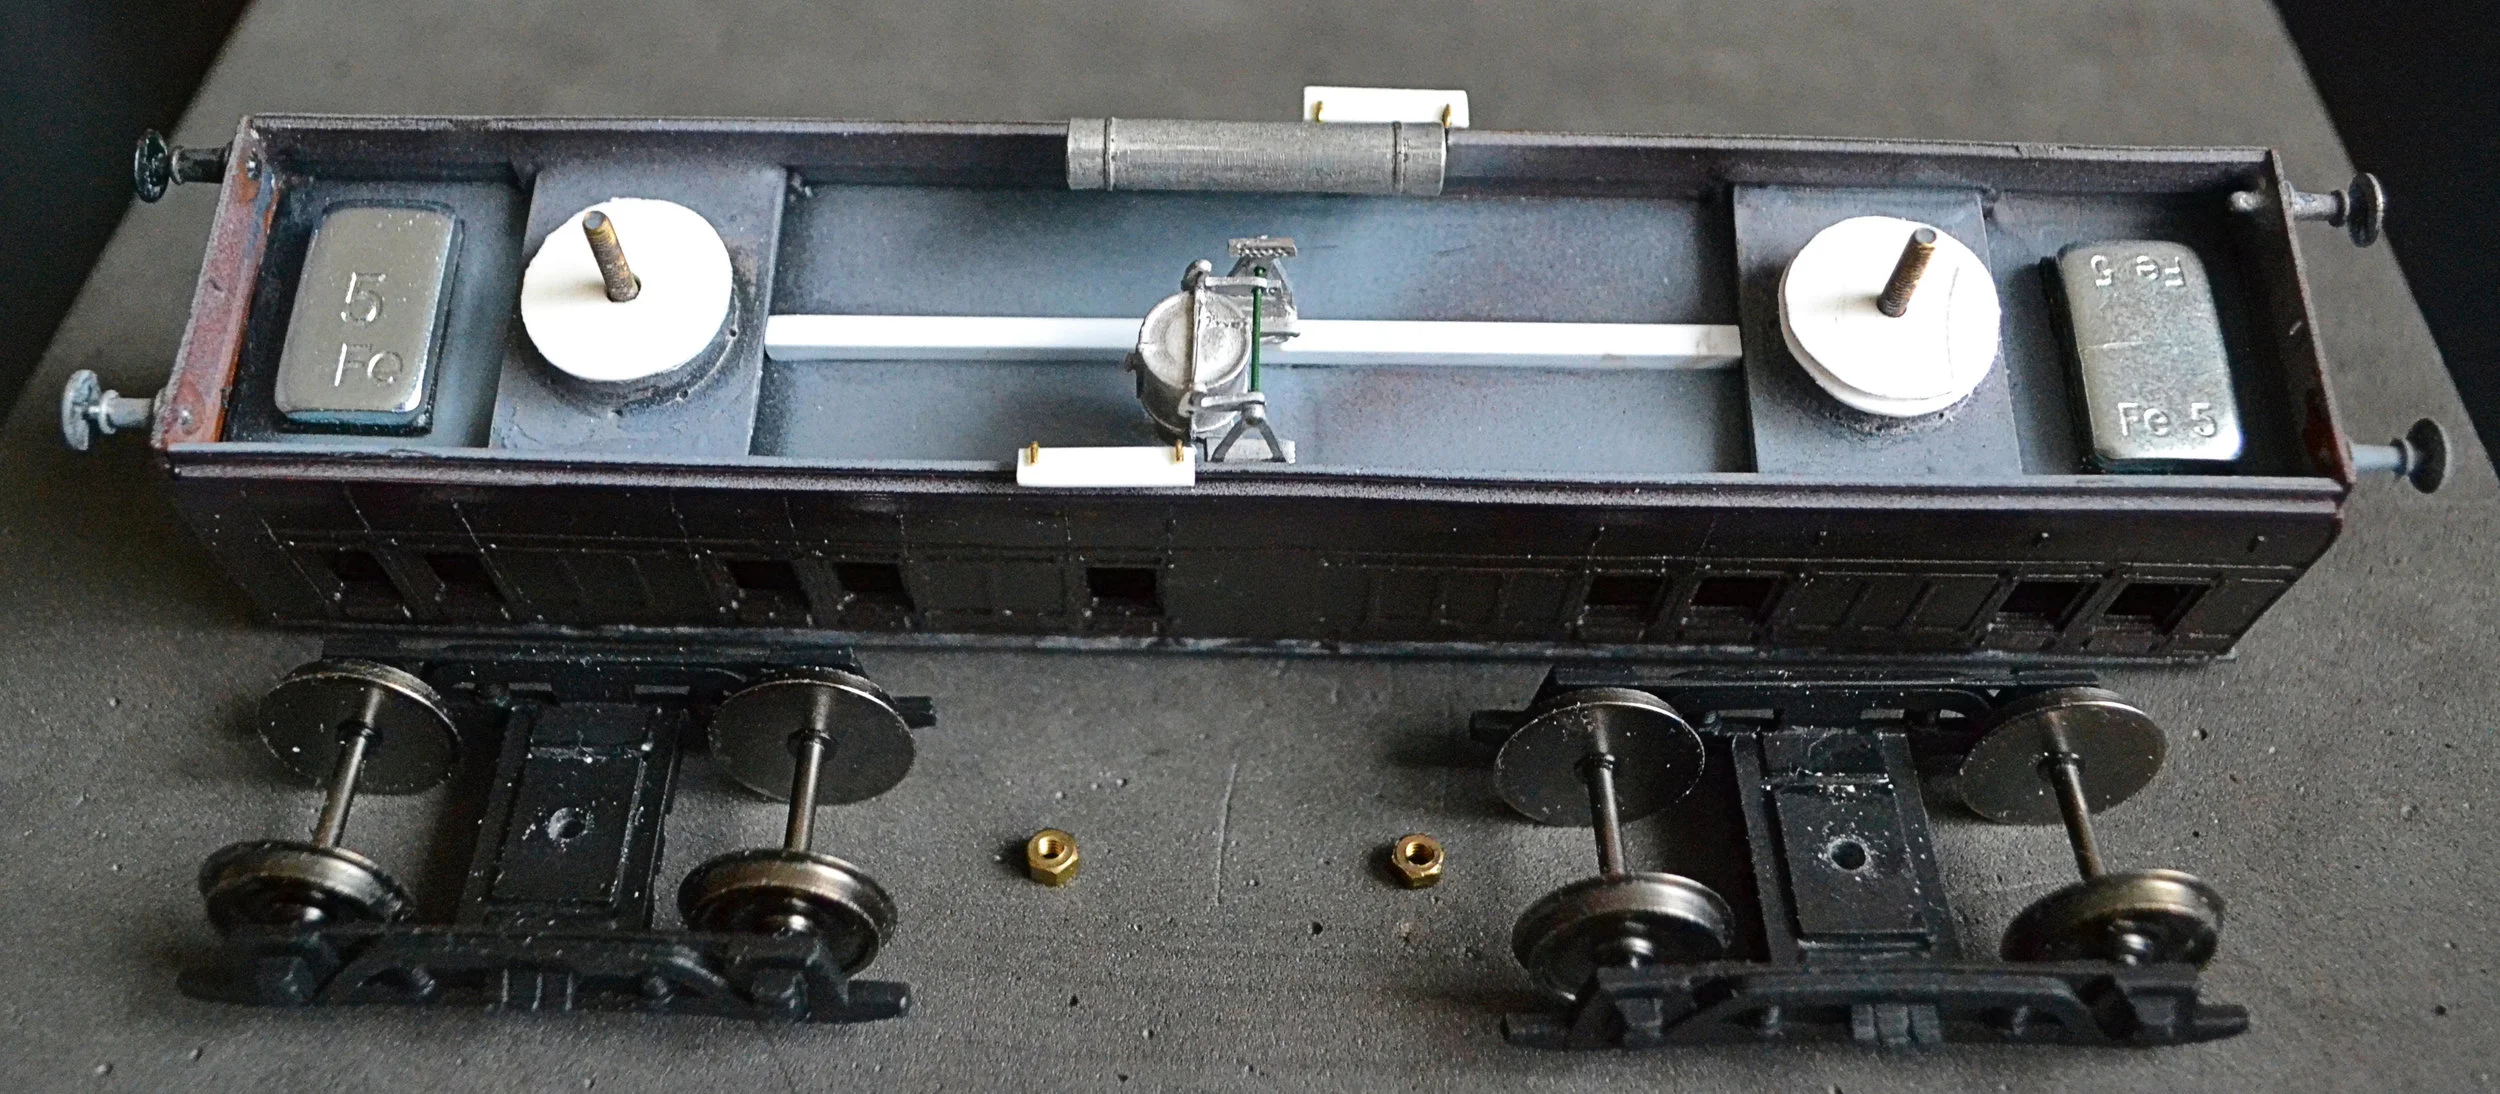
What do you get with this kit ? Not a great deal really and the photograph below shows one already dismantled and in its constituent parts. Just sides, ends, a roof, side look-outs, limited underframe detail and bogie parts with wheels. All is plastic except for the side look-outs, the underframe parts and the bogies, which are white-metal. Metal side look-outs were a surprise. A floor and glazing are left for the builder to provide: Keyser never provided floors for their coaches but they are absolutely essential to add strength and prevent bowing. The wheels supplied are better discarded and replaced by modern sets, fitted into brass bearings.
You’ll see from the next photograph that the other PBV is missing a side look-out. On most, these were taken off and plated over in later life but the livery for this is then incorrect as it is too early. I may reinstate the look-outs on both sides with some spare Ratio LNWR ones from the bits box: they are not correct, obviously, but do fit and when painted will look acceptable. A decision awaits however.
Purely as a narrative update, this new project is going to present a number of challenges, not least because of the lack of photographic [or other] detail concerning the under-frame arrangements: the position and make-up of vacuum brake-gear for example. The standard texts are not that helpful and there are few usable internet photos / illustrations either. Further, it is clear that during their longish life, a good deal of plating-over took place, covering the side look-outs and various parts of the panelling. And then there were conversions from gas to electric lighting, non-corridor to corridor rebuilds, some with small end windows, others with changes of bogie and between them all various different brandings.....
So, my models will inevitably err on the side of generic, but not as generic as the original Keyser model. I'll attempt to use correct numbering too but it's likely that the numbers used may not wholly accurately represent the vehicles' conditions during the 1928-34 period. Actually, having written that, I can't really see that it's going to happen. However,I think it's good that we should, wherever possible, strive for accuracy rather than simply rush in and build for effect but, as ever, a degree of compromise is sometimes unavoidable because of a lack of recorded detail.
The various parts are currently enjoying a refreshing bath with Mr Muscle. That doesn't sound quite right, but I do hope that you know what I mean !!!
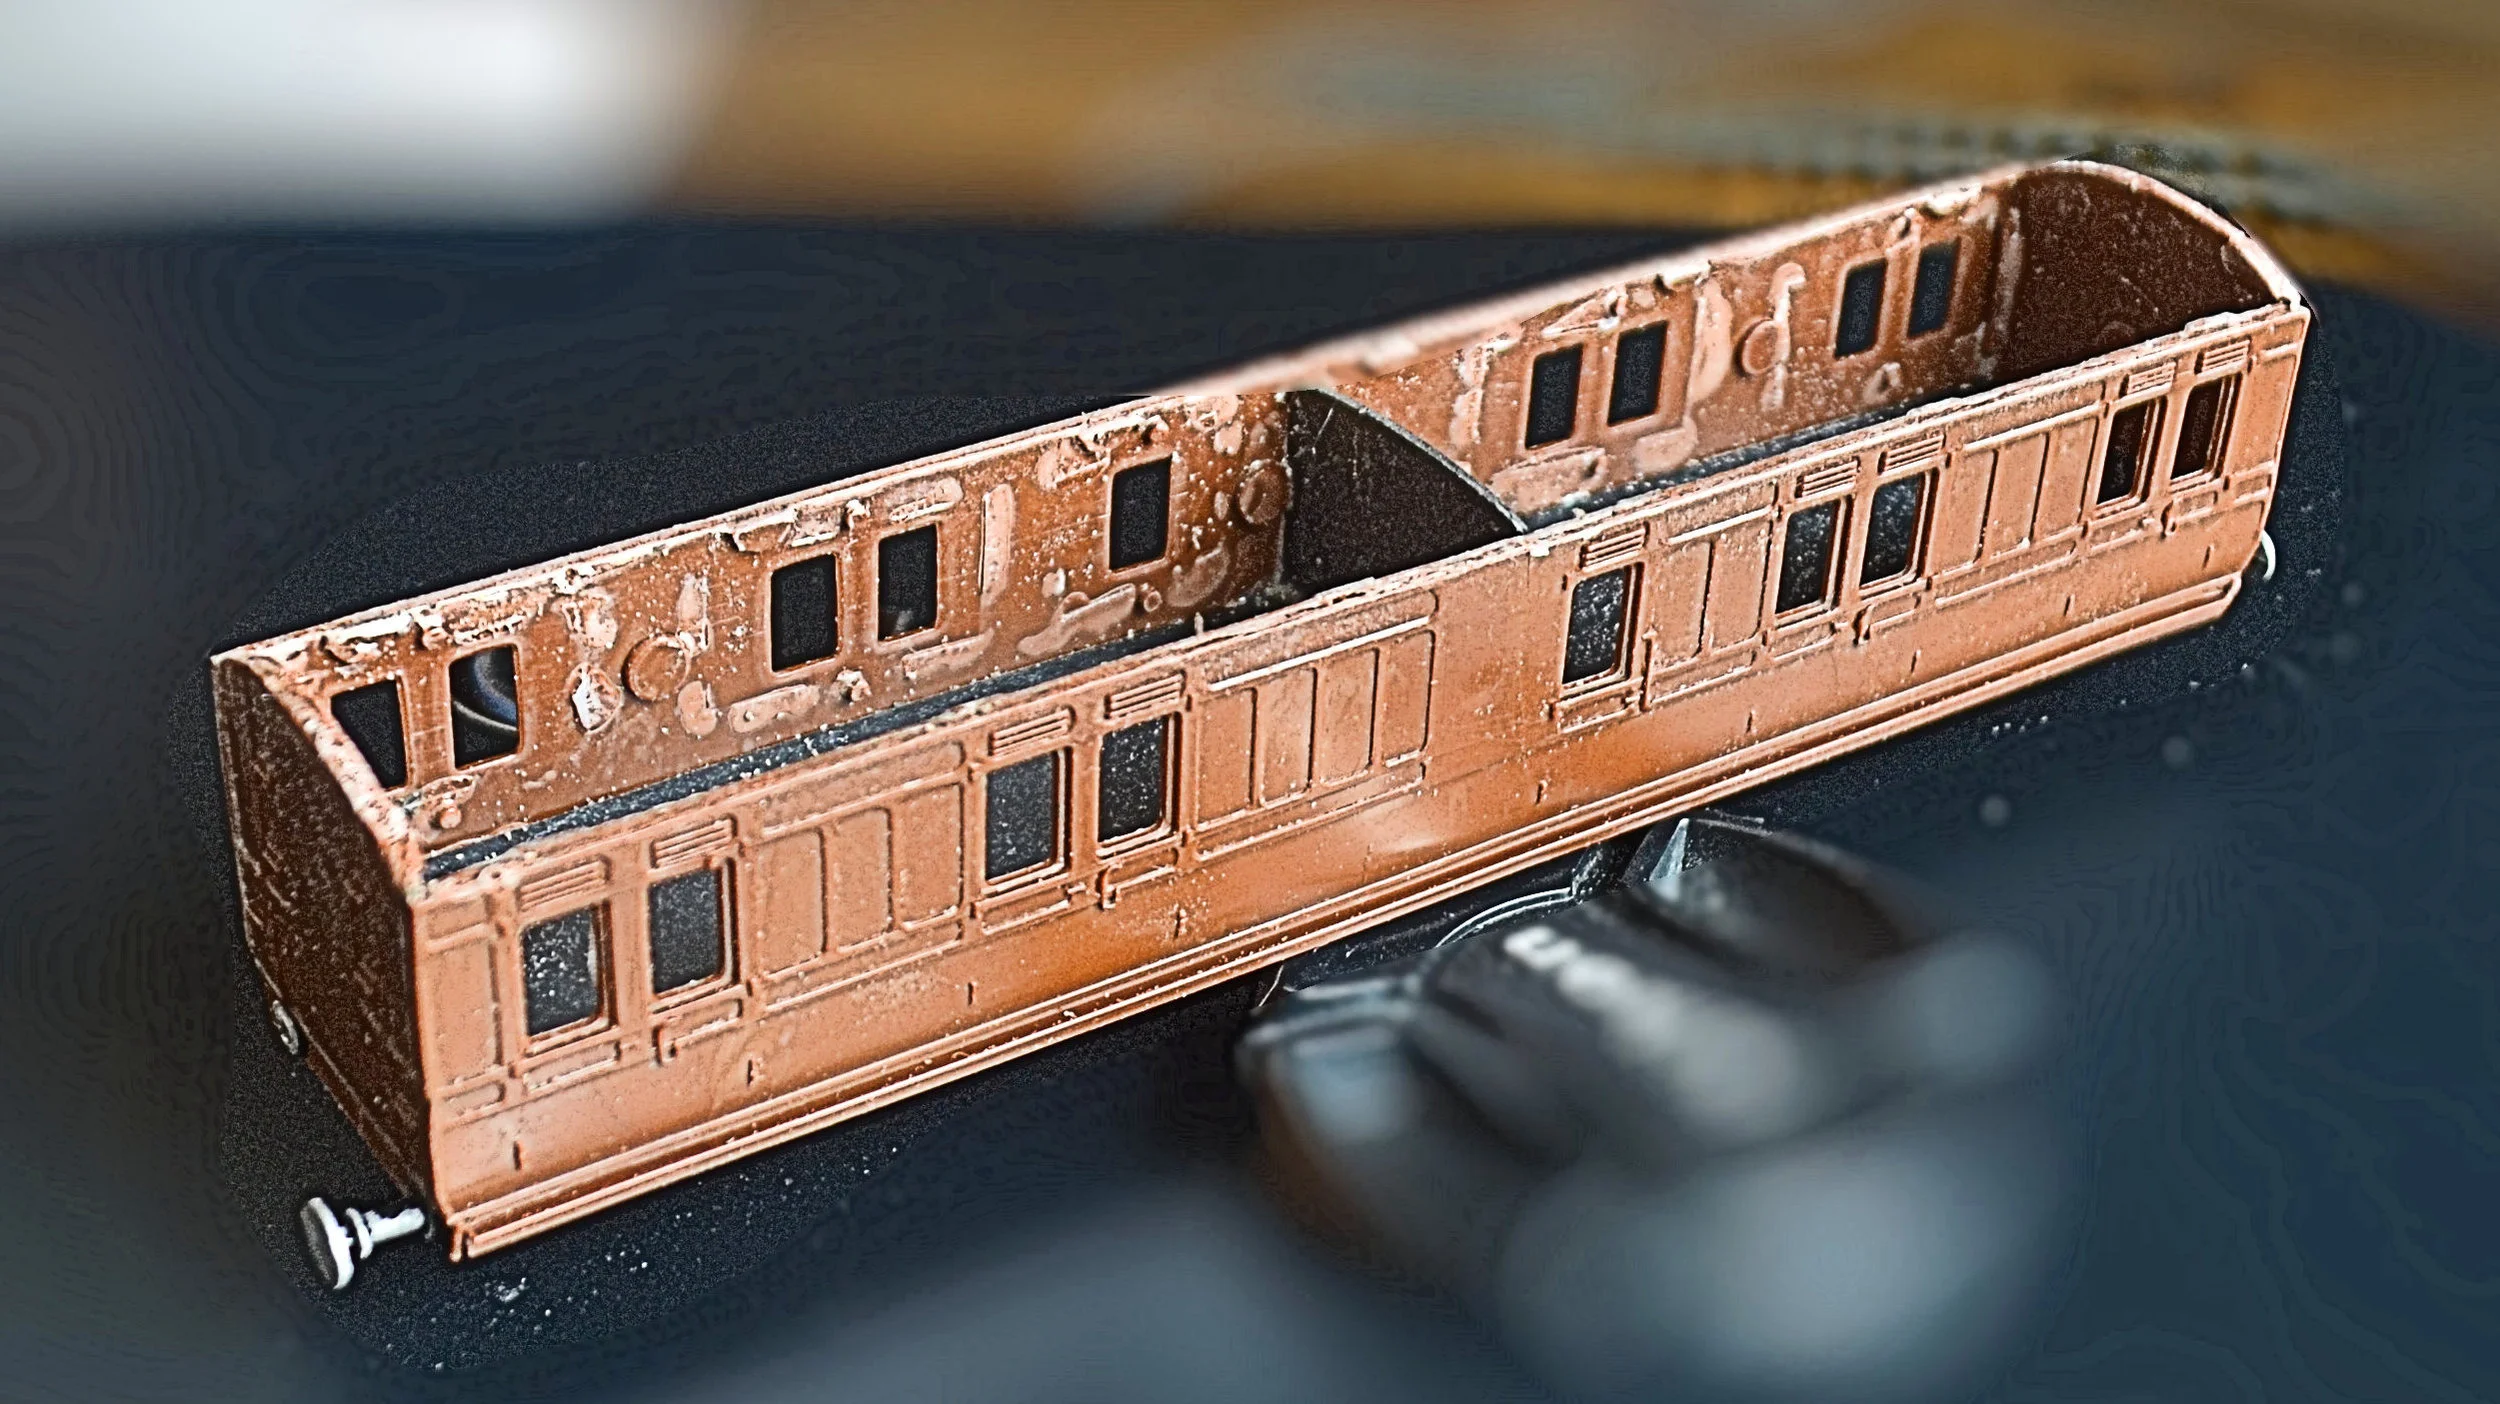
I have now made a start on the body in the above photograph. Whilst I was able to remove the roof without breaking anything, so much adhesive had been used to assemble the body it was not possible to separate it into its constituent parts without damage. The glazing has been removed and binned however and the left-hand photo below shows the unit after the paintwork has been stripped by coating with 'Mr Muscle' oven-cleaner.
The buffers fitted are white metal castings. They are actually quite nice but incredibly fragile, the head having broken off one before I acquired the coach. Consequently, the broken shaft and its pair buffer will have to be removed from that end and an attempt made to match them from the bits box.
The right-hand photo below shows an initial spray of primer to check over the body for flaws, etc.. I have also cut away all of the commode handles as they will be replaced with etched parts. The buffers have also been removed as mentioned above. The moulding is in surprisingly good condition although a little sanding and trimming will be required here and there. No major repairs are necessary however. Whilst the second photo will not show it, I have also drilled out 0.4mm holes for the grab/commode handles on each side and scribed out the door shut lines to give the body some relief when painted. Further scribing will probably be necessary after the next coat of paint. In primer, it's beginning to look better already.
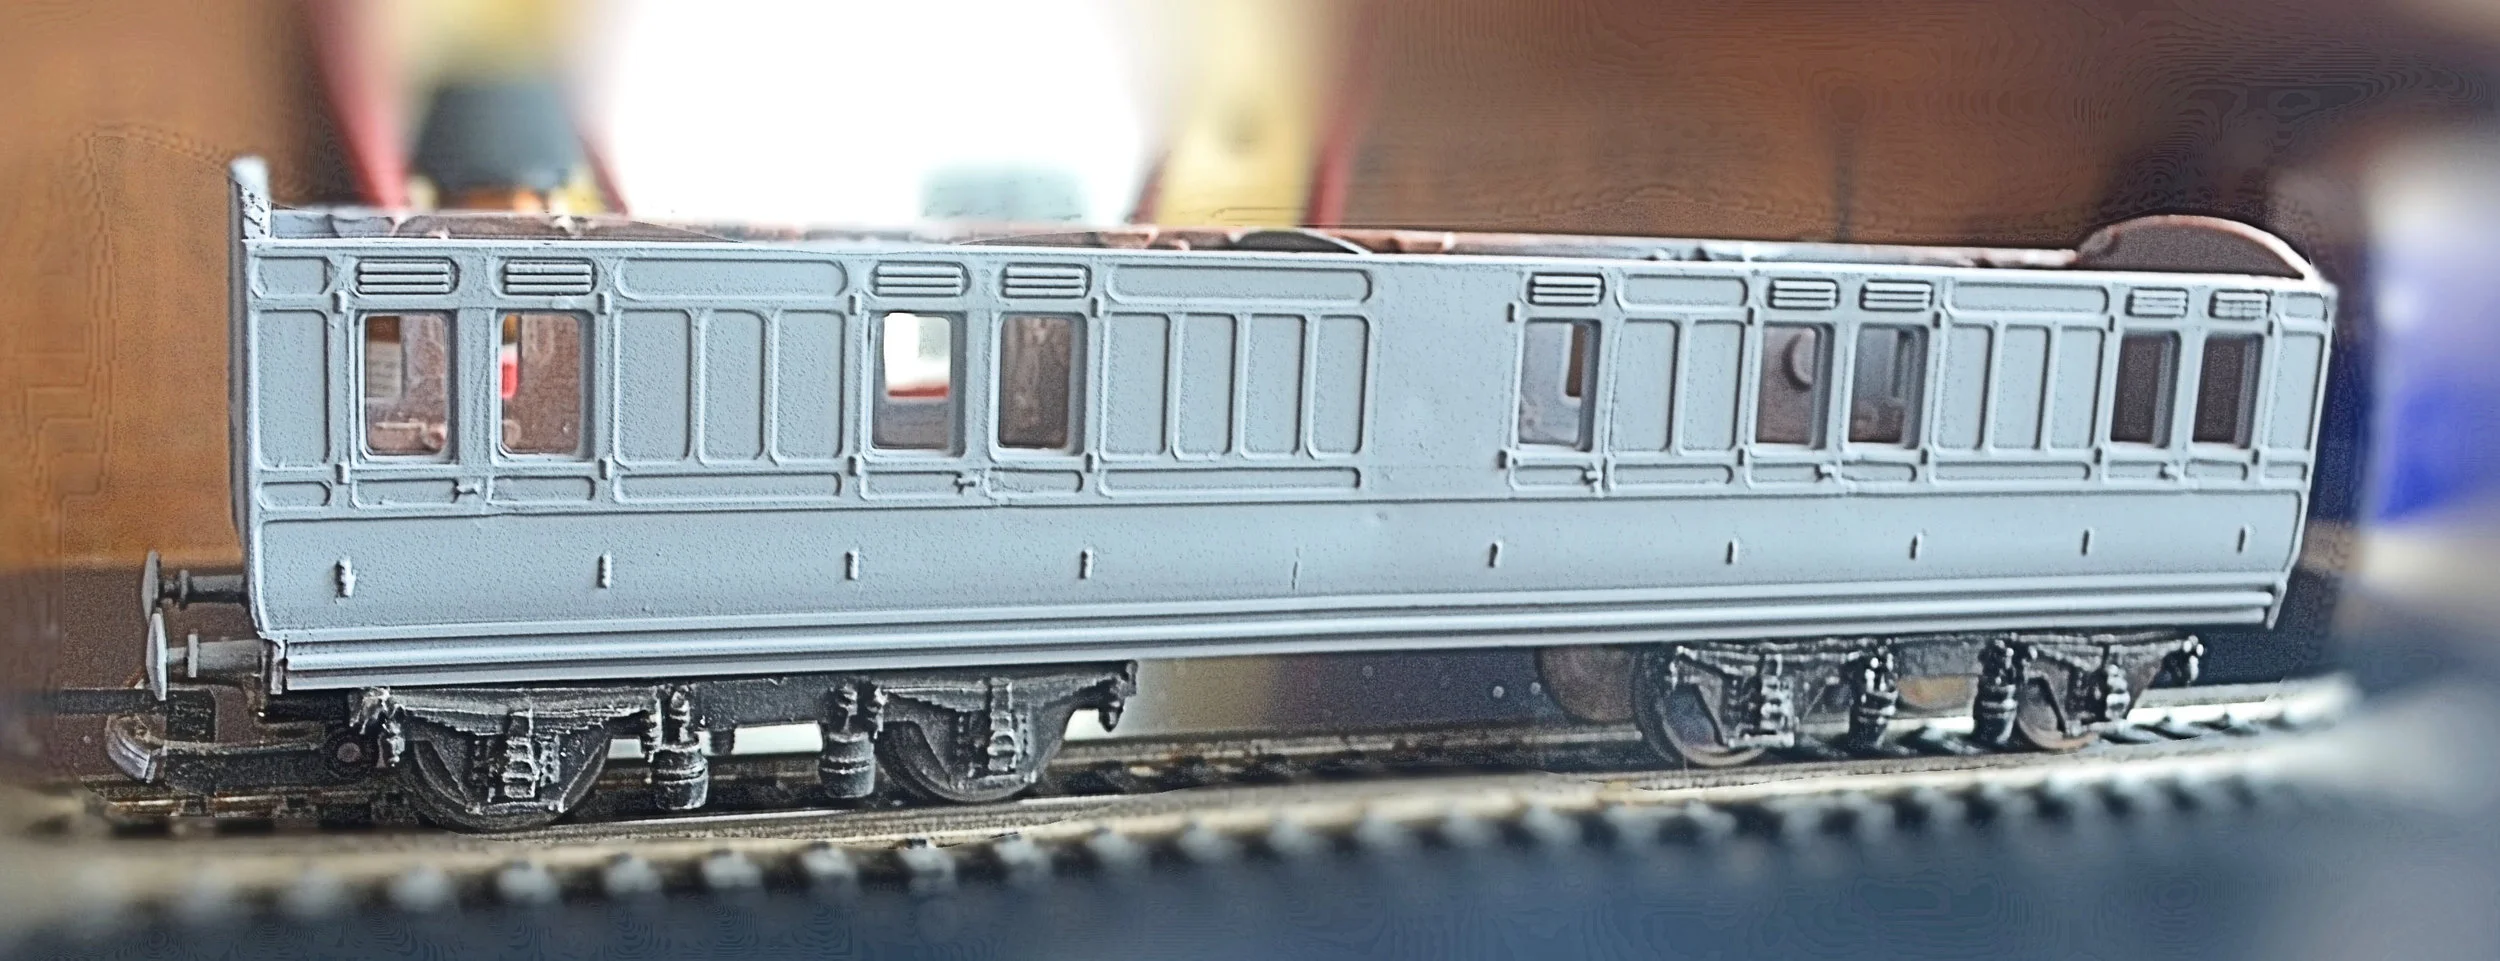
The second photo shows the coach resting on its original white-metal bogies. Providing much-needed weight, these will be cleaned up, re-wheeled and re-used. They, too, are fragile however and removing the original coarse wheel-sets may result in some breakage: great care will be needed in springing the old wheels out of their frames.
The next photo shows a test fit of the etched brass commode handles. They were surprisingly easy to fold-up and fit and although a little over-scale [inevitably] have improved the look of the coach enormously. They will eventually be fixed proud of the body surface. I decided to give one side a quick flash of brown paint to see how the brass fittings would look against that livery. The door shut lines show up well, too and, compared with the photo above [in primer], make a great deal of difference. I have now decided not to fit side look-outs to this coach and it will run as one which had had them removed and plated over during the 1920s. Obviously, this is just an initial coat of brown: several more coats will be laid down before the body has been completed.
Some progress has followed. I have now repaired or substituted all of the buffers and they are a combination of white-metal and plastic. To be on the safe side I shall also look for some brass replacements for the future as the existing ones are all extremely fragile. For the time being they'll do however.
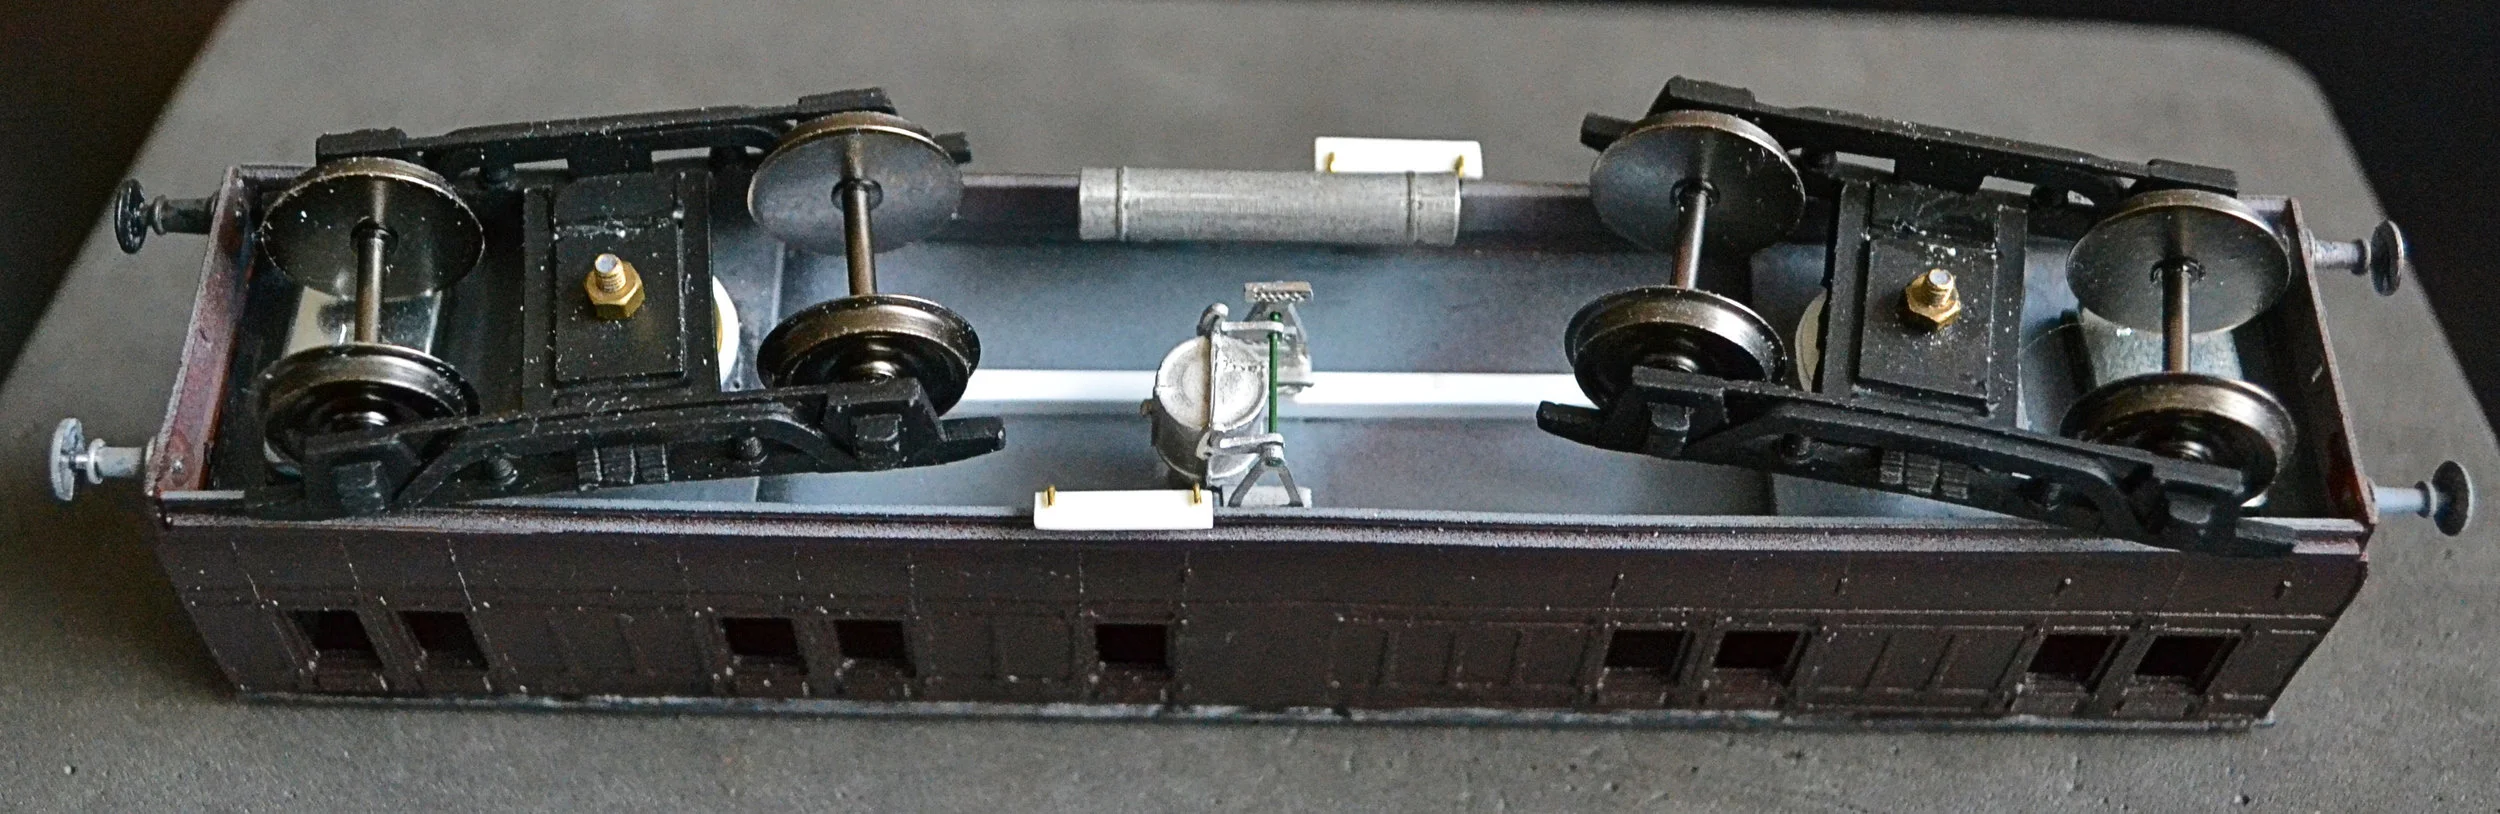
I have also been dressing the under-frame. The original white-metal gas cylinder has been reinstated and I have also attached some vacuum brake gear. The latter was an interesting diversion which required a little ingenuity. I'm only 90% certain that this is the correct brake-gear but as these were Dean-era coaches, and the brake-gear is Dean-era large cylinder equipment, it seems a safe bet.
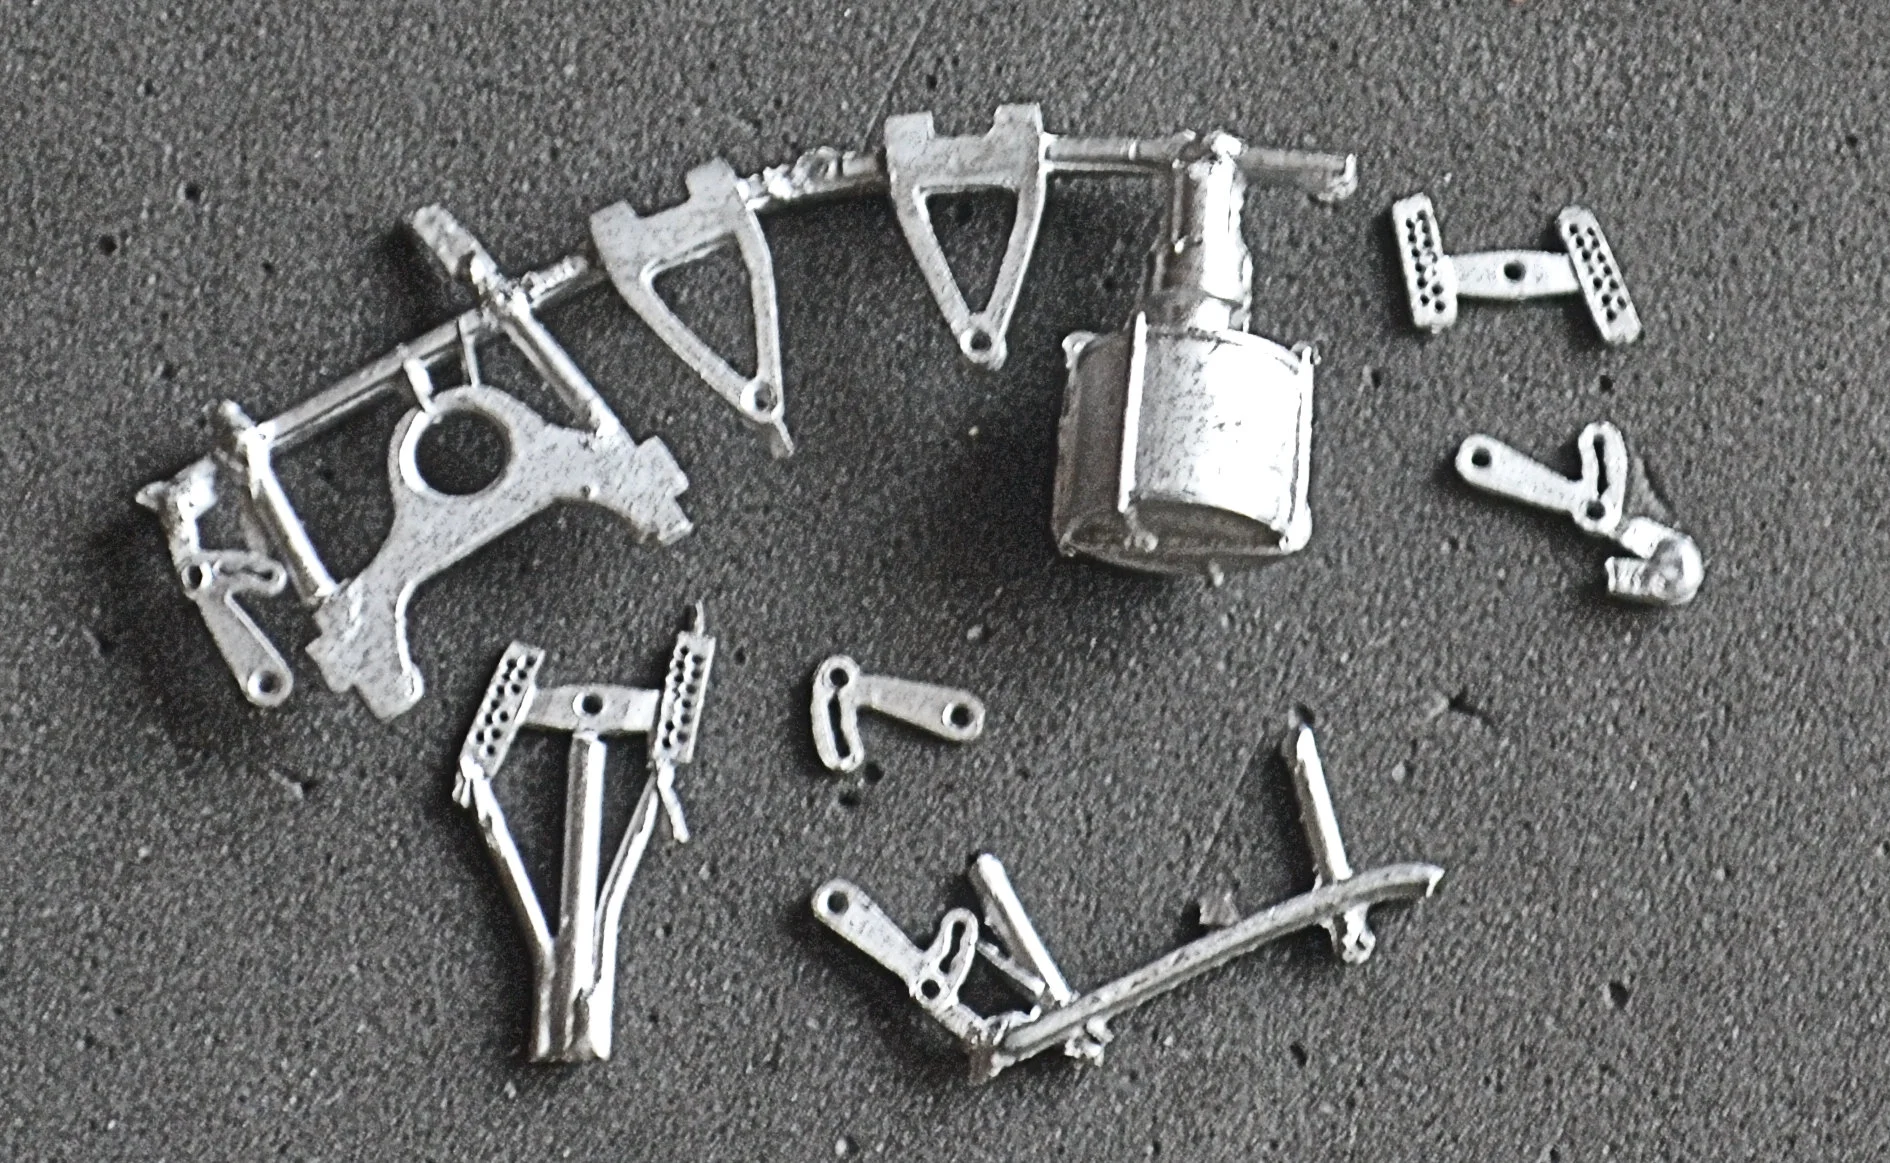
The brake-gear came from ABS Models and arrived without assembly instructions. I was not able to find anything on-line either to assist: the undersides of coaches is [literally] a dark area. Eventually I worked out a plausible fix however and as it uses a] all of the parts and b] goes together I think it safe to assume that it is correct. Photos below show the parts and the assembled unit. Looking at it from the side it looks quite convincing and fills what would have been a completely empty area.
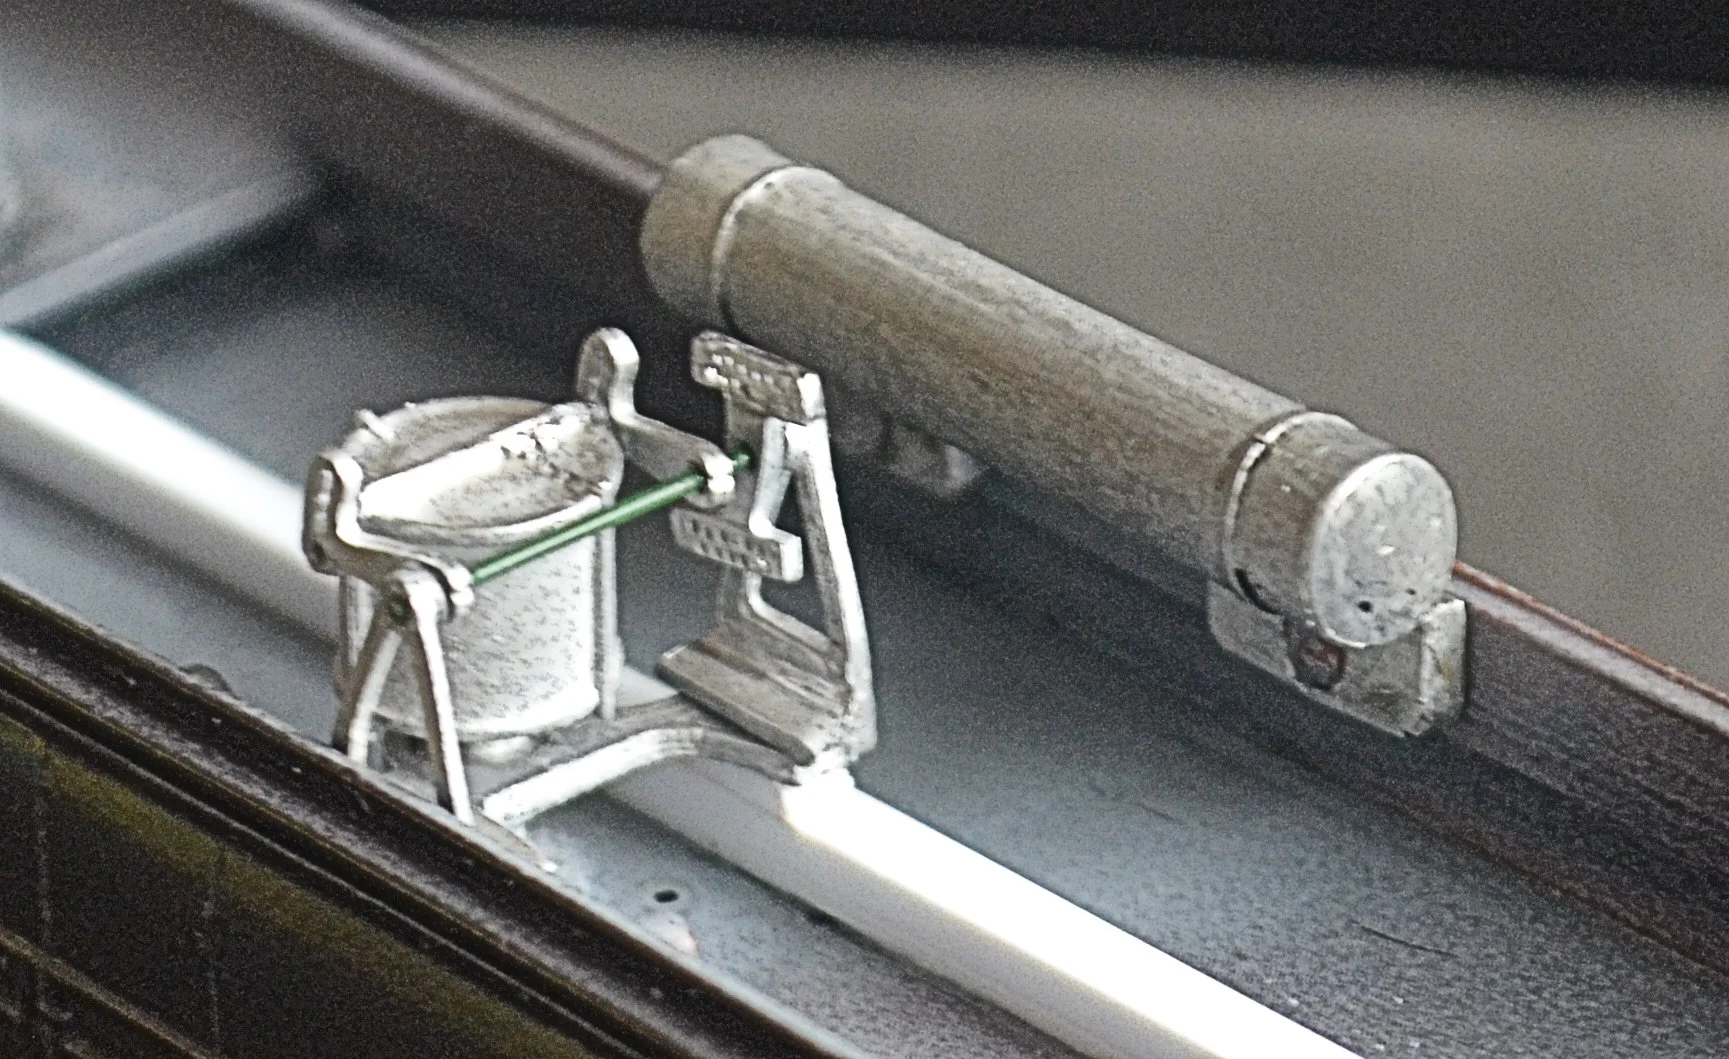
Fitting the brake-gear to the underside was problematic too. The leg with protrudes from the top of the cylinder has such a small surface area that super-glue alone would be insufficiently robust - it would snap too easily if brushed or handled carelessly. I drilled out the leg and epoxied a track pin into it. A hole was then drilled in the carriage floor through which the pin was inserted when the leg was glued to the underside. The pin was then epoxied to the inner floor bottom. I also glued a rib longitudinally along the underside and glued the inner V-hanger to it. The outer V-hanger was glued to the side. A good, secure fix. The photo below explains better. When all is sprayed matt black it'll look quite real. Obviously, the pull rods will be the last things to be fitted once the bogies are in place. I'll use plastic rod this time so that it flexes rather than bends if brushed.
You will see that I have also attached some self-adhesive wheel-balancing weights at each end of the underside, 5gms each. This is less that half an ounce in old money but it will make a difference to the running of the finished model.
Next jobs - sort out the damaged white-metal bogies and re-wheel them to ensure smooth running and fabricate steps to go under the centre doors. Painting will have to wait for fine weather.....
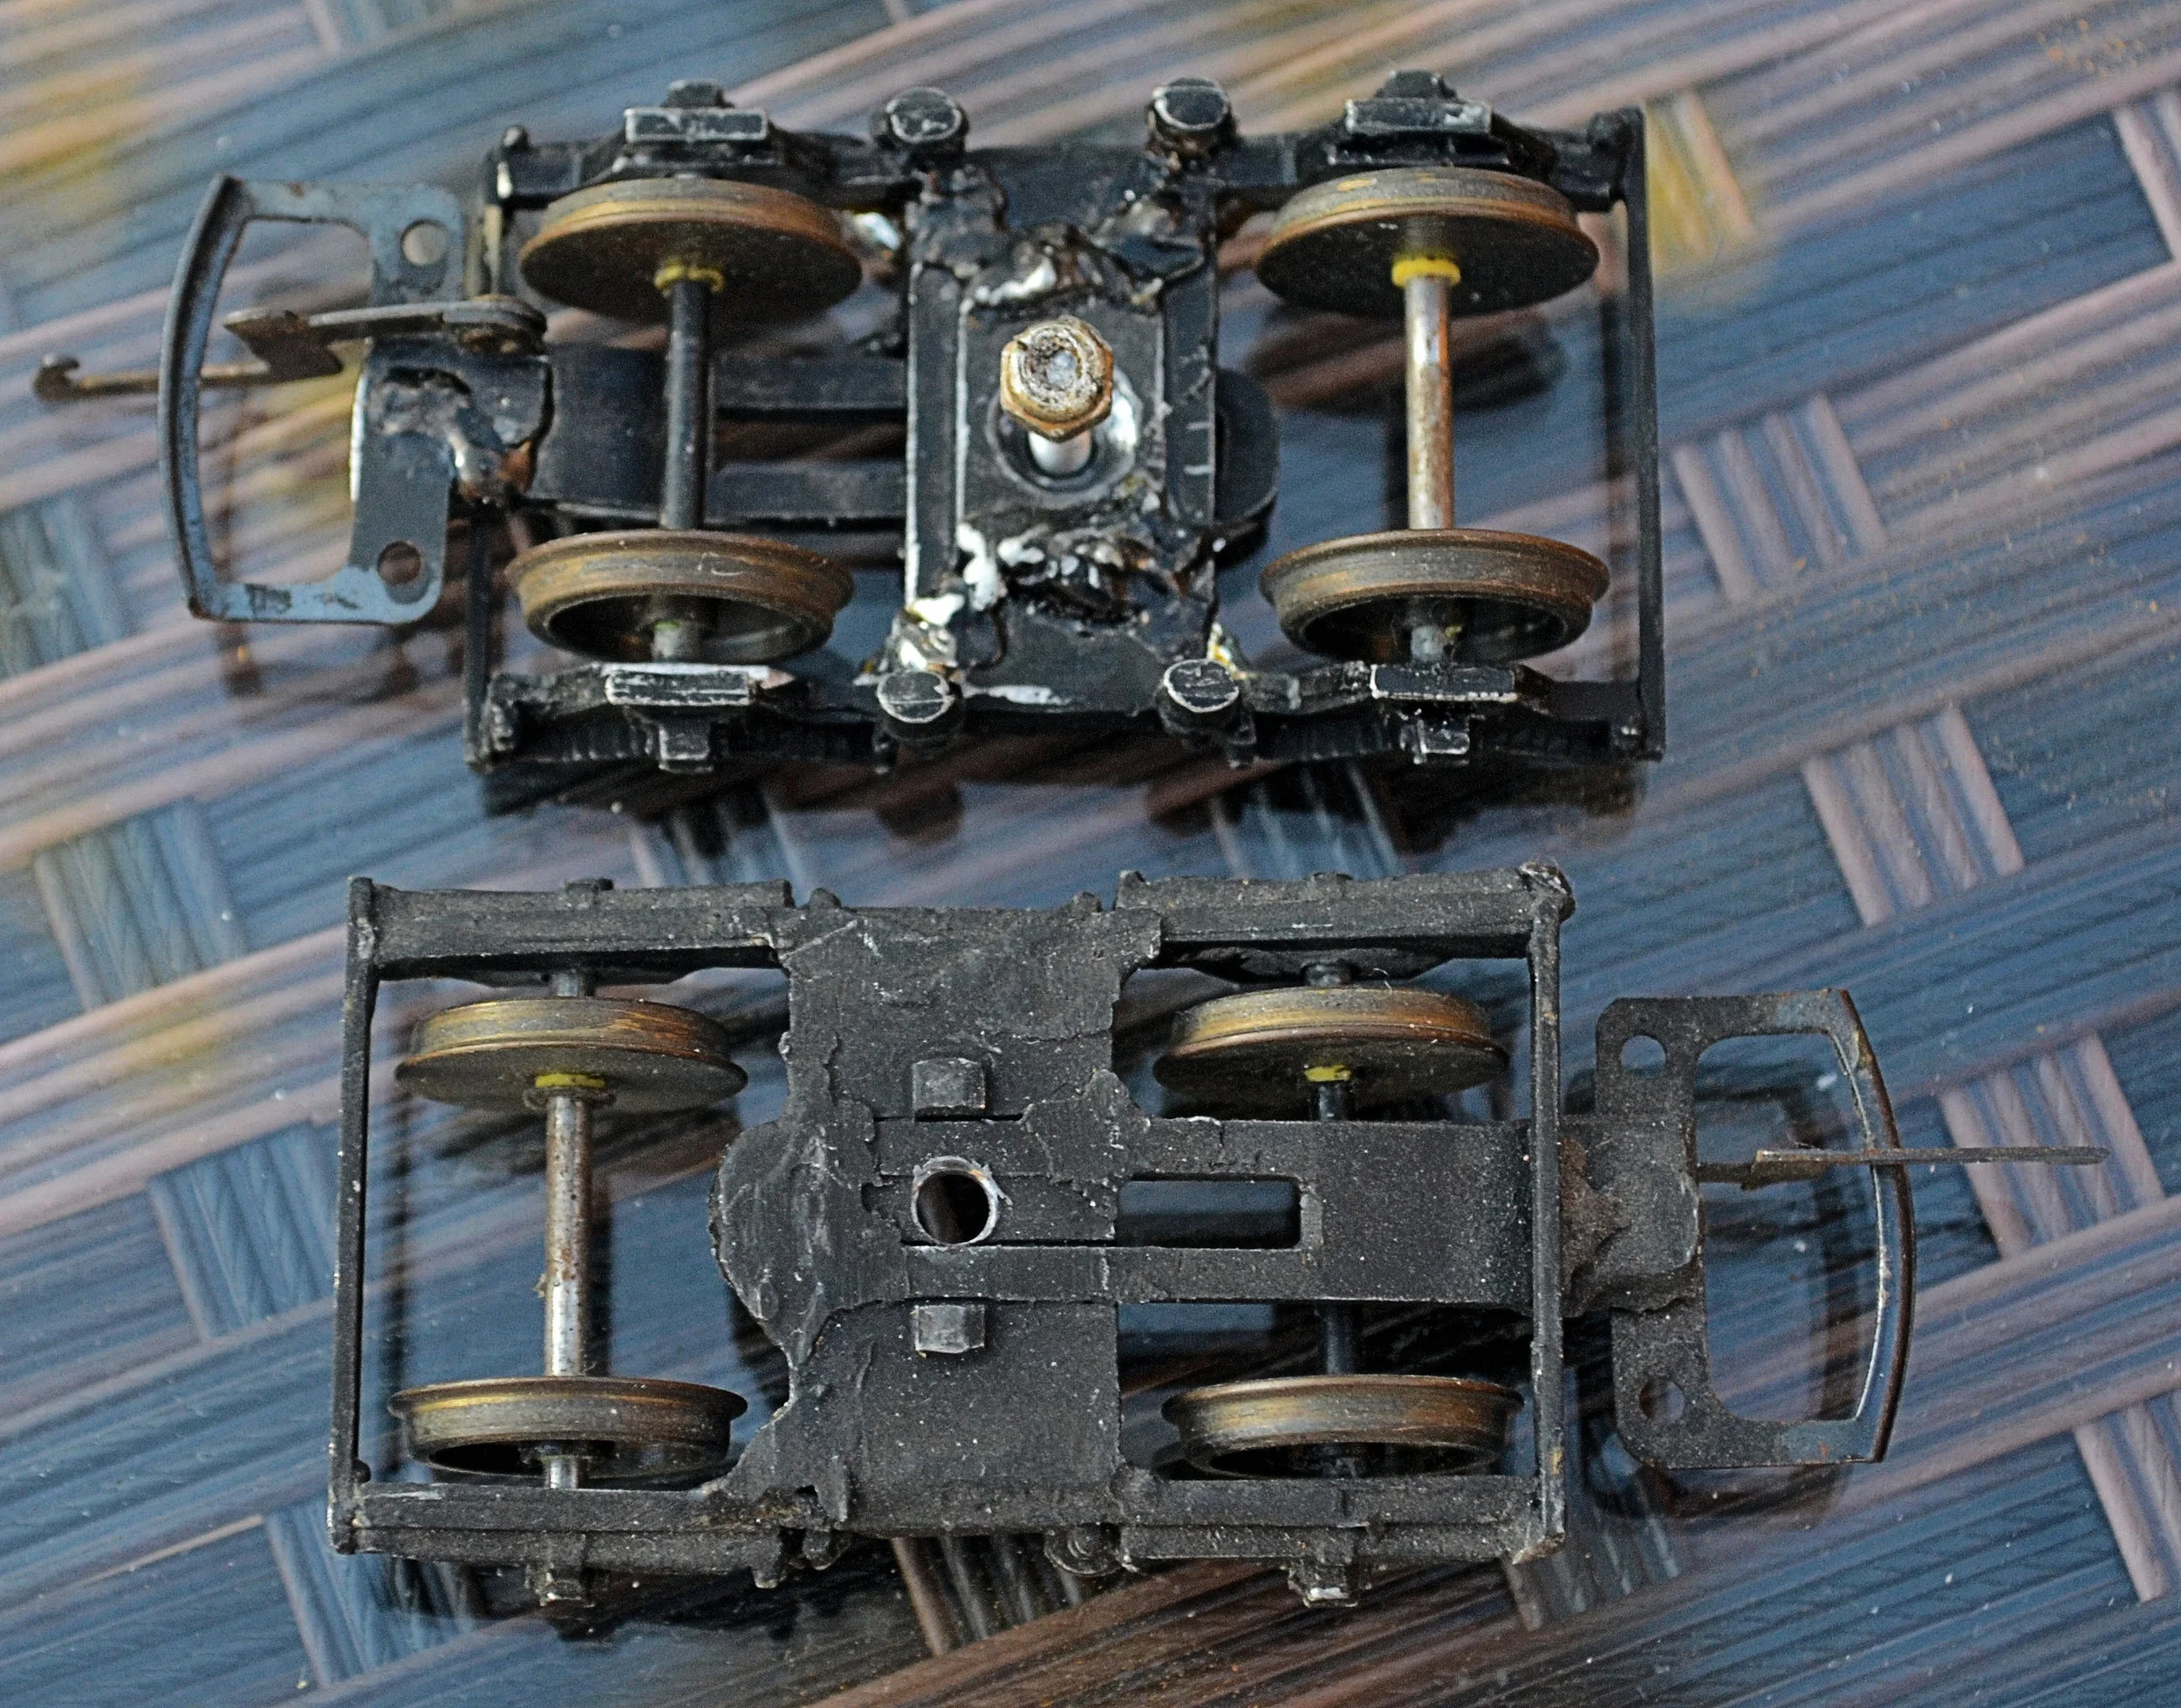
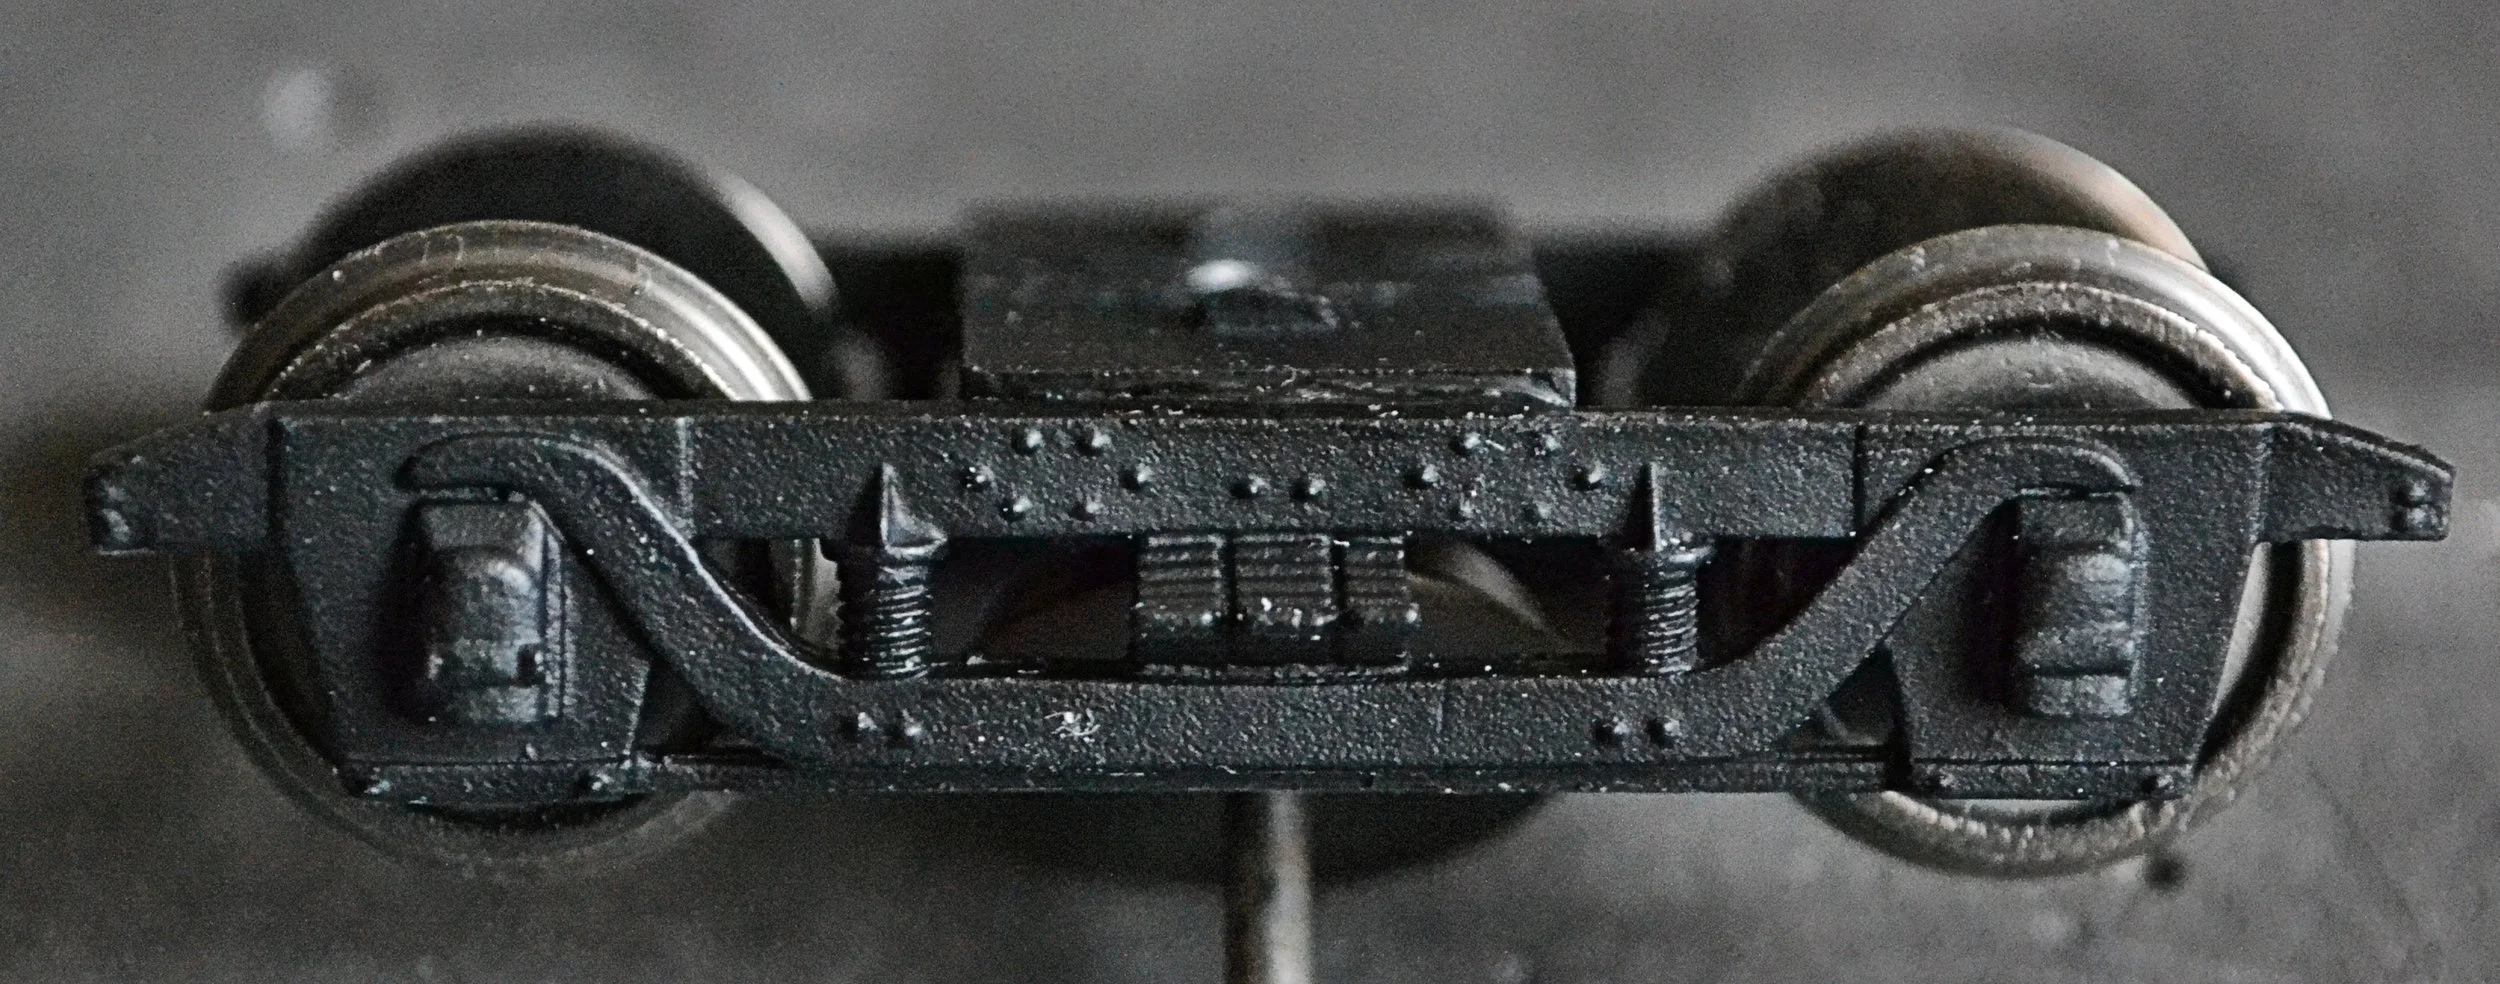
As things transpired, sorting the bogies for this build presented a problem, which ones to use: the Dean pattern ones which came with the kit, or some GWR American-pattern types? Both would be acceptable, but the latter would provide variety. In the end, the decision was a simple one: the original bogies were in poor shape and required quite a lot of fettling and repair before they could be pressed into service. The first photo below [on the left] shows them in their battered glory. The American-pattern bogies required little more than cleaning and dismantling which made the choice an easy one. The American pair are shown below on the right, dismantled and cleaned up.

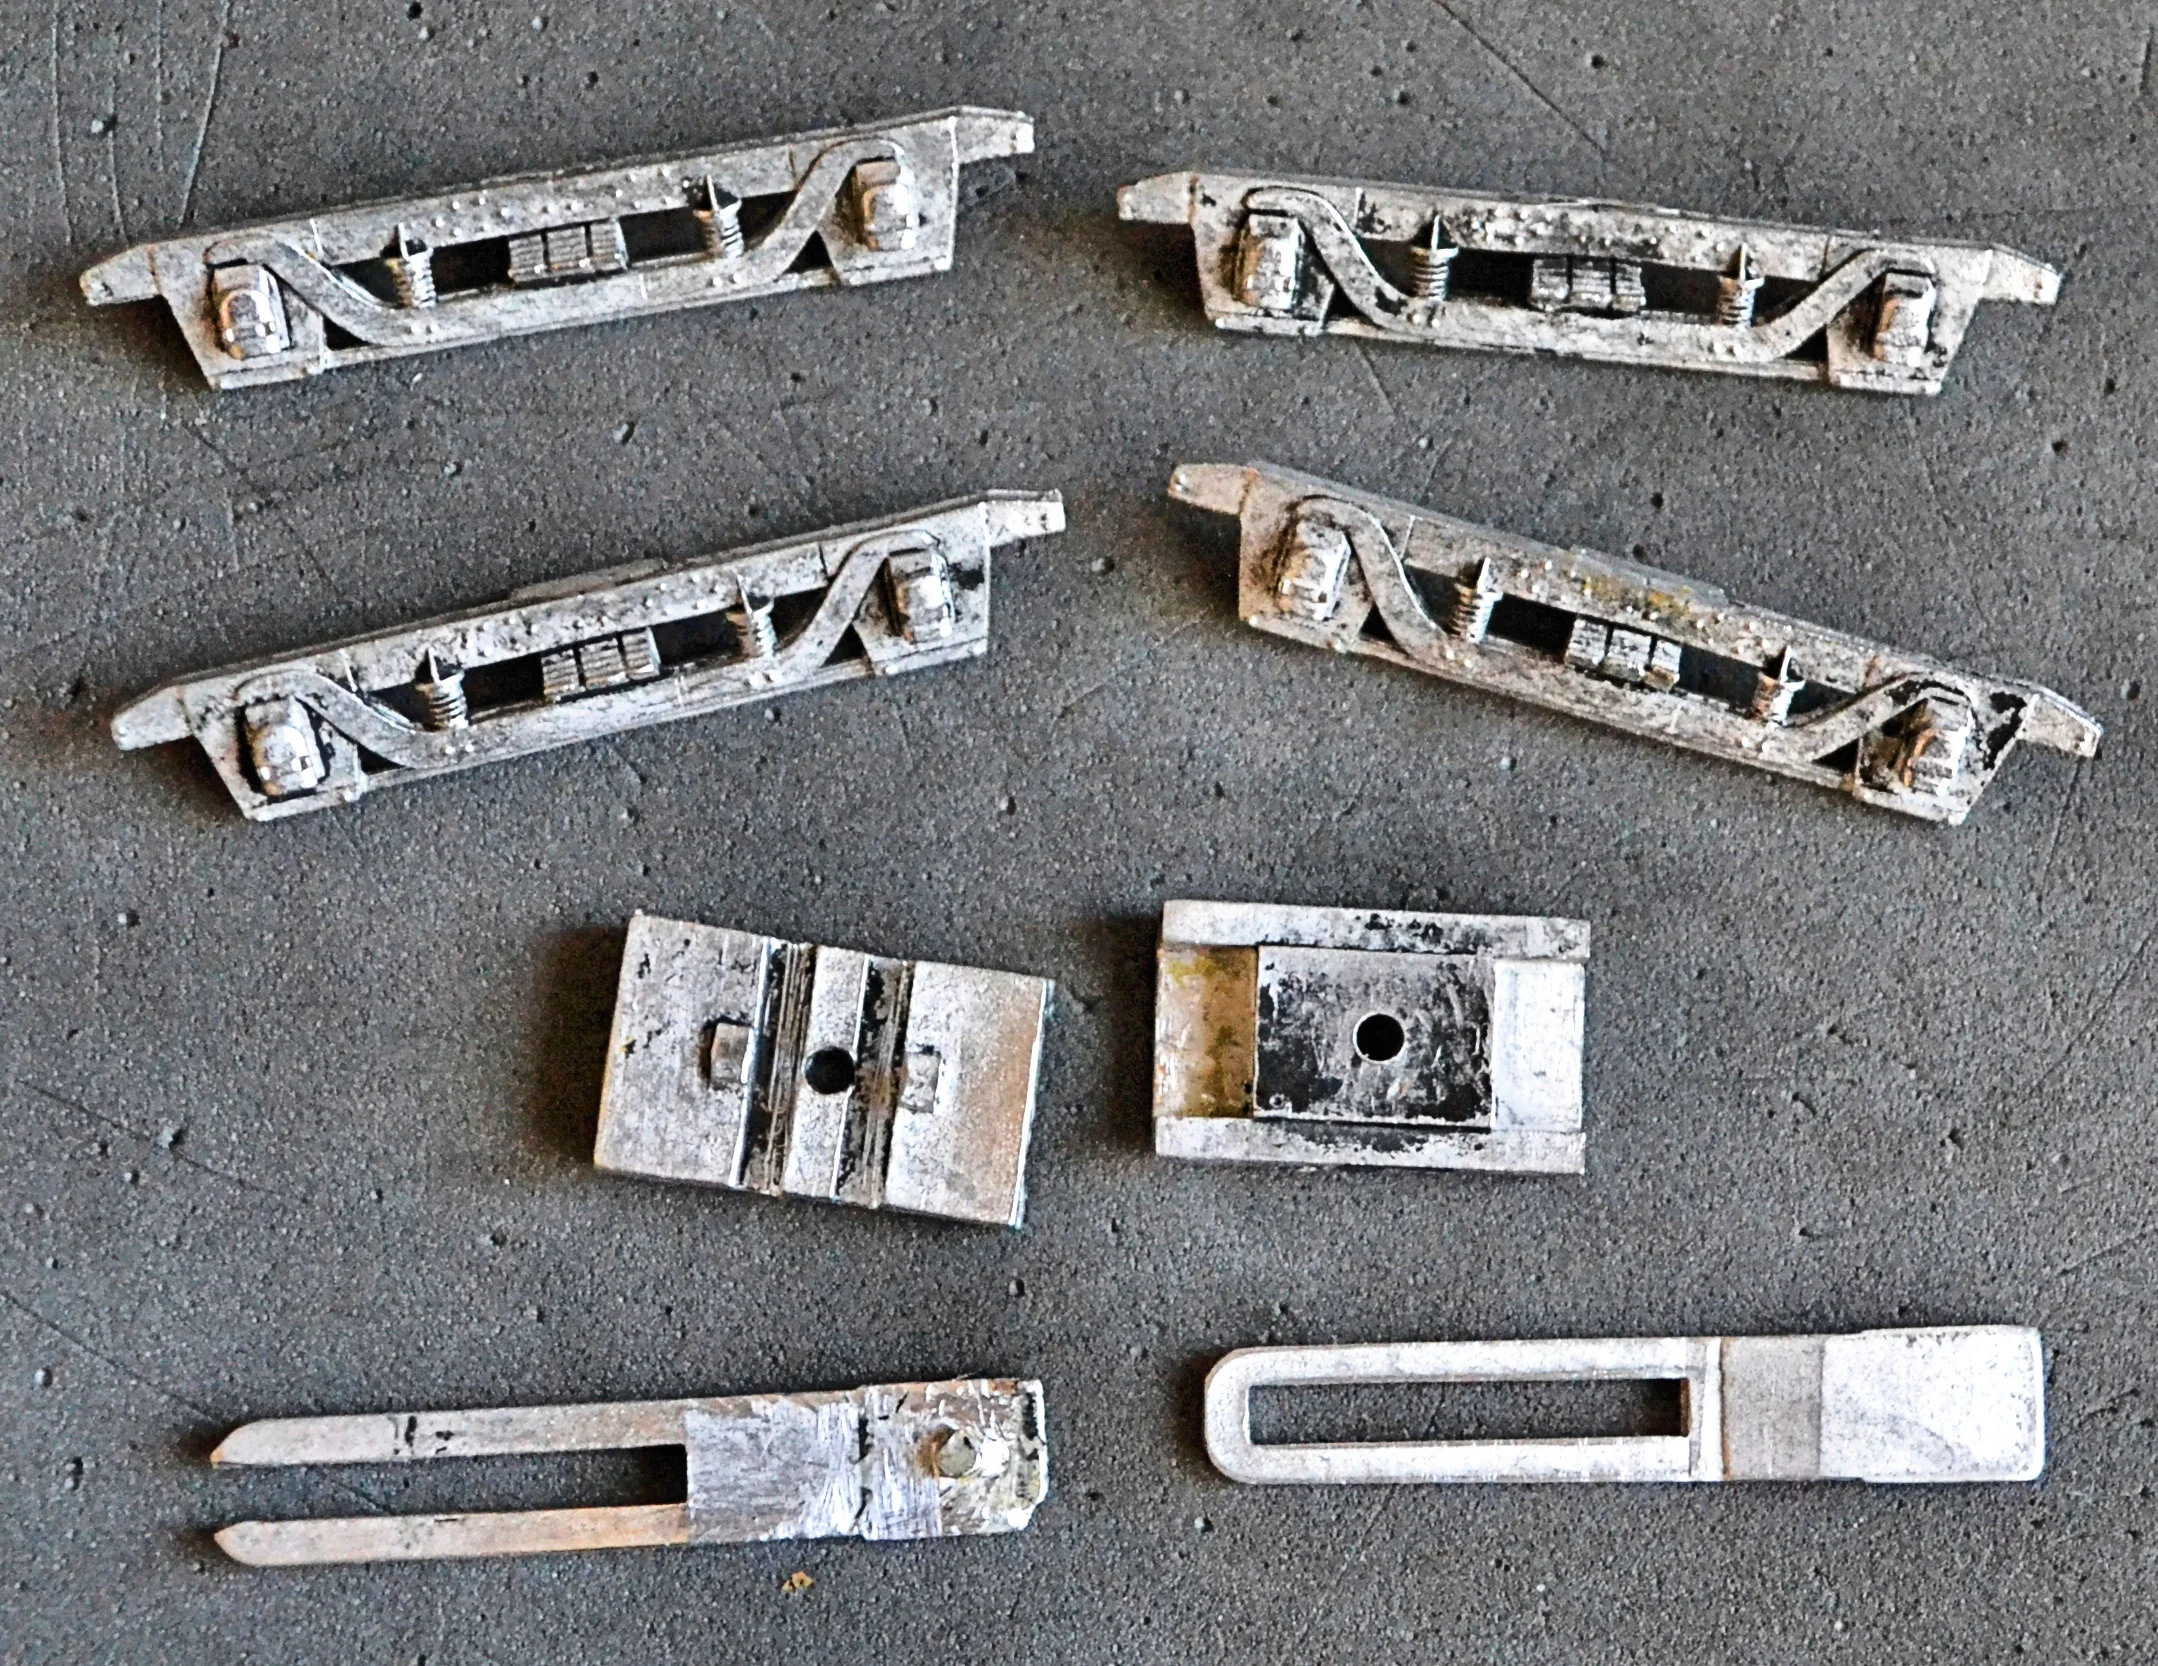
The bogie components were assembled before priming by glueing one side-frame to the stretcher with epoxy resin [and allowing it to cure fully] and just tacking the other side-frame to the stretcher with a drop of superglue [to allow for later dismantling]. Both bogie frames were then sprayed with Halfords grey primer and then Halfords matt black. Once the paint had dried, the super-glued side-frames were cracked off and brass top-hat bearings glued into the axle holes [these needed drilling out a little first, to accept the bearings]. The first photo below [on the left] shows one of the side-frames with the bearings inserted.
The detached side-frames were then reattached to their stretchers with epoxy resin that had been mixed to go off quickly. Once the mix had become sufficiently tacky, those side-frames were carefully eased out and the wheel sets [Hornby coach disks] inserted. The side-frames were pushed back into place and the completed units set aside to harden. This operation allowed sufficient time for adjustment to ensure that the bogies were square, the wheel spun freely and the axles were in line. The second photo below [on the right] shows a completed bogie unit. Later in the build, stretchers will be attached to the ends.

These bogies, although made by Keyser, were not designed for use with this kit. Consequently, when attached, they sat too low between the solebars. A simple fix using spacers cut out of plastic card resolved this issue although a lot of fiddling was required to set each at the same height. The first photo below shows the underside of the coach with the spacers fitted [the steps have been attached also]. The second photo shows the bogies now bolted into place.
The next job will involve removing the bogies again and then painting the coach in a all-over brown livery. The ends, under-frame and solebars can then be painted matt black. The body will then be set aside and work can commence on the roof...

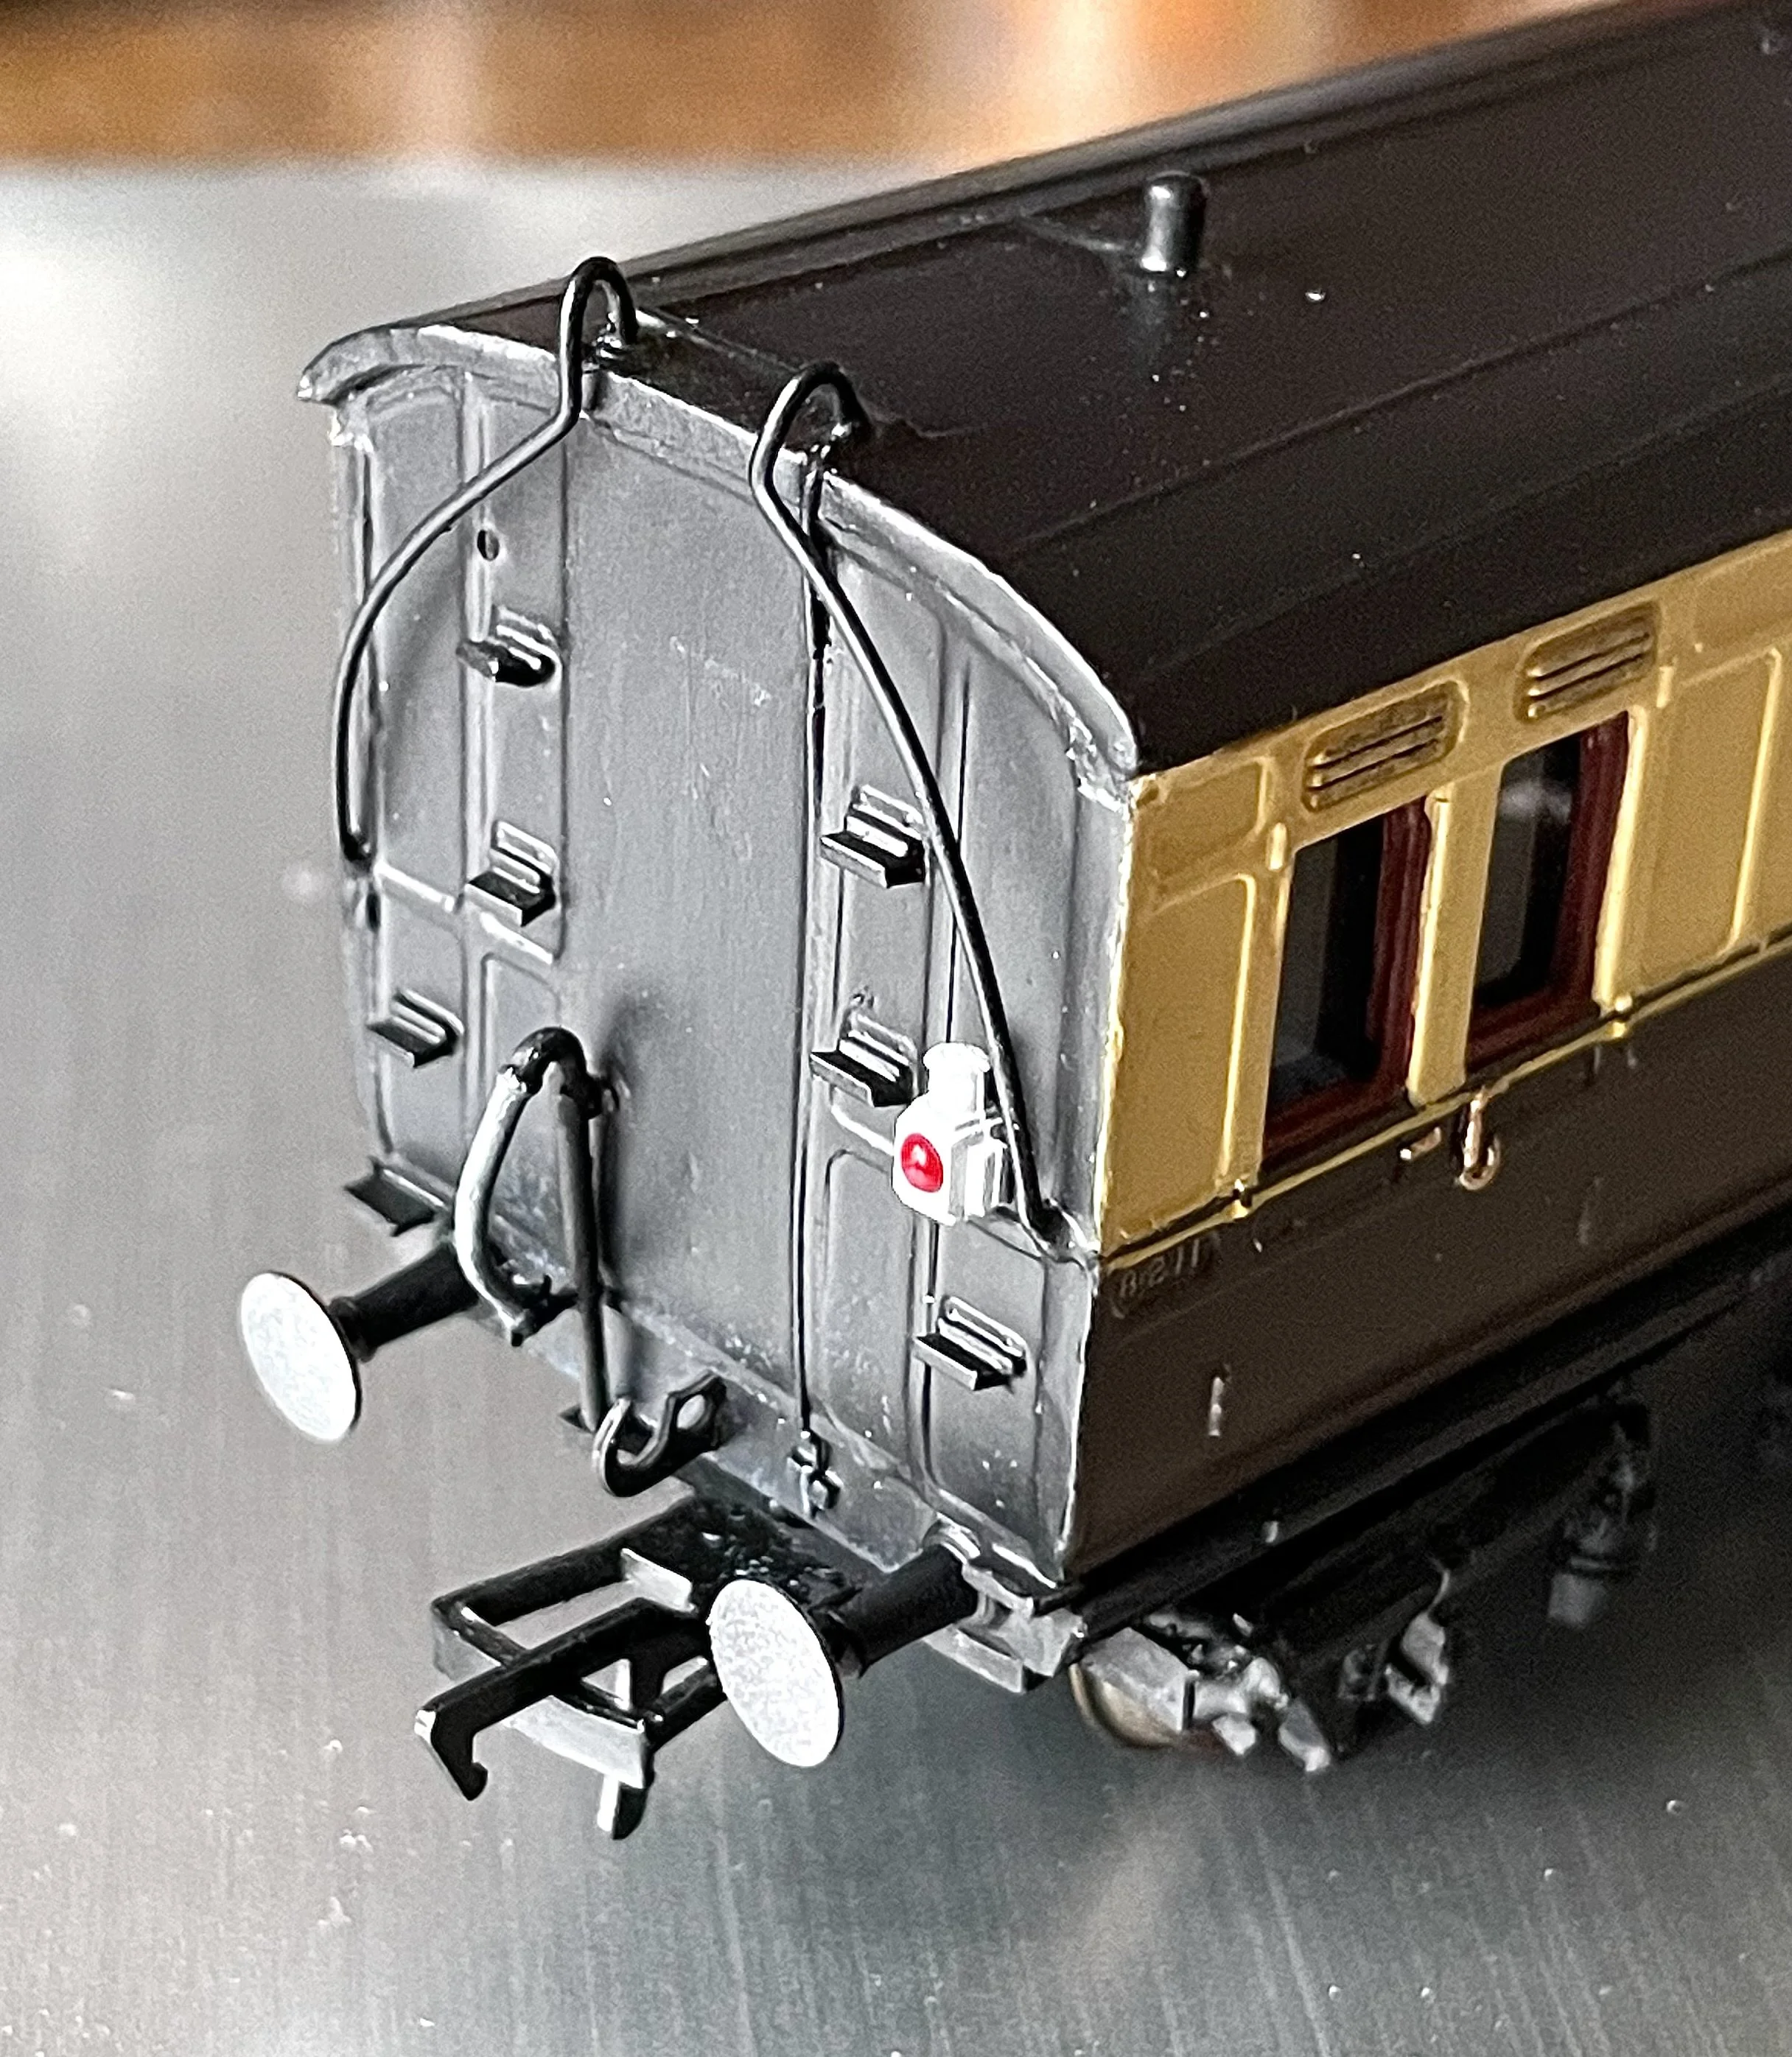
In the meantime, a test run to check platform tolerances and passage through points was undertaken on the club layout. The model sailed through double-slip and single-slips with ease and other pointwork presented no problems either. Stretchers can now be fitted to the bogie ends as the wheels will not need removing for adjustment. I have also fitted emergency brake gear rodding to one end - see photo opposite.
The body has now been painted [as has the roof] and awaits lettering. Once that has been done, it will be varnished and then glazing, etc., can be fitted. The matt black finish to the under-frame and ends is quite pleasing and completely covers the damage caused by the original excessive use of glue. The sole-bars will be very slightly weathered in due course, along with the bogie side-frames.
Stretchers were glued to the bogie ends and couplings then stuck on with epoxy-resin. The bogies were then attached the the coach and their securing nuts held in place with a thread-locking compound.
The lettering [Pressfix] was applied and excess backing glue was removed with Tesco's Shower Cleaner, applied with a hankie [it's important to use non-fluffy material for this exercise or the fibres will adhere to the glue]. The 'Parcels Van' branding may not be 100% correct although I have found no photographs to disprove it. These vehicles were used frequently for parcel traffic however and so I'm not stretching credibility that much here.
The body was then sprayed with matt varnish and, when dry, given a light brush coat of Johnson's 'Klear', to lift the colour slightly. Glazing was then applied and, once secured, window bars were glued in place [having first been painted cream]. The inside of the body was then painted matt black.
Exterior door fittings were then super-glued into pre-drilled holes and the body set aside for the glue to cure fully.
The final task involved attaching the roof which was secured with liquid adhesive.
When I have acquired some sufficiently thin wire, I shall attach brake pulls to the brake gear.
As a reminder, this is what I started with...
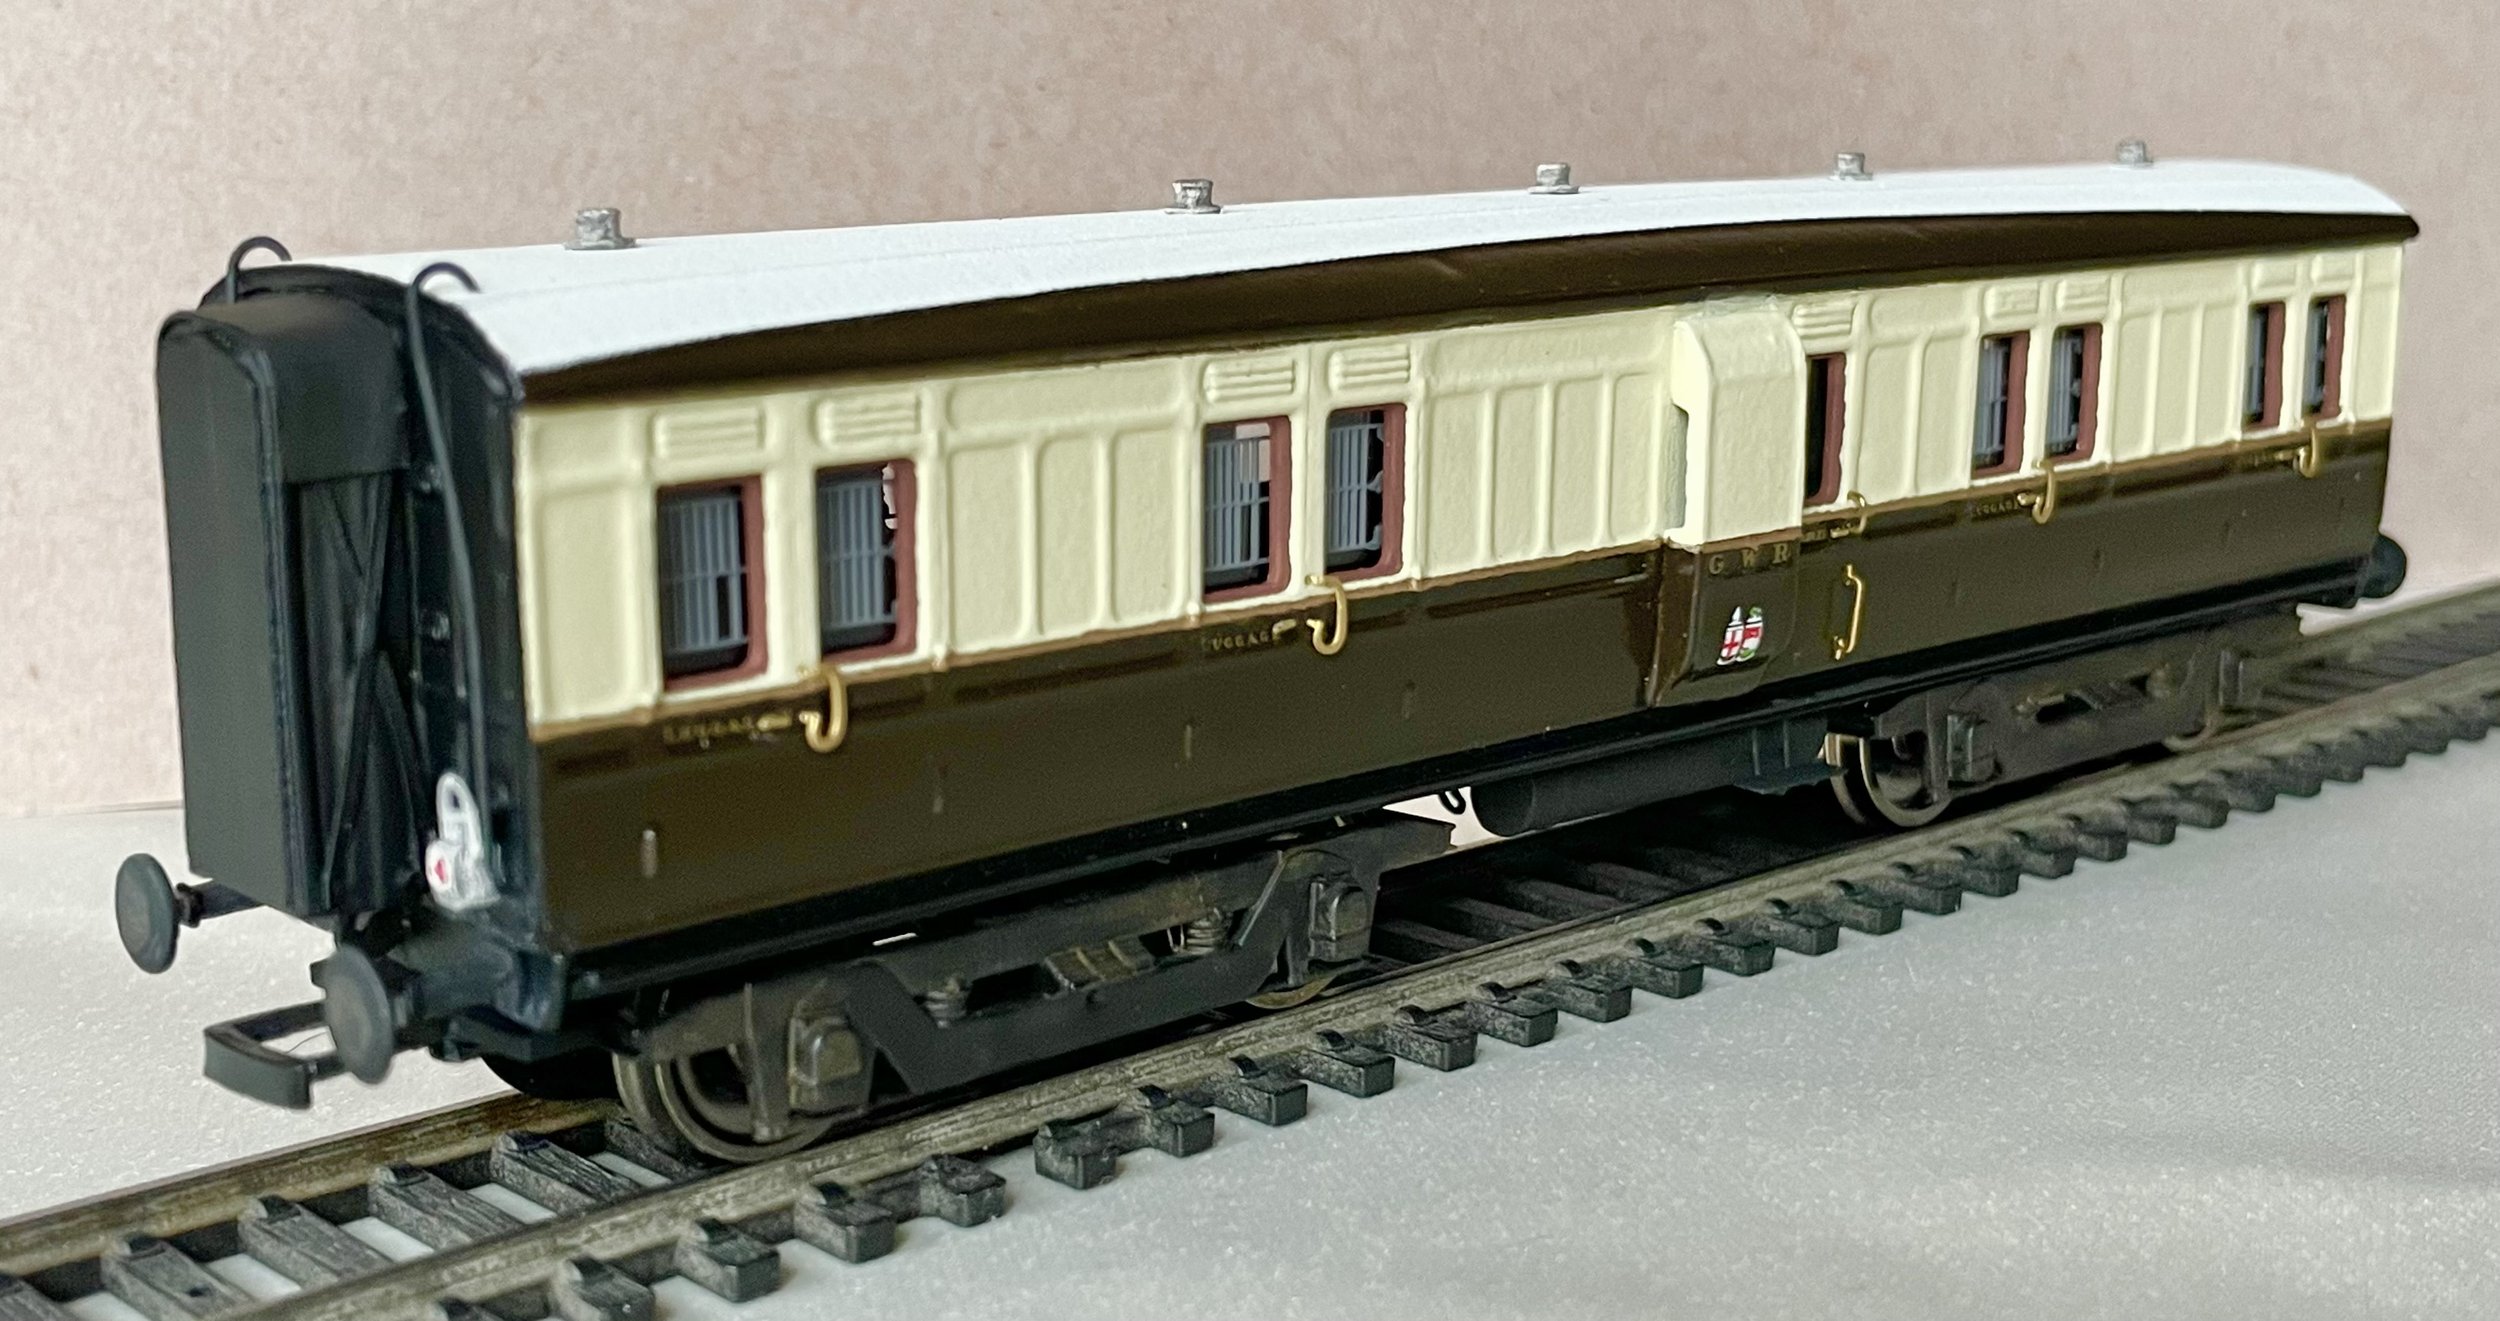
...and this is where I finished...
This was a satisfying project and one which gave new life to an old, poorly made kit. It was more complicated than originally envisaged but worth the effort although the second one will have to wait awhile...!
——————————————————————————————————————————————————————————————————-
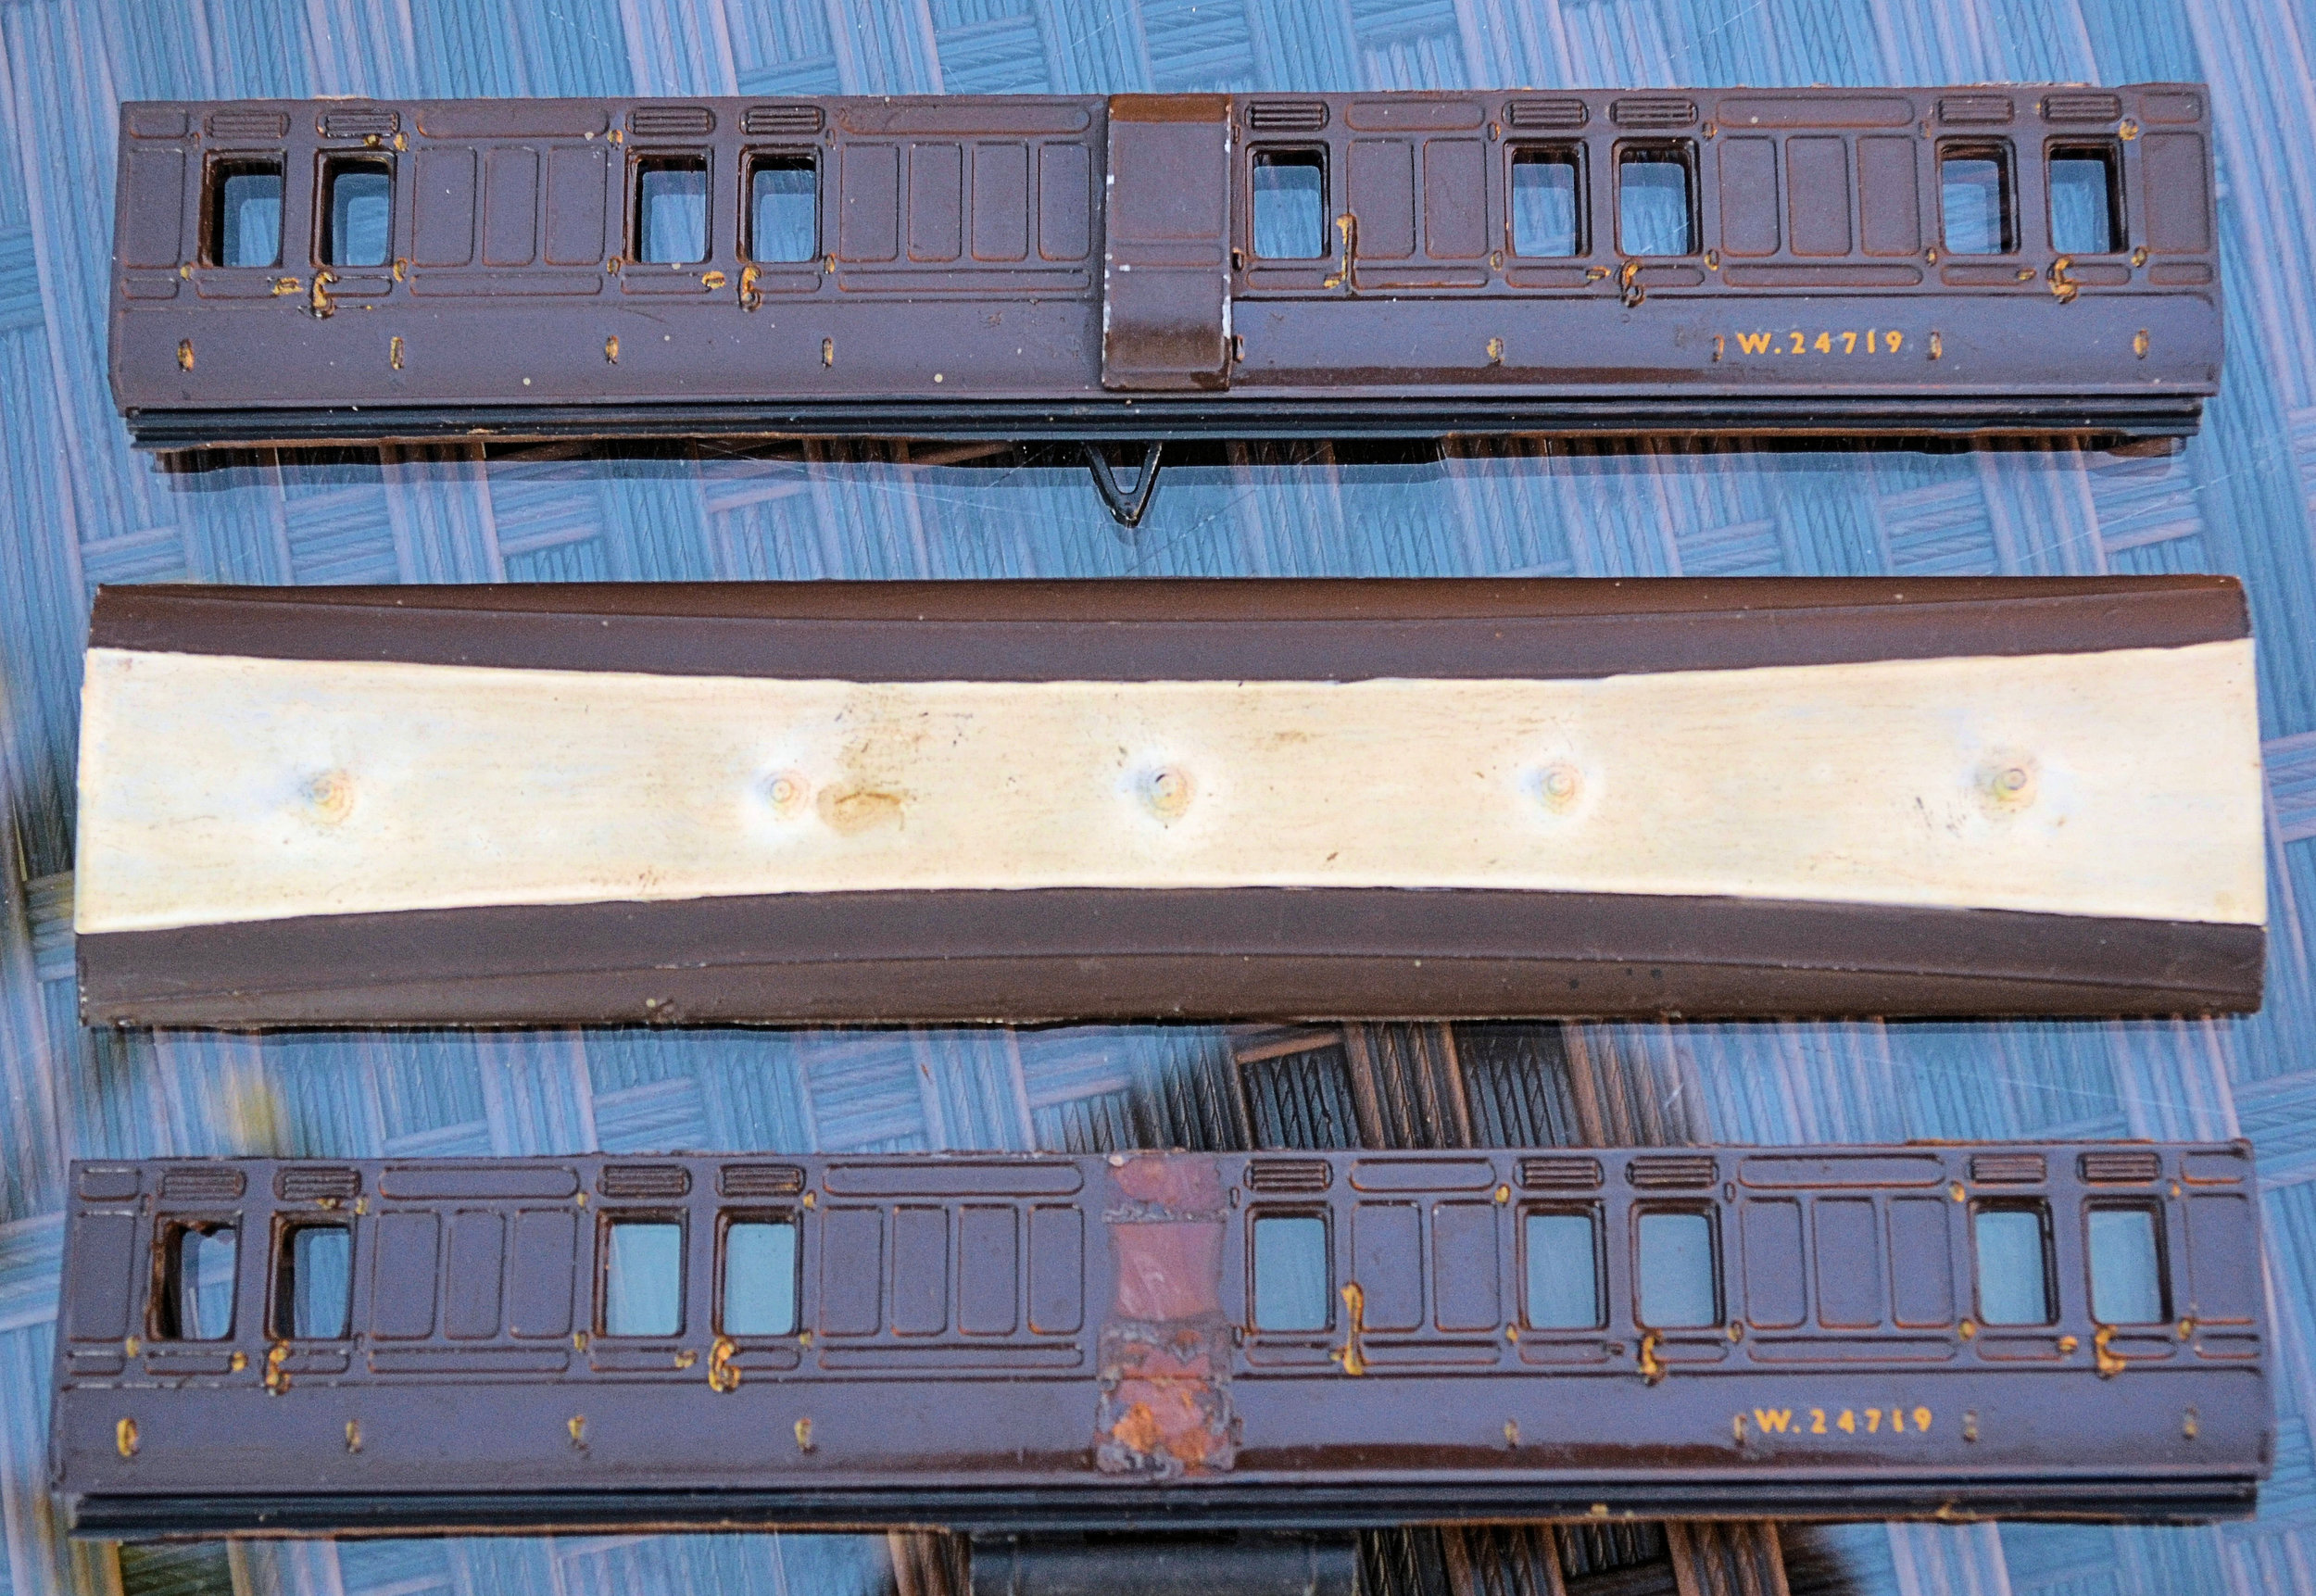
Since the above build was finished, two more kits were acquired although both were in very poor condition and incomplete. The photos below show the starting points for both restorations:


This new build commenced with the black kit of parts. The ends were damaged and new buffer beams were made for each from plastic card. Excessive amount of plastic cement required filing away also, to reinstate a rebate into which the sides could be glued. Both sides required careful sanding in places to remove cement fingermarks and white metal look-outs were then attached. It was found that the sides and ends, when assembled, were too flimsy to allow much handling, consequently, a scratch-built floor had to be attached to provide strength. The roof had also earlier required repair where it had been torn from its sprue by the original builder. Epoxy cement was smeared along the four ‘bites’ along the edges and then sanded back once cured: this provided a perfectly smooth, consistent finish. It was set aside to be attached later.
The body was then primed and, after, given two coats of Halfords Ford Rio brown, an acceptable substitute of GWR Brown [and far better that the Peugeot Cafe Noir used in the build above]. Lettering and livery details followed and the door and commode handles were picked out in brass. The droplights were picked out in light brown and the body was then sprayed with satin varnish to seal it. Once dry, the interior was glazed and window grilles glued into place. The roof - already sprayed matt black - was glued in place and any gaps filled with Milliput epoxy putty.
The underframe was detailed pretty much as in the first build above and the bogies constructed from old white-metal BSL kits [the ones illustrated above having been binned as completely unusable]. These were difficult to get running true and bind just a little: they will do until replacements can be sourced however.
Finally, handrails were bent up for the step end of the body, attached and then the ends and the underframe sprayed matt black. Bachmann couplings were screwed into the ends of the bogies, which were then attached to the underside of the body. A great deal of work to resurrect an extremely old, damaged kit of parts, but a satisfying build followed and these Dean vans are really very pretty, vintage vehicles. This one will run with a rake of four Keyser Siphon F kits, currently under construction.

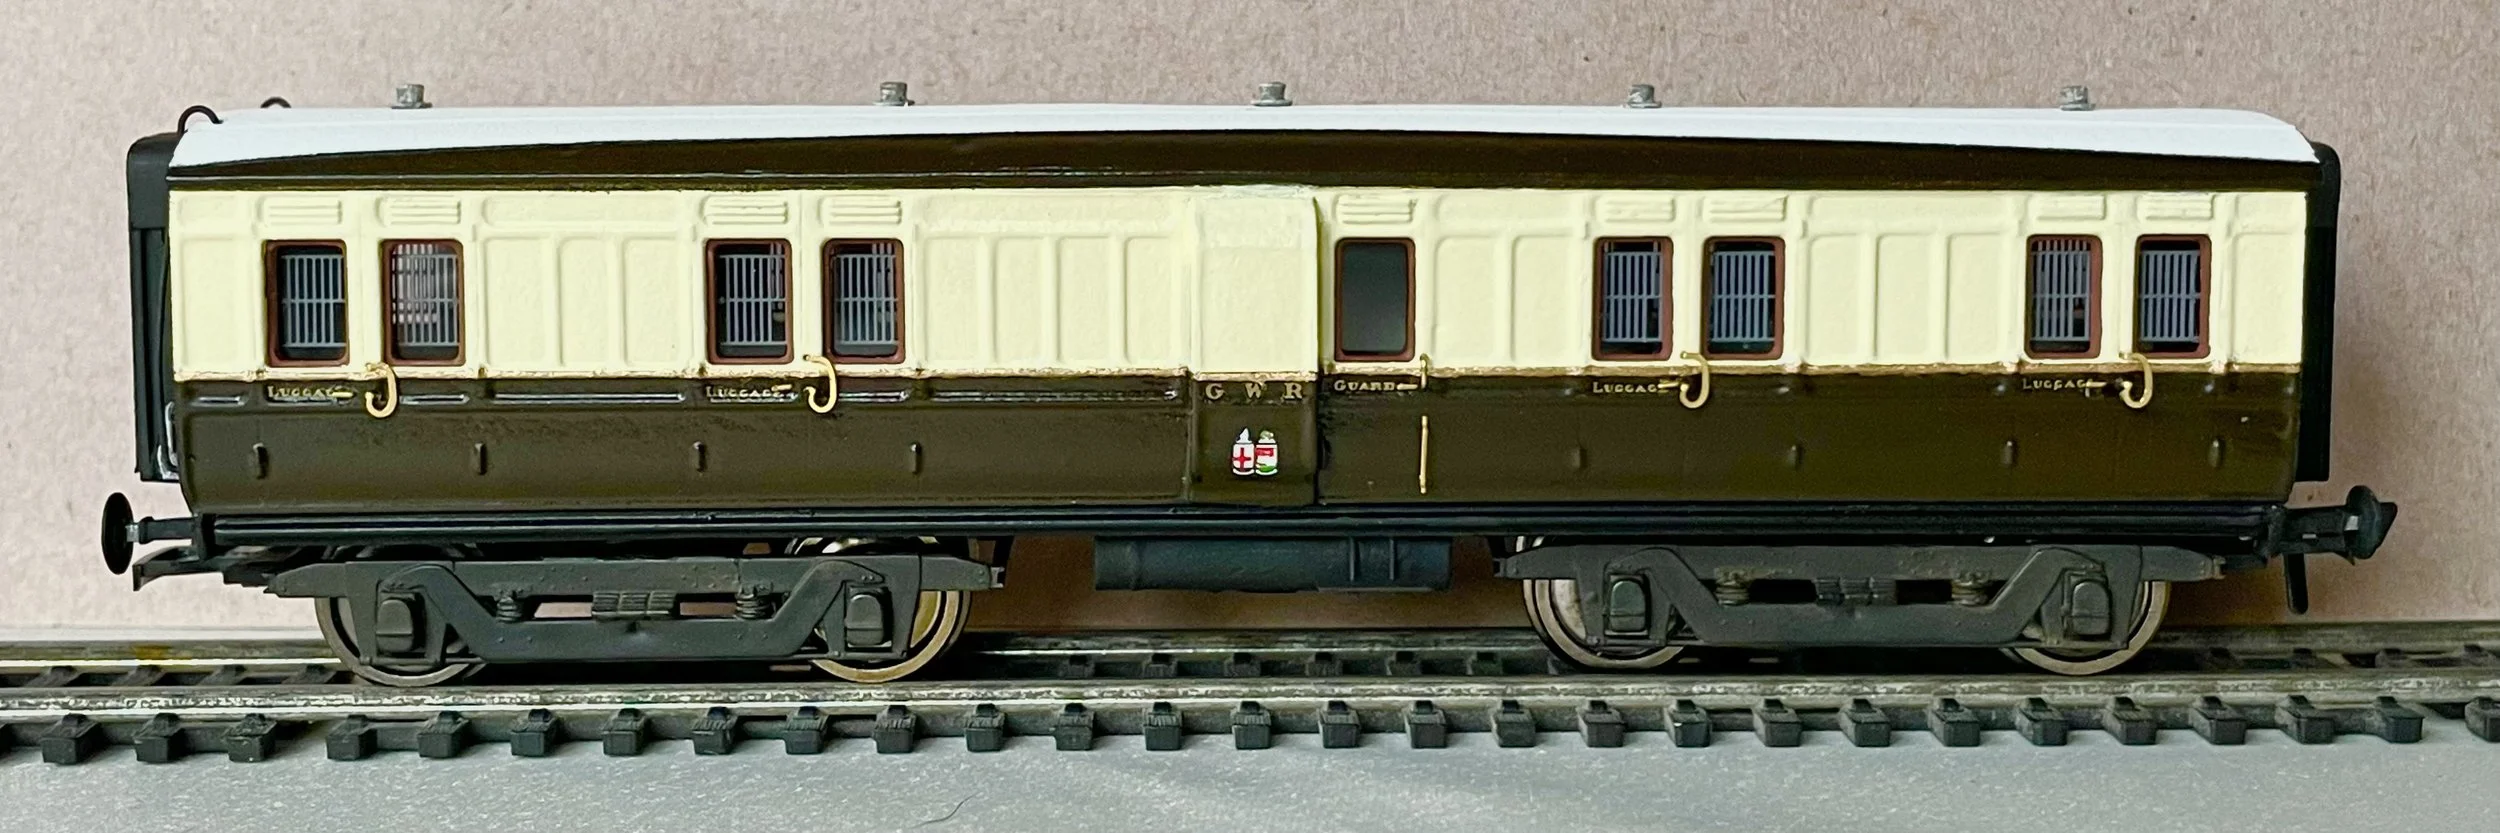
And to conclude this thread, the second PLV constructed from the brown set of parts in the above photo. Repaired and rebuilt in the ‘27 - ‘34 passenger livery, it has had much additional detail including look-outs, end handrails, corridor connections, etched brass door and commode handles, underframe brake equipment, more accurate buffers, glazing with window grilles and white-metal gas lamp tops. The GWR ‘American’ bogies are by Keyser, but from another kit.
An element of Rule One applied to this build as the lookouts and gas lamps would almost certainly have been removed by the time that this vehicle received its livery. Some may just have soldiered on like this though.

The next ‘build’ is actually a restoration rather than a construction. An older assembled kit was acquired very cheaply but in poor condition. An enigma really, as the builder had fitted good sprung couplings and also taken care to neatly model the gas pipes leading up to the lamps in the roof. The paintwork was very poor though, the body unlettered, the widows had not been glazed, the interior was a visible mess, no floor had been fitted and there was a lot of glue and other damage to the body. The model was worth a basic upgrade however and would be left in a grubby, slightly weathered condition. The project was intended as a ‘quickie’ in between other builds and not a fully-detailed build.


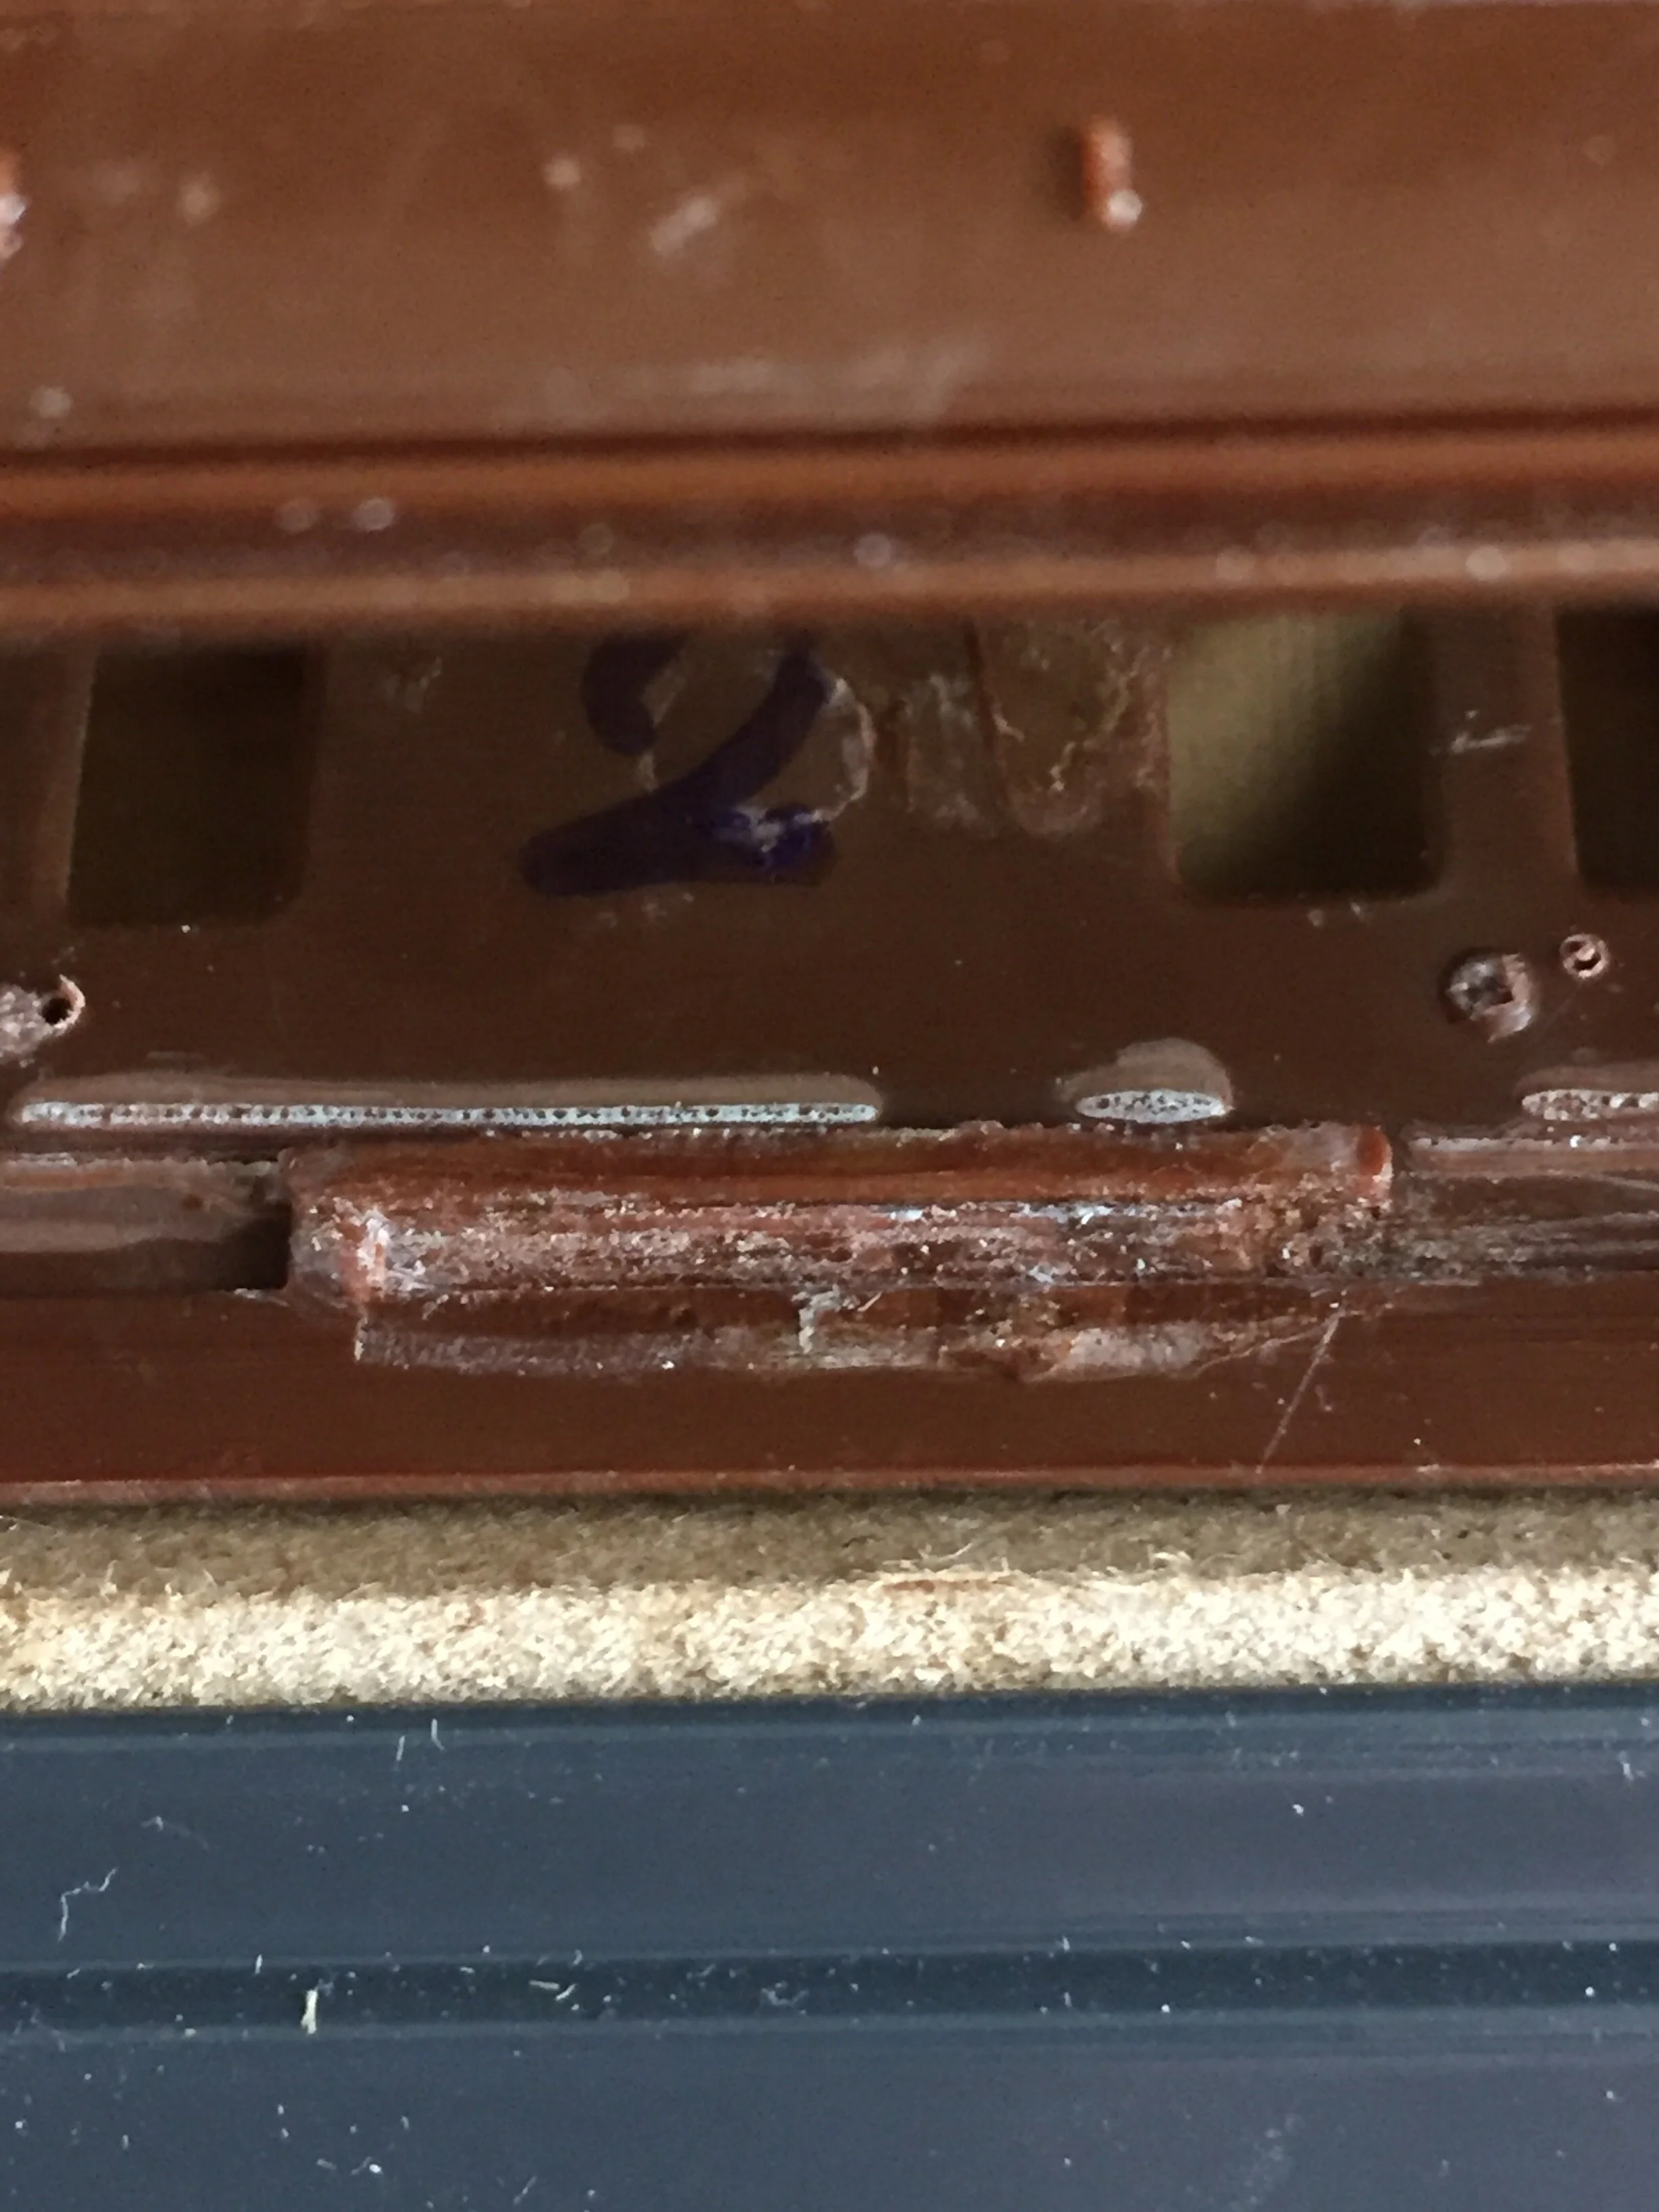
The photo above shows the underside once the bogies and other fittings had been removed. Painting this black would have been easy but, for some reason, the interior had been left in raw white plastic. The red brackets are for attaching the sprung buffers. They, too, should have been painted
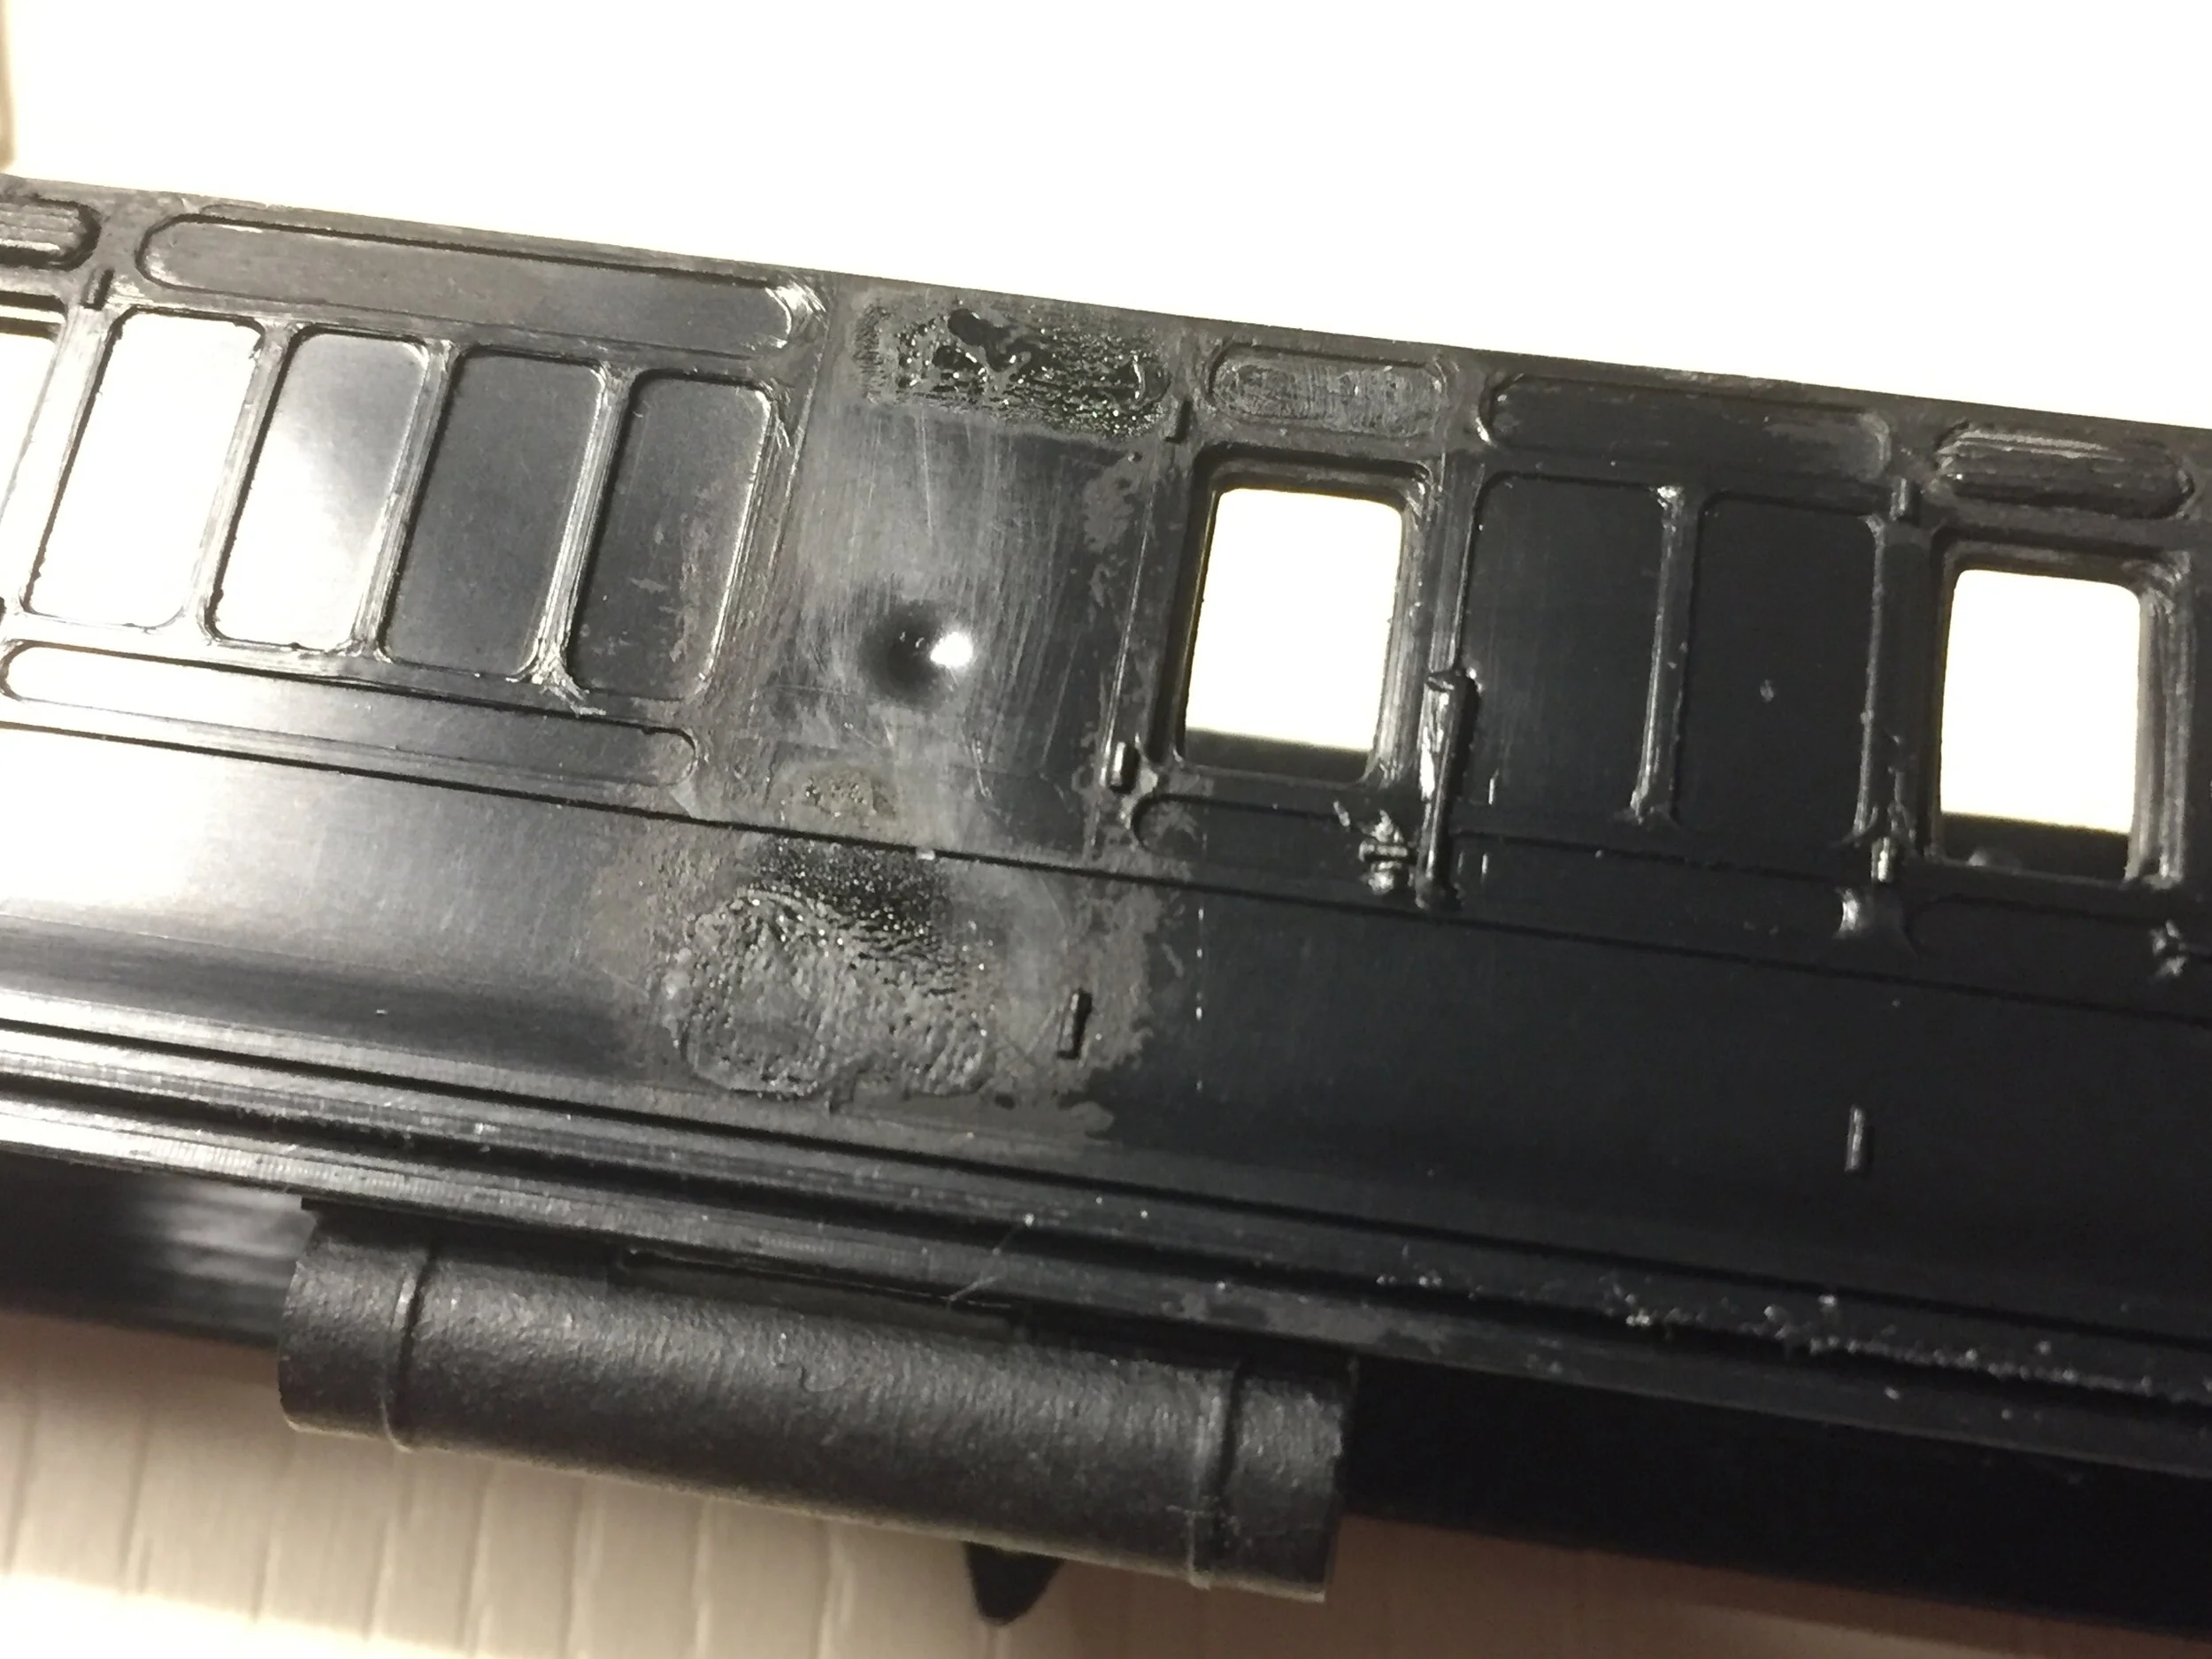
Opposite, this close-up shows the poor paint work and chipped damage to the top of the end of the side. Each side shows this at both ends and, clearly, this required attention. The ends were painted brown, too, whereas they should be black [an easy improvement]. The builder fitted quite neat handrails though, saving me from bending some up myself.
The roof, in grey, would be sanded to remove fluff and dust embedded in the paint before spraying black.

The chipped ends of the sides were repaired by excess applications of superglue gel. This was applied twice to overfill the gaps and then, when cured, sanded back to the correct profile. It’s an effective way of dealing with small imperfections and, when painted, is invisible.
The photo opposite shows one end before the glue had been sanded back to the correct shape. I decided to use glue rather than Milliput filler in this location as, from experience, sanding the filler back would probably have dislodged it.
This photo also shows the gas pipes nicely installed along the length of the roof and running down the end.
The next photo below shows this repair work completed and also gives an indication of the general state of the livery before it was cleaned up. The unpainted interior is clearly visible, spoiling the effect. The waist lining is quite effective however.

The rest of this project was fairly straightforward. After cleaning them up and removing some original glue damage, the ends and the roof were sprayed matt black and the step board moulding and rudimentary sole bar painted similarly. After some remedial work, the lower brown side panels were given a coat of Johnson’s ‘Klear’ to lift the colour a little and the cream upper panels touched-in carefully to cover chips and scratches [the paint was matched by mixing acrylic yellow-ochre and white paints]. The drop-lights were then painted in to cover the original paintwork. The interior was painted matt black and the windows then glazed with plastic sheet.
‘Railtec’ waterslide transfers were used for the livery details and, after application, these were carefully sealed in place with ‘Klear’. Vacuum pipes were attached to each end and a rear lamp fitted. The underside was given a floor and the original white-metal bogies sprayed matt black and fitted with Bachmann couplings. The buffers and dummy coupling hook were reinstated before the bogies were finally attached. Finally, the brass work was painted up and, when dry, also sealed with ‘Klear’.
The final photos show the finished model and the underside. The weathered appearance is fairly effective, and saved a complete repaint, too. The model is not the freest-running coach, the ancient K’s bogies could not be dismantled to fit brass bearings without breaking them. It moves well enough for use though [even though it’ll spend most of it’s life in a box!]. Overall, a worthwhile ‘save’.

