Ex-Great Western seven compartment Clerestory Camp Coach in later BR days. Many thanks to Martin Williams for advising that the location was Dolgellau on the Ruabon to Barmouth line..
Glamping it up, 1930s style……
The Great Western did not originate the idea of camping coaches, that accolade lay with the LNER in 1933. The Great Western followed a year later in 1934 however, and certainly embraced the initiative with great enthusiasm. The company stabled its Camp Coaches, in their iconic ‘Chocolate and Cream’ livery, all over the South West and Wales, with many of the locations remaining is use [and new ones found, too] within the Western Region of British Railways [who adopted ‘Camping Coach’ in place of ‘Camp Coach’ for their inherited stock].

One of a series of cigarette cards issued by Ogden’s Tobacco in the 1930s, showing a rather jolly, staged impression of the interior of a GWR Camp Coach.
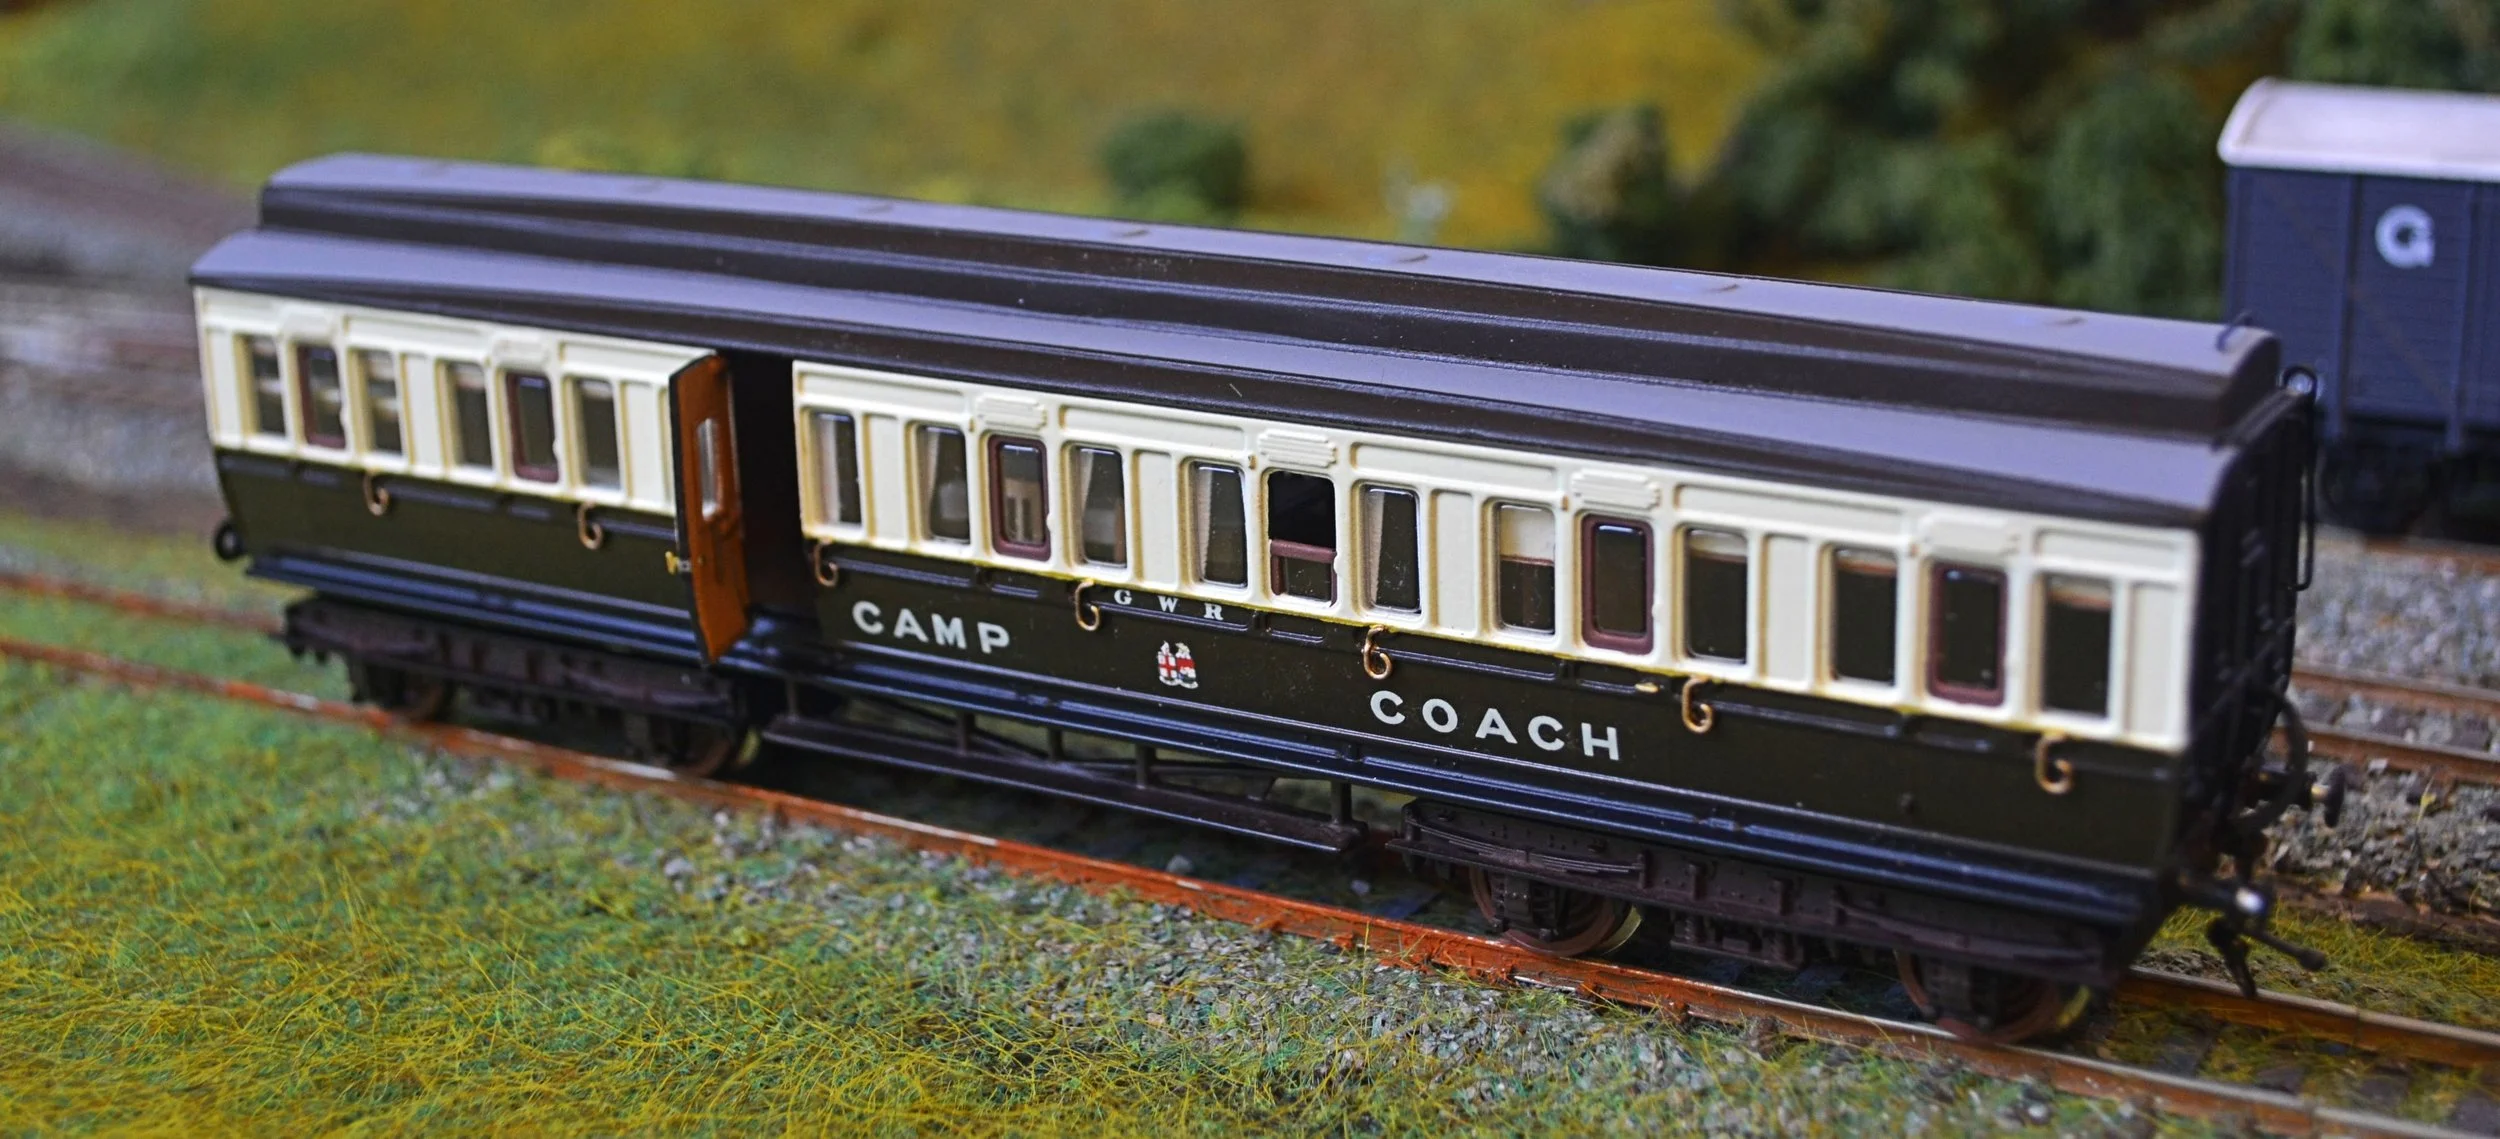
The coaches used by the Great Western were a variety of superannuated 4 and 6 wheelers, and corridor and non-corridor bogie stock, both Clerestory and non-Clerestory. It is probably the type of coach shown above that most typifies peoples’ memories of the Great Western’s stock however and it is that which is the subject of this latest build.
At the outset I’ll state that this conversion is pretty much within anyone’s ability: the only two really fiddly operations [fitting an open door and forming the separate end handrails] can be easily left out without spoiling the general impression of the model.
Models of Camp Coaches seem particularly rare: I can never remember seeing one at an exhibition and have only seen one once on-line [and that was based on a BR Mk1 coach]. Consequently, this build relied mainly on photographs and notes in an excellent Wild Swan publication, ‘Camp Coach Holidays on the GWR’ [Mike Fenton]. I also found, once the build had been completed, a short article on constructing one in a March 1962 copy of the defunct ‘Model Railway Constructor’. The article did not arrive too late though as it was of interest but little use!
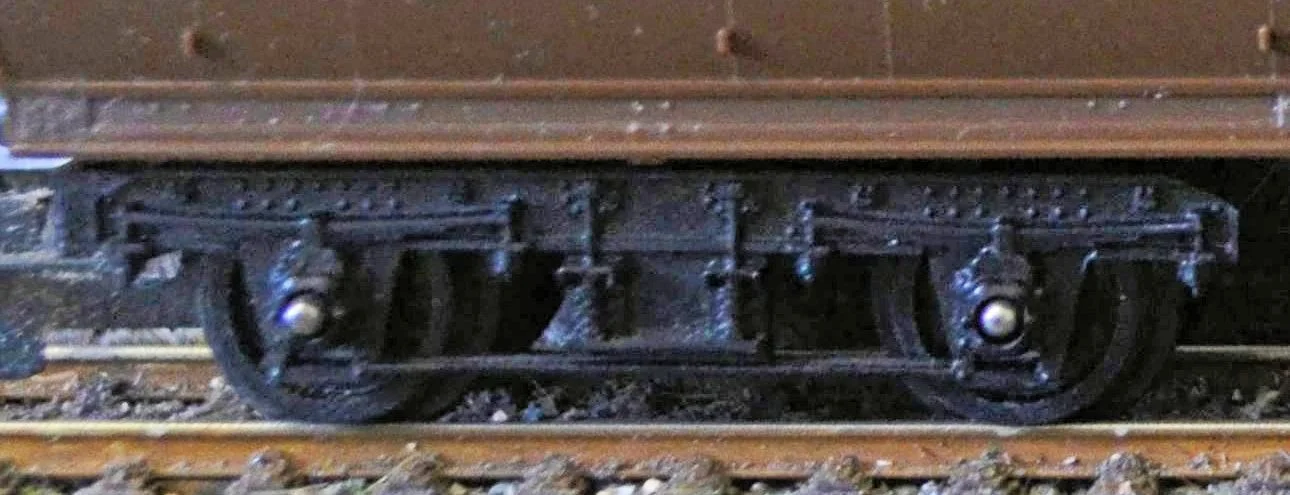
The starting point for this build is the standard Triang seven compartment Clerestory 3rd. I used a particularly old one as can be seen below. Note the open axle boxes and very crude representation of a BR Mk1 bogie. The coaches are readily and quite cheaply available on eBay and Hornby still produce them, nearly 60 years on, in their current Railroad range.


The build starts in the traditional way for Triang Clerestory conversions: remove the roof, buffers and glazing; drill out the bogie rivets to release the bogies from the underframe; remove the crude truss rod/gas tank moulding; clean up the body and make any repairs which are necessary [I had to reinstate some raised panelling and repair the solebar]. All of the door handles were cut away also and two holes drilled in each side to later accept etched brass door handles [only two doors on each side were left to open, generally]. You will now be left with a kit of pieces, although in this case I discarded the bogies, the buffers and the underframe mouldings. But more on that, later.
The first job involved adapting the roof. The gas light pots were cut away and their mouldings filed flat. The clerestory windows were also covered with thin plastic strip as they would have been either painted out or plated over by the mid-30s. I chose to paint the roof at this stage and put it aside until the build had been completed. I used Halfords’ grey primer and Halfords’ Peugeot Cafe Noir [in aerosols] for this task. Strictly speaking, the roof should have been white and brown rather than grey and brown: I much preferred the latter however.
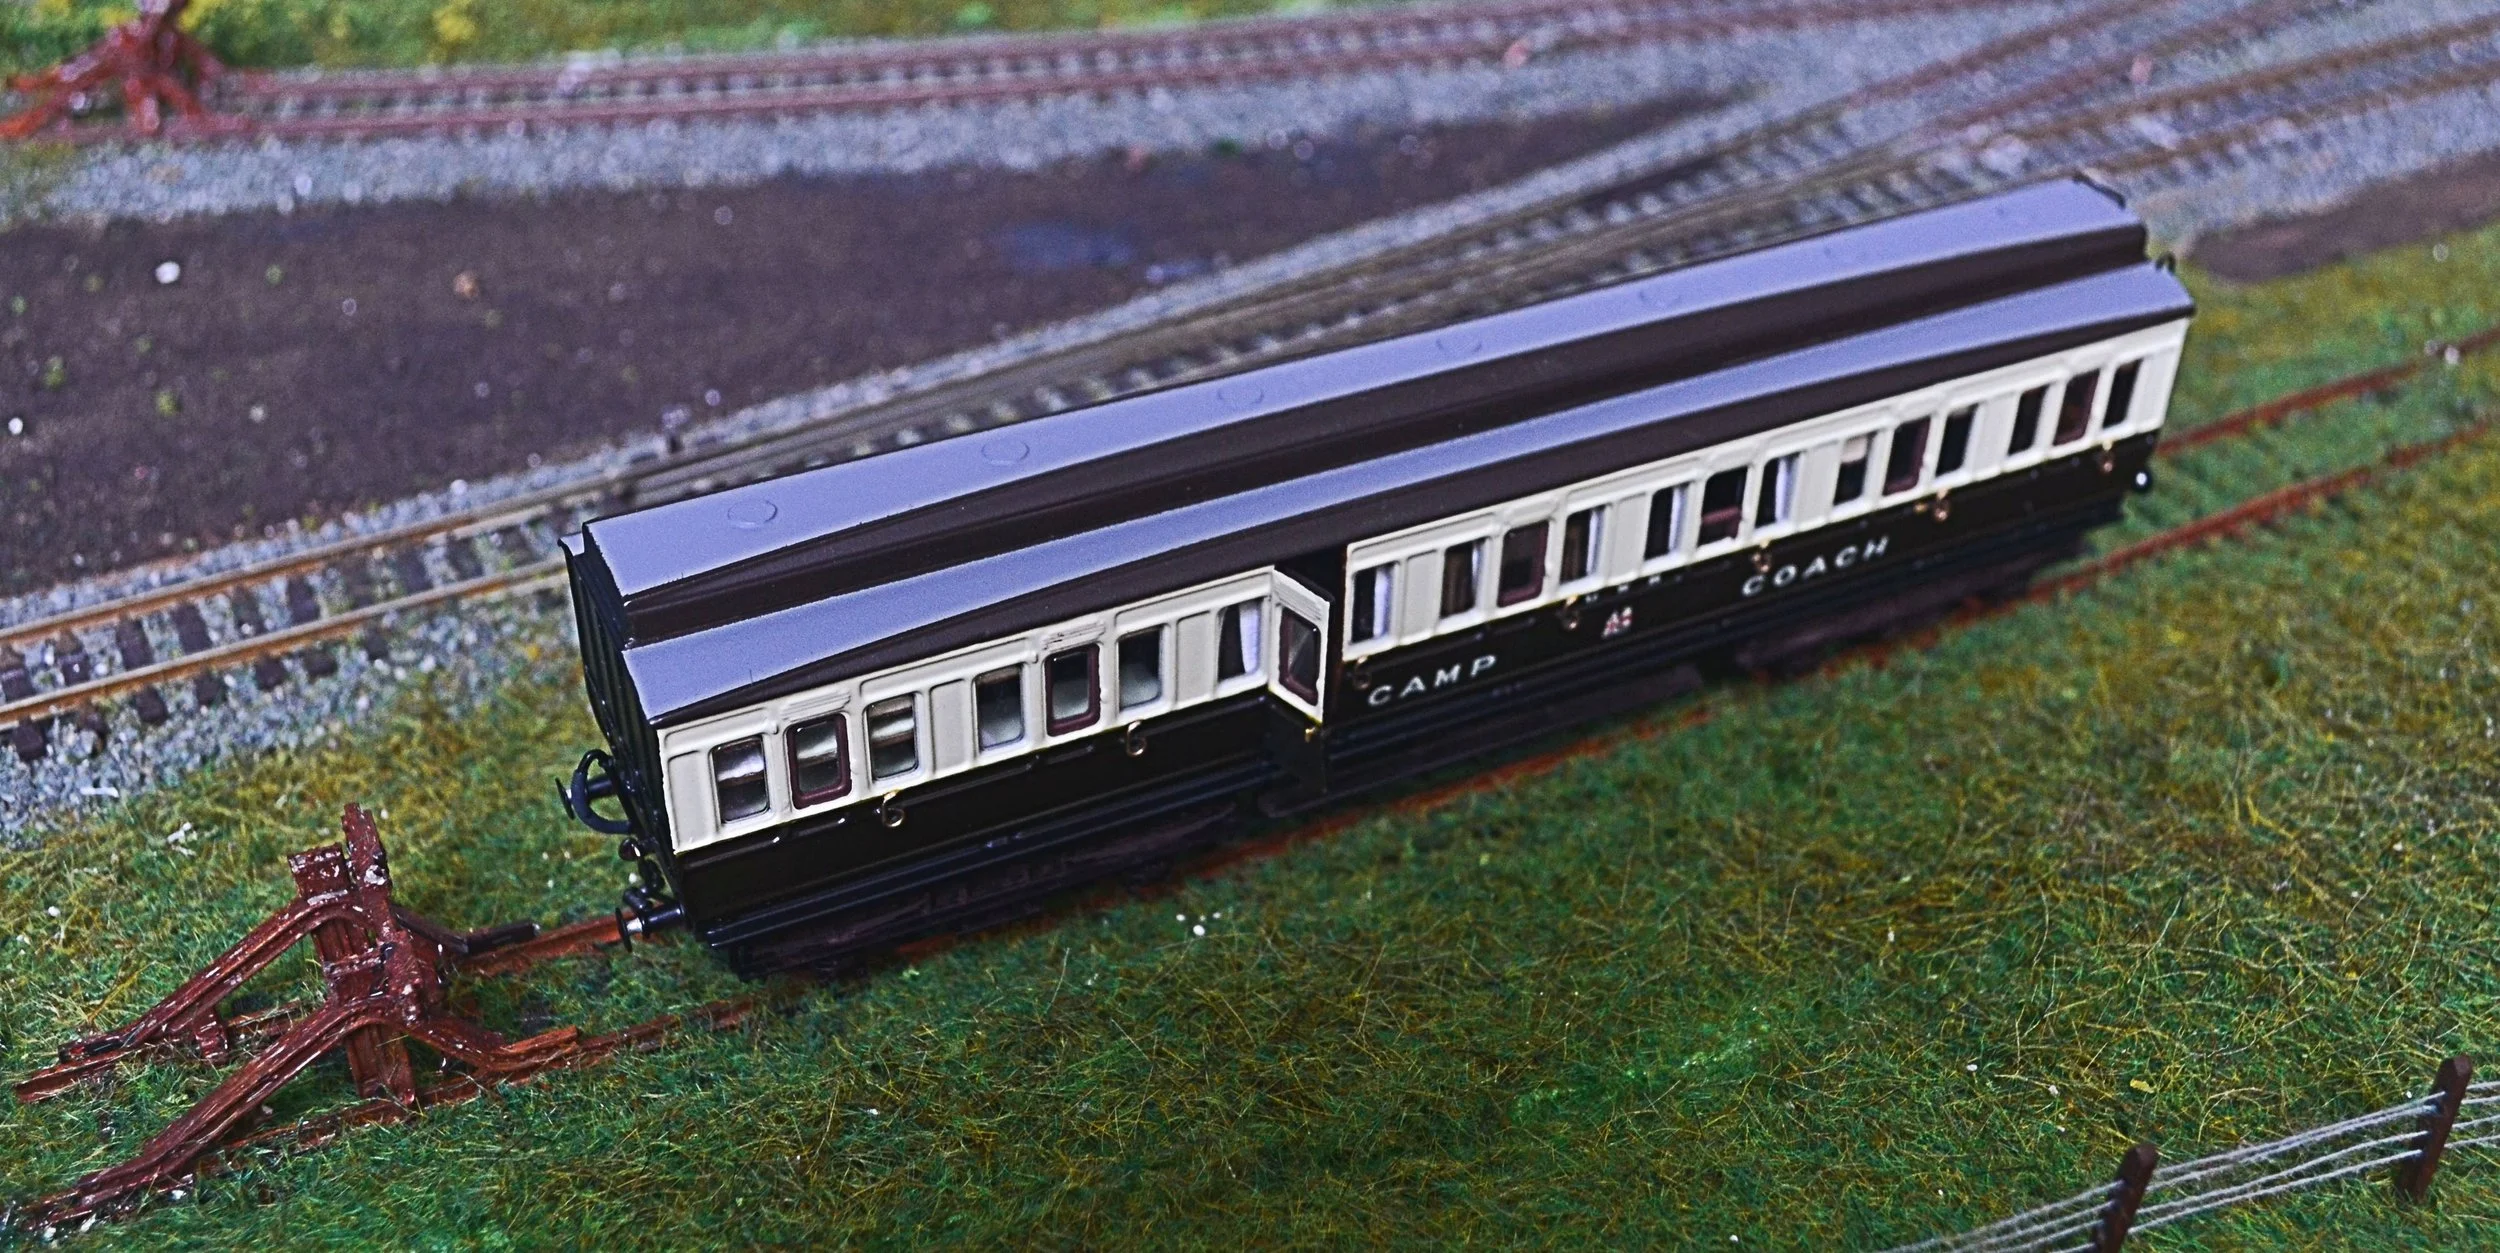
The next tasks involved removing a door from one side of the coach body and also modelling one of the door windows in a half-open state. This was done to suggest occupation and it is quite effective I think. To remove a door, I cut [with a fine razor saw] the centre two-thirds of the door out and then, using an emery board, sanded the remains of the door back to its shut lines. This ensured that the door aperture had been accurately opened-up and that nothing beyond it had been removed.

To provide a door for the re-fit, I cut one from a scrap part of a Clerestory coach body, this time cutting away the door and a few mm. on either side. Then, using the emery board once more, I was able to sand the moulding back to just the door, and no more. The net result was a door moulding which, when offered up, fitted the coach body perfectly.
The half-open window was modelled by cutting away the upper half of the window frame and gluing in strips of brass shaped to simulate the window frame top about half way down. These tasks were the main adaptations to the coach body sides [and only undertaken on one side as well]. The photograph opposite shows the door refitted, in an open state, later.
At this point, I turned to the underside of the coach. Somewhat newer bogies were sourced from a later Clerestory coach, had most of their tie-bars chopped off and were fitted with plastic-strip step boards to disguise their incorrect appearance. The couplings were also cut away as they would not be needed. The underside of the coach body was adapted to accept the new bogies by repairing the damage caused by removing the originals with plastic card, drilled to accept the new fixings. The replacement bogies then simply clipped into place. The photographs below show the original and replacement bogies. The simple improvements make a great deal of difference once the bogie has been fitted with metal wheels, painted and weathered.
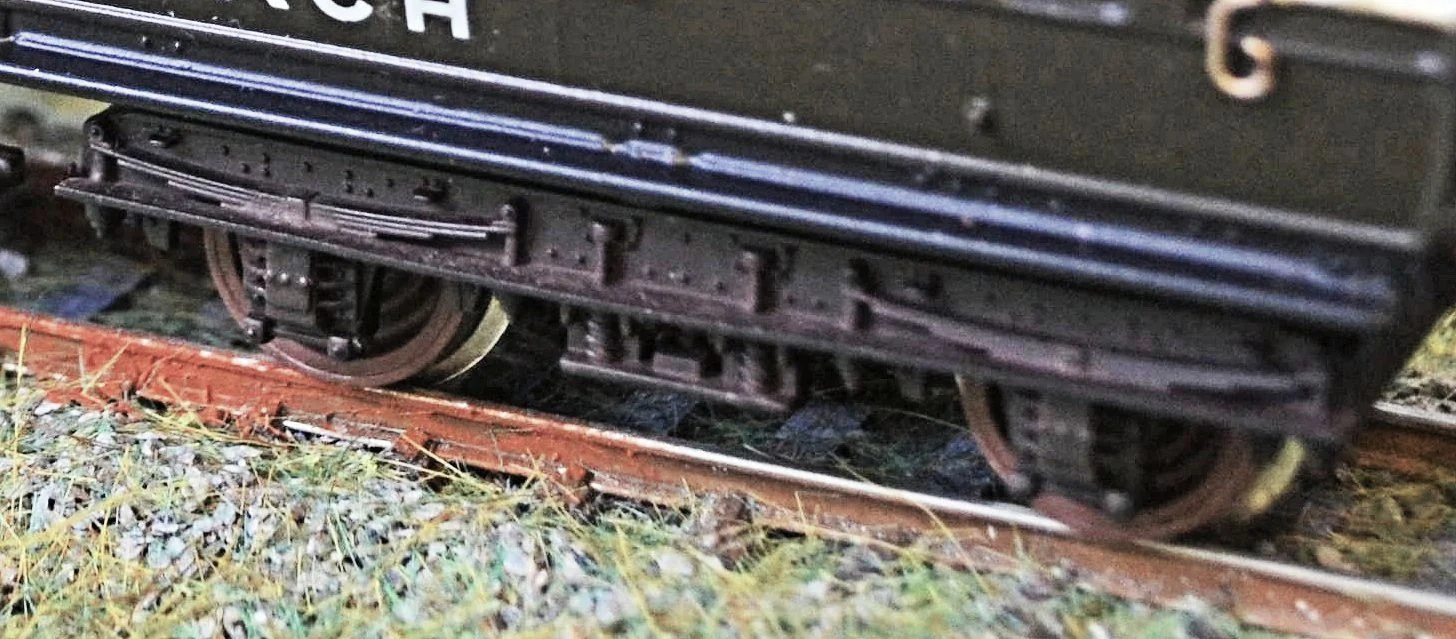
Other areas of the underframe which required attention were the footboard/truss rod/gas tank fittings. The gas tank was a simple 3 amp fuse, glued off centre under the body and later sprayed black. It can barely be seen. The footbaords and truss rods were scavenged from an old Ratio LNWR coach kit body which I had saved for spares/surgery. These were carefully cut away from the donor and glued under the coach body, butting against the inside of the solebars. Their footboards sit at the same height as those on the bogies and the bodge looks extremely effective. Judge for yourself: the original is the lower picture:


The buffer beams were also drilled through, centrally, to accept white metal coupling hooks [to which dummy couplings would be fitted later].

A ‘Senior Service’ cigarette card, again from the 1930s, showing campers outside a GWR Clerestory Camp Coach stabled in a platform bay. The original was probably a GWR publicity image and the coach probably a Brake Third.
With the bogies detached, the coach body was then sprayed in primer to check for defects and act as a key for its final livery. Once dry, two coats of GWR Cream were applied and later, after masking, the lower body was sprayed in Chocolate. The inside of the coach body was then brush painted in Humbrol walnut and the whole left to dry thoroughly. The door droplights were later painted in a dark tan/mahogany colour [this can be seen in a photograph a little way above] and the underframe and coach ends sprayed satin black. Once all of the paintwork had hardened thoroughly, the lettering and coat of arms were applied. These transfers are waterslide, made by Fox Transfers and of the correct font and colour. As far as I am aware, nobody else makes the correct pattern for these coaches. They are extremely easy to apply. Finally, in terms of decoration, before spraying the body with satin varnish, the brasswork was picked out in brass paint and a thin gold line was applied along the coach at the boundary of the chocolate and cream. Incidentally, the still-loose door moulding was also painted as above.
Next, the windows were flush-glazed using an SEFinecast product [their Triang Clerestory 3rd. pack]. Each window was glazed individually and the units were fixed in place with Johnson’s ‘Klear’. Once these had set in place, the two end compartments at each end were fitted with pull-down blinds, all fitted at different heights on each side. The long centre compartment was fitted with curtains, again modelled in different positions, and hung from thin brass rod. The pull-down blinds were made from manilla card and the curtains cut from some real window blind material [to give them some texture]. Compartment partitions were then cut from plastic card, painted dark brown and glued in place. Furnishing could now commence.
The photograph below shows furnishing at an early stage [it was later adjusted and tidied up]. The end compartment on the left was fitted with two pairs of bunks, fitted fore-and aft. This was prototypical. The bunks were constructed from card and paper and the upper ones hung from brackets made from staples [cut into an ‘L’]. The next compartment in contains two beds, made in the same way. All of the beds have light green blankets although this does not show well in the photograph. The centre compartment contains a table and a number of chairs made up from a laser-cut kit. The table has a cloth. Adjacent to the centre compartment is a room with a worktop and cupboards under. At the right end a compartment with a chair and a larger cupboard. Absolute realism was not necessary here as only outlines and impressions can be seen in the completed model.


From an early British Railways Western Region publication, the furnishing arrangements for a Camping Coach converted from an old corridor coach.
The build is now very nearly complete. Two etched-brass door handles were glued into the pre-drilled holes in each side, the one inserted into the open door was positioned correctly to show that it was open. The photographs later show their location. The open door was attached by gluing two very thin brass strips to both it and the inside of the coach body, and painting them walnut to match the interior. This was extremely fiddly and only succeeded on the third occasion. A tiny piece of brass strip was glued to the inside of the door to represent the inside handle and a piece of stainless steel etch was glued to the side of the door to represent the locking mechanism. A piece of very thin brass strip, painted dark brown, was also attached vertically below the door window to simulate the window strap.

A photograph some way above shows these tiny details [but not the long leather strap for opening the window of the open door- that remains almost invisible!]. Handrails were bent up out of thin brass wire and attached to the one end of the coach and the roof [which had now been attached]. Metal buffers were sourced and glued in place and dummy couplings attached to the white metal hooks already positioned. The bogies were finally clipped into the underside. Vacuum pipes were also glued to the ends and painted. The roof, incidentally, is clipped into place but not glued in case there is a need to repair/reattach the open door in the future. The final photographs show the completed model.
Finally, steps are in the process of being constructed from a laser-cut kit to allow campers access to their holiday home. The model is, otherwise, complete.