- Dinner in the Diner -
(nothing could be finer)
By Tony Richards
Collet Bow-ended Composite Restaurant car to Dia H33, as rebuilt in 1939
Elsewhere on my workbench I have provided an account of how to make basic improvements to the popular Hornby Collett dining car, available in the Railroad Range, often for less than £20. Relatively little work, easily undertaken, can improve the original beyond recognition. Lifting it still further is a more involved task however involving, in addition to the original improvements, the provision of replacement sides, etched brass and white-metal fittings and, of course, a complete repaint.
None of this is beyond the ability of the averagely-competent modeller although it cannot be rushed and will cost rather more than the original project. Consequently, once embarked upon it needs to be completed successfully or much will be wasted.
I had been musing over the possibility of this project for quite some time [I referenced the existence of Comet brass sides in the other account]: this all got no further than just that though, musings. An excellent May 2016 Railway Modeller article by Alan Davies showed how this could be done however [in that case a maroon British Railways Western Region project] and that provide the necessary spur. This build will be slightly more detailed as I also intend removing Hornby's awful roof ventilators, changing the buffers, adding dummy lights to the First Class tables and lowering the chassis slightly. So, here we go: a Diagram H33 Bow-ended Dining Car as rebuilt in 1939 !
I should have added perhaps that a cheaper option would involve the use of one of the pre-Railroad Range dining cars: they can often be picked up for under a tenner and only require Hornby's newer Collett bogies in addition [the original older versions being fitted with BR Mk1 bogies].
For those who have not seen the donor model, this not-unattractive coach is the starting point. The poorly moulded roof ventilators and inadequate corridor connectors do stand out however, as does the deep glazing :
Start by disassembling the coach entirely. Pull off the bogies carefully and then, using long-nosed pliers, pinch together the twin tags protruding through the floor immediately inboard of and underneath the coach ends. That will enable the chassis to be carefully pulled away from the ends of the body. The chassis will still be connected to the centre of the body however and four transparent plastic tags [part of the glazing unit] will need to be pushed across [with a small flat-bladed screwdriver] to finally release it. These are located either side of the centre-line [see the photo of the glazing unit below]. Depending upon the age of the model, the glazing unit may also be glued to the inside of the body. If it is, it needs to be cracked off carefully. It does not matter if the glazing or the tags get broken as the unit will be discarded in any case. Once the body and chassis are separated, the glazing, ends and seating can be removed from the body moulding. You'll end up with a pile of bits like this:
The glazing unit tags and their receiving holes in the chassis can be seen clearly in the above photograph [as can the holes in the ends of the chassis into which the coach body tags fit.
Surgery can now commence. Using a very sharp scalpel blade on its side, like a chisel, I very carefully pared away the roof ventilators and the four handrails which run fore-and-aft on either side of the raised central roof-detail [two each side]. Once these were removed, I cleaned up the roof with a very fine emery board to leave a completely flush finish. With care and patience this is a very easy task, but do try to avoid gouges !
The finished operation should look like this:
The above photograph also shows that I have sanded away all of the raised mouldings [including door shut lines] on each coach side. The sides must be completely flat and the reason for this will soon become obvious.
Before undertaking any more drastic surgery I drew centre lines, lengthways, along each side of the roof to provide markers for drilling holes to take the replacement ventilators. The ventilators fitted were plastic Dapol mouldings, Centenary coach ventilators, obtained as spares some years ago. They may still be available from Dapol [or eBay, etc]. The positioning of the replacement ventilators is not 100% accurate but I am content to leave them as is. The handrails have not yet been fitted and this will await a time when the body will be held less firmly for finishing: they will become easily damaged otherwise. The replacement ventilators should look like this:
With the replacement ventilators set hard in place, major surgery can now follow. To adapt the body to accept the new brass overlays, it will be necessary to cut away much of the upper cream panels of the body on both sides. The cuts will in fact extend down into the brown section a fraction below the lower gold line and upward just a fraction into the brown cantrail [see the photos of the donor model above for clarification]. A little of the wider areas of cream between the windows and doors, and a sliver at each end, will remain to provide upper support. The photos below will show this clearly.
To ensure clean and accurate cuts, I first held the replacement sides up against the donor body and marked out where the new window and door openings would lie against the plastic. These were then drawn more fully onto the coach side but enlarged an additional 2-3 mm. in order that glazing could eventually be fixed to the inside of the brass overlay and clear of the body, for a flush effect. Using a sharp scalpel blade and a steel rule, cuts were made along the pencil line until, eventually, it was possible to snap the plastic away from the body. An emery board was then used to clean up the edges of each rectangle, removing any burrs and, once again, the brass overlays were offered up to the sides to ensure that none of the original plastic was visible through the many openings. If any is seen, simply file it back with the emery board.
The finished body should look like the photo below. Again, this was not a difficult task but it could not be rushed and required a very sharp blade. Watch your fingers!
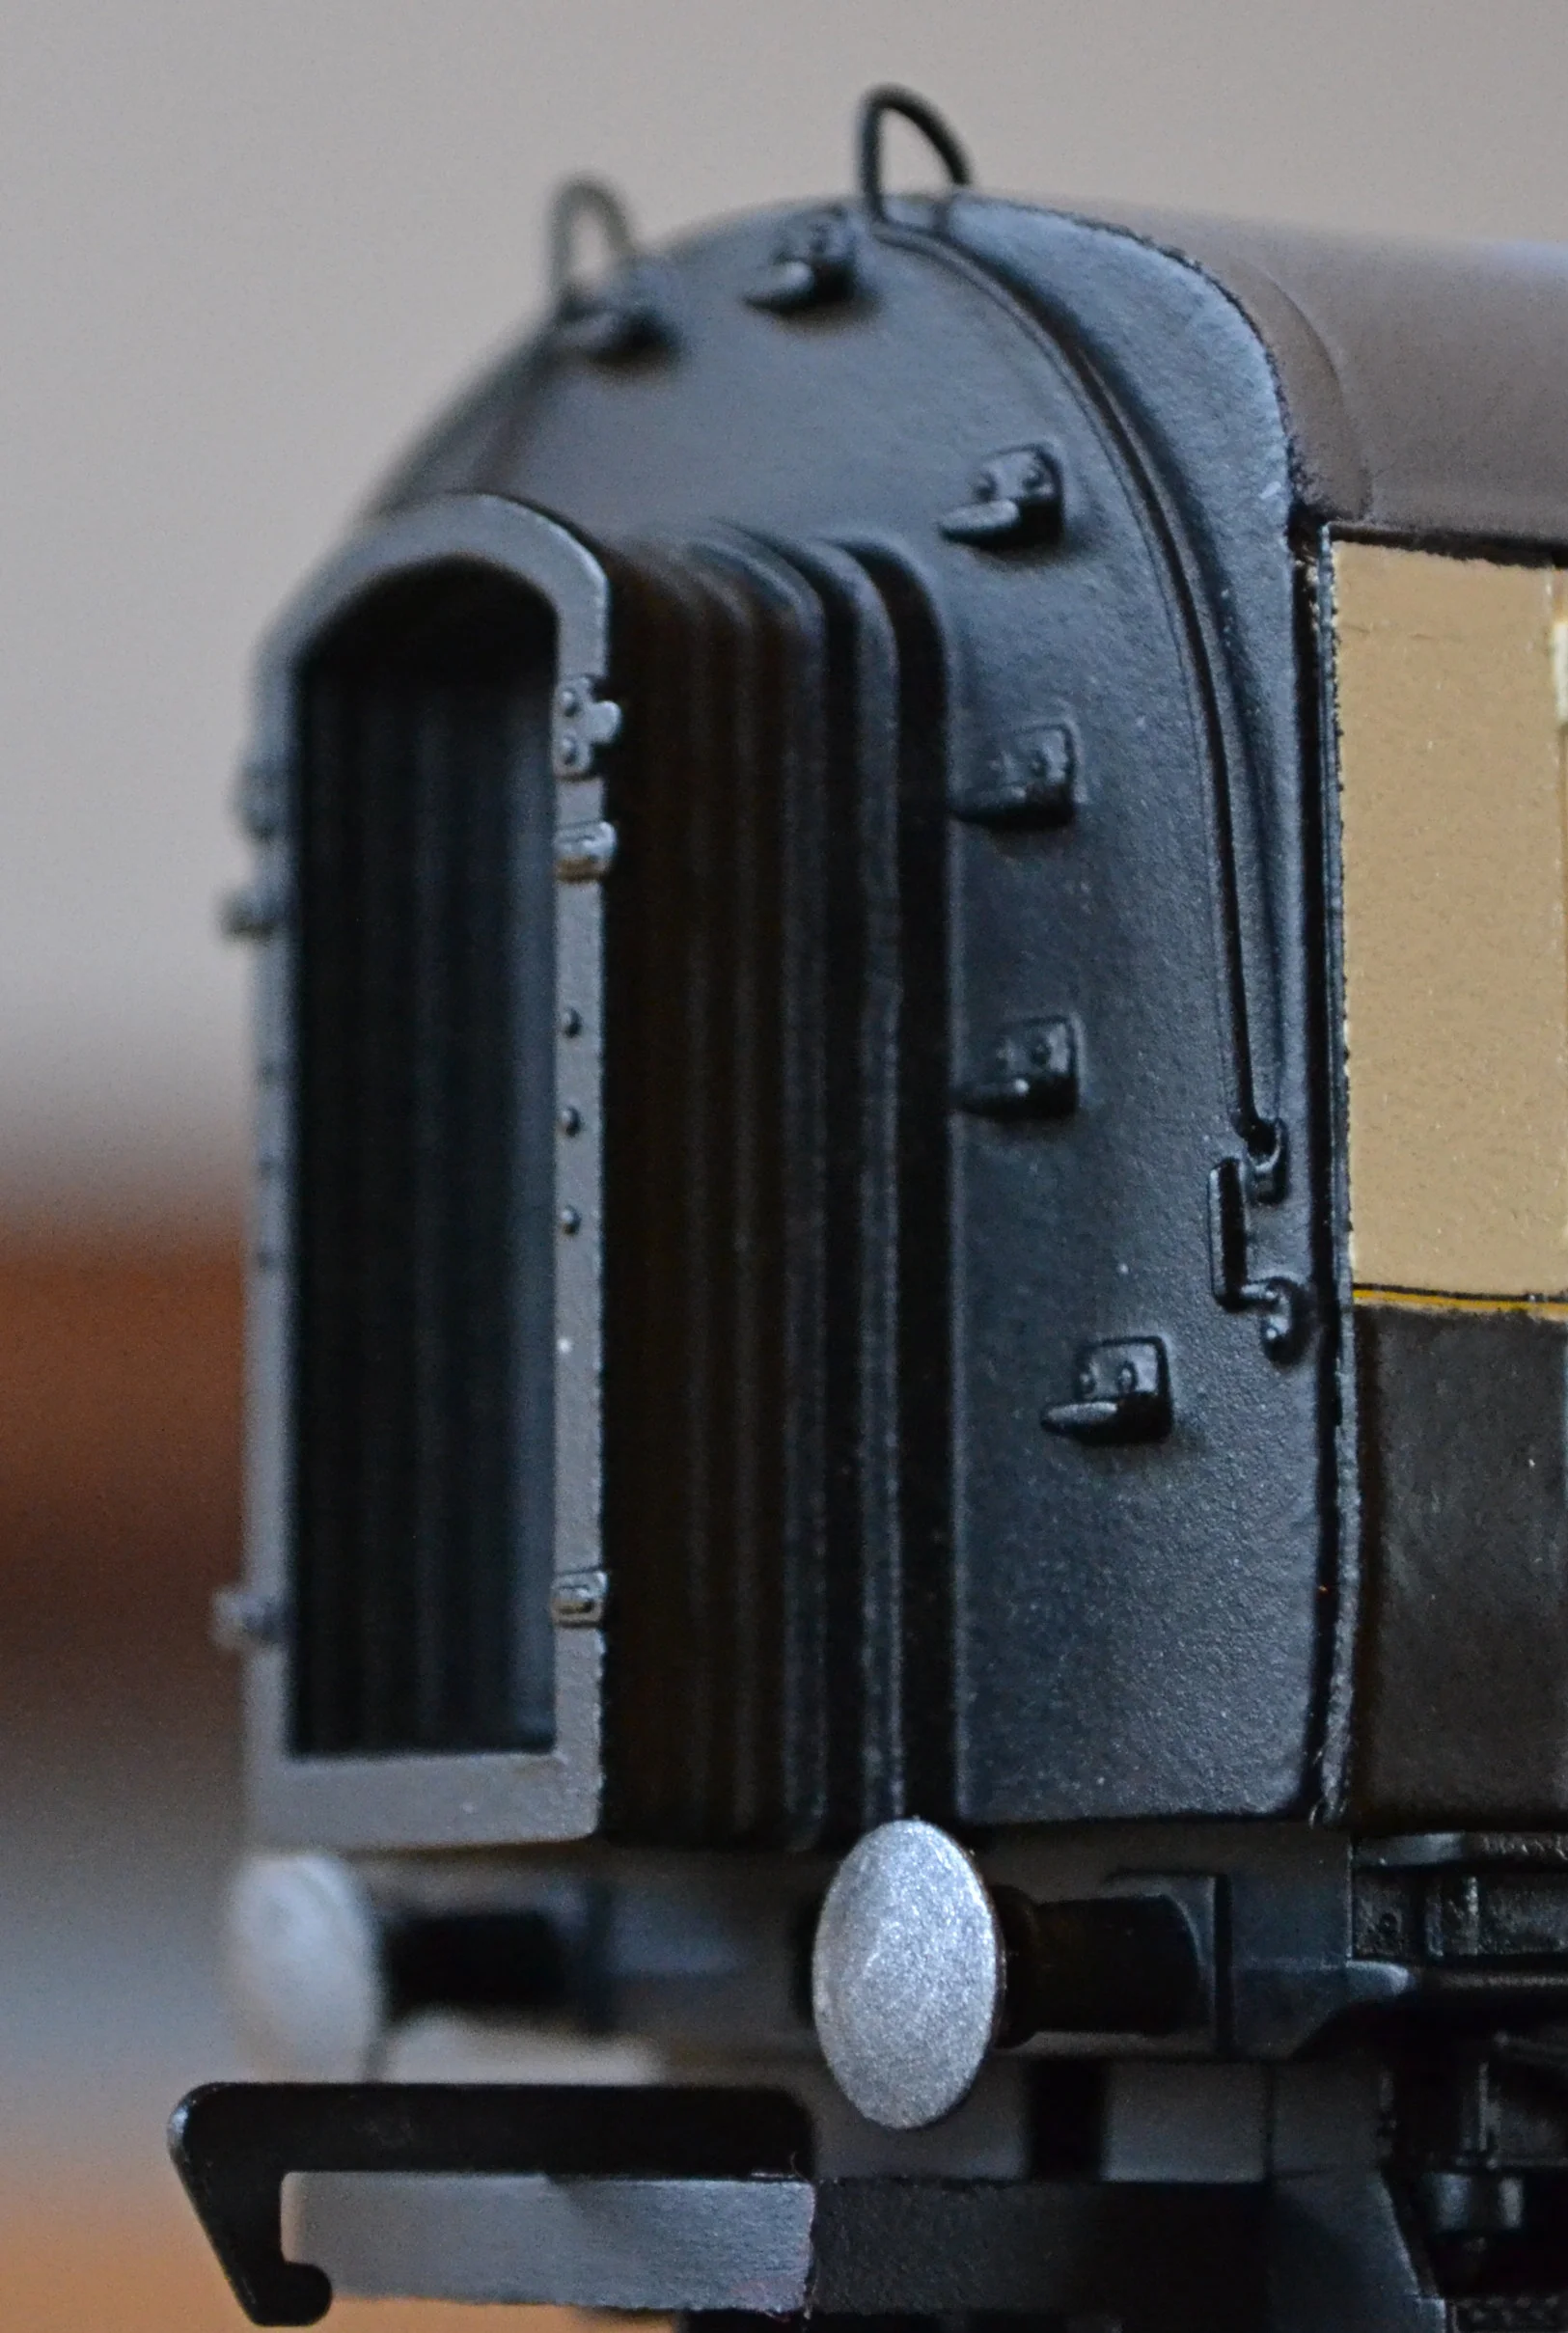
You'll see from the above photograph some other development. I temporarily reunited the body with the chassis to check the fit of the end pieces: I wanted them to sit flush with the roof, not standing slightly proud as was in fact the case. Some work with an emery board reduced both their height and width: they now sit flush all around. I have also removed the original oval buffers and drilled out the shanks to accept round metal ones in their place. The original corridor connectors were also cut away and Dapol Centenary coach connectors glued in their place: not entirely accurate but far more realistic.
It all looks pretty grim at present, but all will be hidden under a coat of matt black in due course and the bellows for the connectors weathered brown-grey.
Handrails will also be fashioned to replace the moudled ones which have been cut away.
The buffers are not sprung by the way.
I have also cut down the boss which accepts each of the bogie clips to allow the coach to ride about 1.5mm lower. If anyone wishes to attempt this, the easiest way to do it is by slicing the boss with a razor saw which has been placed flat across the solebars. No damage was done to the solebars in this way and I think it is far easier - and neater - than filing.
The photograph opposite shows it as done: the boss is now flush in height with the solebars. The coach will run without a wobble: guaranteed !
Next: brace the truss rods and fit gas tanks...
The gas tanks for the kitchen - a pair of them - are white-metal castings from Comet. Assembled with superglue, they are quite hefty affairs which needed little by way of cleaning up although their bases did need to be reduced considerably for them to sit within the truss rods. Some of the moulding detail from the underneath of the chassis had also to be removed to enable the tanks to sit squarely and not protrude below the truss rods. They were attached with superglue. The photo shows them in place: not pretty cosmetically right now but, like the ends and the chassis, they will be sprayed matt black in due course.
Unfortunately it wasn't possible to brace the truss rods prototypically by attaching cross members at the end of the horizontal sections as the gas tanks were exactly the same height as the truss rods themselves. It's hardly a ha'porth of tar however...
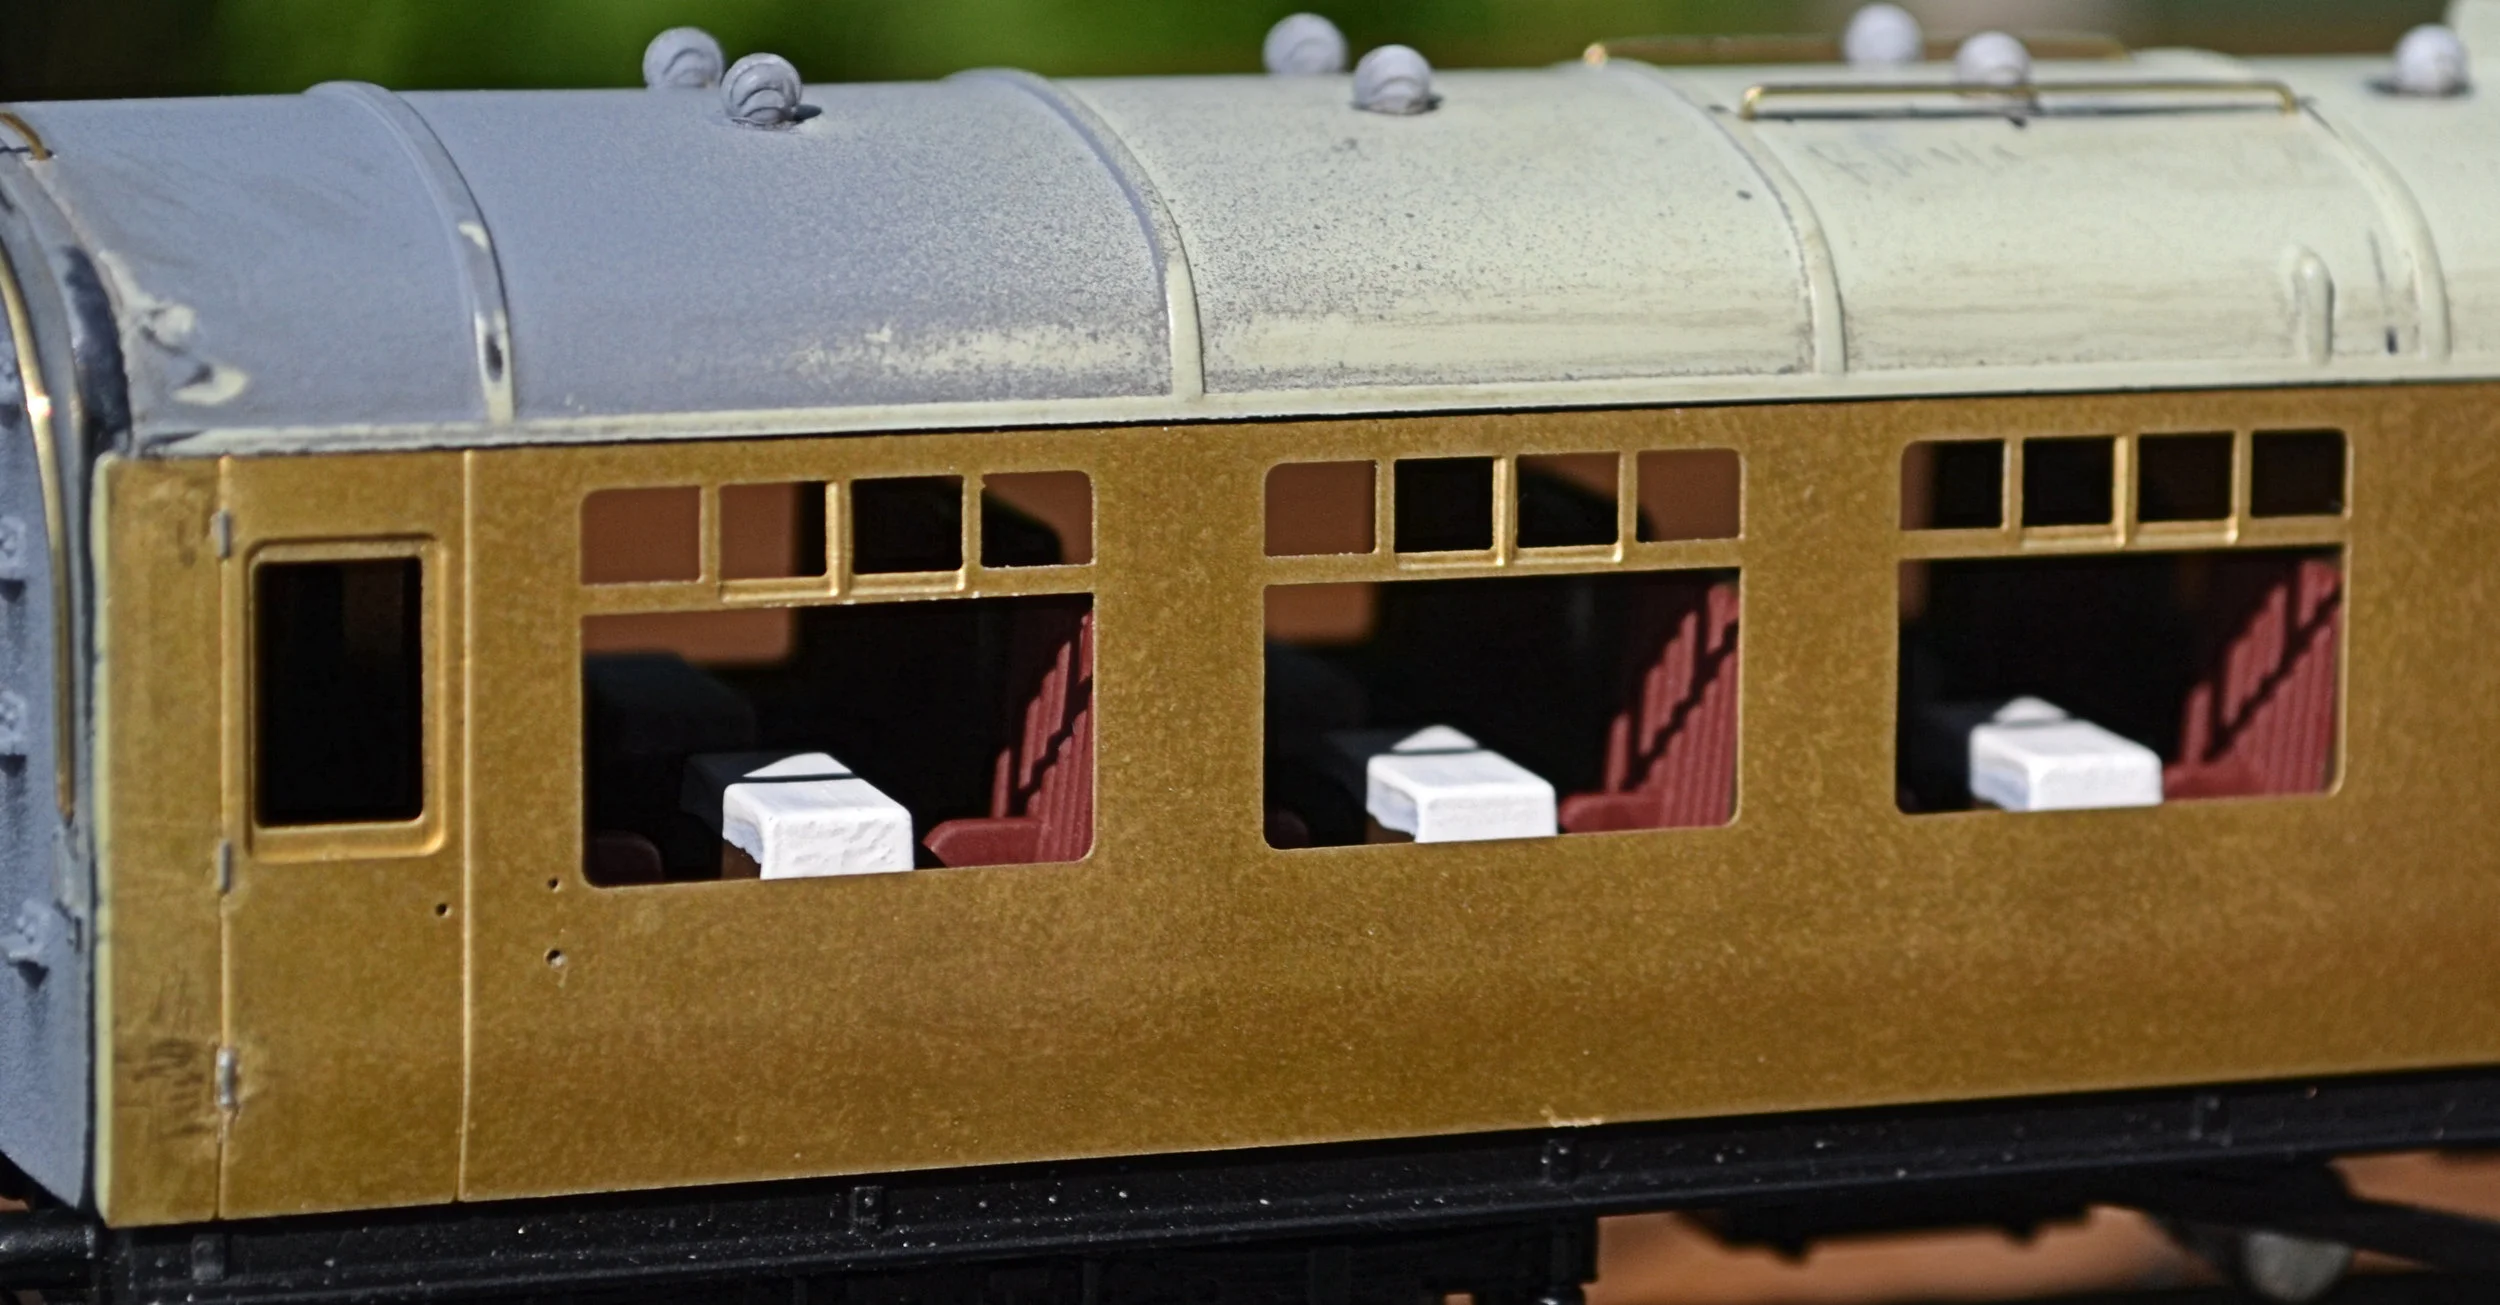
And this next photo shows what it is all about. A pair of etched brass overlays from Comet, modelling the coach as rebuilt in the late '30's. these will be attached to the plastic body with impact adhesive in due course. It will be clear now why the sides of the original body had to be perfectly smooth. These sides needed minimal dressing, just a few burrs to file away. Eight etched drop lights are provided and the top overlay shows them to have already been fitted. Superglue was used and I chose to show one window [at the end] open. The sides will be given door handles and grab irons once they have been glued in place.
Before then however, a couple of other tasks needed attention. First, I sprayed the self-coloured seating/kitchen unit in a dark brown: the original reddish hue just didn't look realistic. The tables and chairs will be picked out in appropriate colours later, blue for First Class and red for Third Class.. Next, I glued the coach end mouldings into place and sprayed the whole of the coach ends in primer to see what, if any, further sanding was required to ensure a flush fit. There is always some to do and the photo shows how much. Again, not pretty, but it will all disappear soon. Finally, I reattached the bogies to the body and took the coach to the club to be certain that it ran squarely without wobble or cant. There would be little point proceeding further at this stage if the finished product ran like a dog. All was fine however and I need not have worried.
The body is now ready for its new sides. They will be fitted with the body attached to the chassis for bracing and to ensure the squarest fit possible. The chassis will be removed again later.
Before fitting the overlays I cleaned the coach sides and the inner faces of the brass sides with IPA to remove any grease. Impact adhesive was then applied to both sides and allowed to dry before the overlays were pressed into place. Once happy with the positioning, I left the whole unit alone for 24 hours to fully cure. Impact adhesive can be messy, stringy stuff to use but it does appear to work well in this application and the new sides are firmly - and closely - attached to the plastic body.
The overlays are just a fraction shorter than the donor body, almost immeasurably so, but it does show in this photograph. The effect is considerably exaggerated by the contrasting colours and the enlarged image however and, once painted, it will be completely unnoticeable unless viewed through a lens.
The photograph has also highlighted a loose drop-light: this will be re-glued shortly. The image also reminds me that it's time to construct some handrails for both the coach ends and the roof.
Priming the whole body will follow once the outer surfaces have been rubbed down with IPA to degrease them, hinges have been added to the doors [with superglue, an extremely fiddley job] and various door handle / grab iron holes have been reamed out to enlarge them slightly. I may also scribe the door shuts a little deeper in case they are filled by paint.
The photograph also shows just how flush the brass sides fit, following the tumblehome of the donor body nicely.
Fitting the door hinges, all 24 of them, is straightforward but mind-numbingly dull. You could do without them but they do provide detail to a relatively flat side and I'd say that they are necessary. Anticipate a 50% attrition rate and produce twice as many as you need - you'll be amazed by how many ping off into outer-space as you try to cut, file or fit them !
I cut mine out of thin steel wire. Brass wire or plastic micro-rod would do just as well however - just use what you have. Fitting them is easy if you open up the shut lines with a fine file. You'll find that they can then be super-glued directly into the groove.
You'll also want to ensure that all of the hinges are in line when you look down the length of the coach side. The easiest way to ensure that is by fitting the first set, measuring the positions relative to the top and bottom of the side and then pencilling in those measurements onto the other shut-lines.
I've noticed from the photo that one of the hinges is slightly smaller than the others. This is not worth rectifying as, when painted, it will not be noticed.
The roof handrails were bent up from brass wire and super-glued into place. They'll look a lot neater once the roof has been painted and weathered.
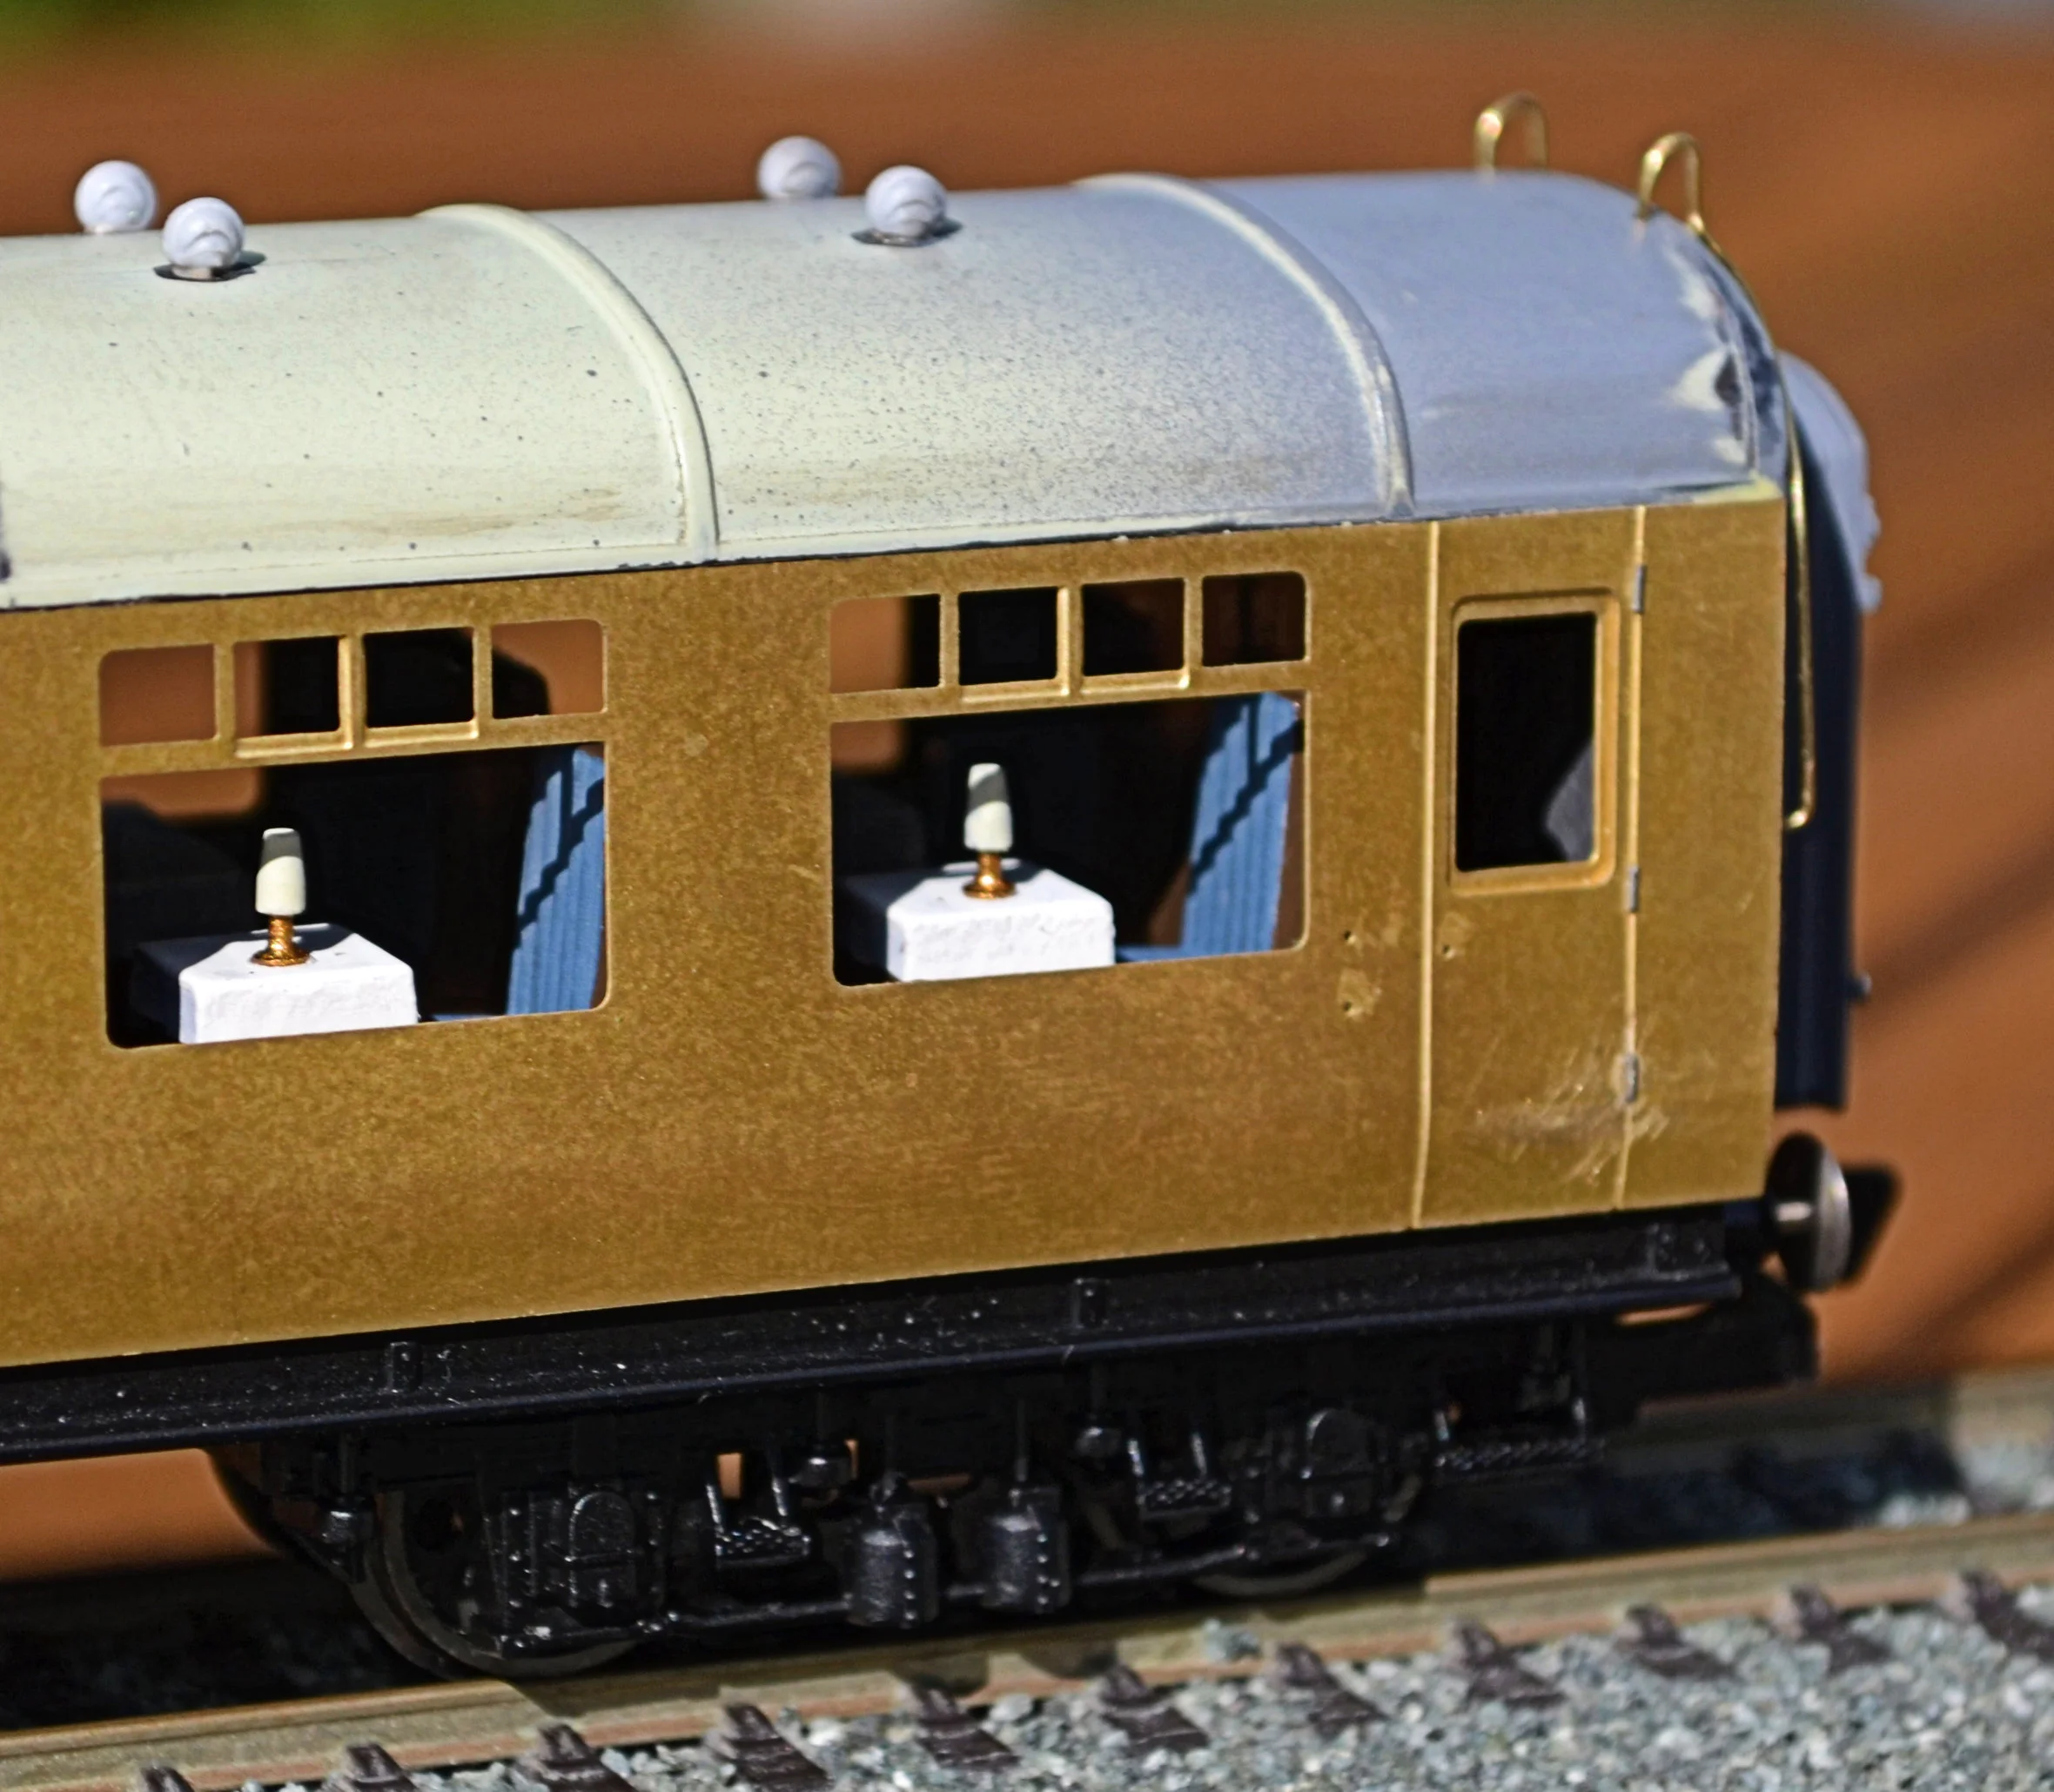
With the major construction work now complete, and the interior painted and lamps added to the First Class end, the body will soon disappear under a coat of grey primer prior to the final livery being applied. The end hand rails were a particularly difficult task: all four had to be reasonably similar and their complicated shape made folding each up quite trying. However, having bent each first into the correct radius for the long curved upright, the rest of the folding and bending went more-or-less to plan. They are a loose fit at present and, once primed, will be removed again for final tweaking and painting. they will not be glued into place ultimately and will remain loose to allow for adjustment should they become bent in the future.
These photos are the last chance to see the diner in its undressed state. I think it's looking pretty good, too. Glazing, lettering, fitting door handles and grab irons will follow painting and varnishing. I have to work out a way of sourcing and fitting convincing curtains too: that one is a bit of a headache at present.
The above photograph also shows a thin seam of filler applied to the left-hand end of the coach. This was not applied to fill out a gap but, rather, to correct the fact that I had rounded off a little too much that side of the coach end moulding. It is much squarer now.
The penultimate photograph also just shows the outline of a more detailed white metal dynamo that I found in my bits box, an improvement on the rather two-dimensional Hornby moulding.
With the construction part of this build now complete, the coach was disassembled for painting and lining.
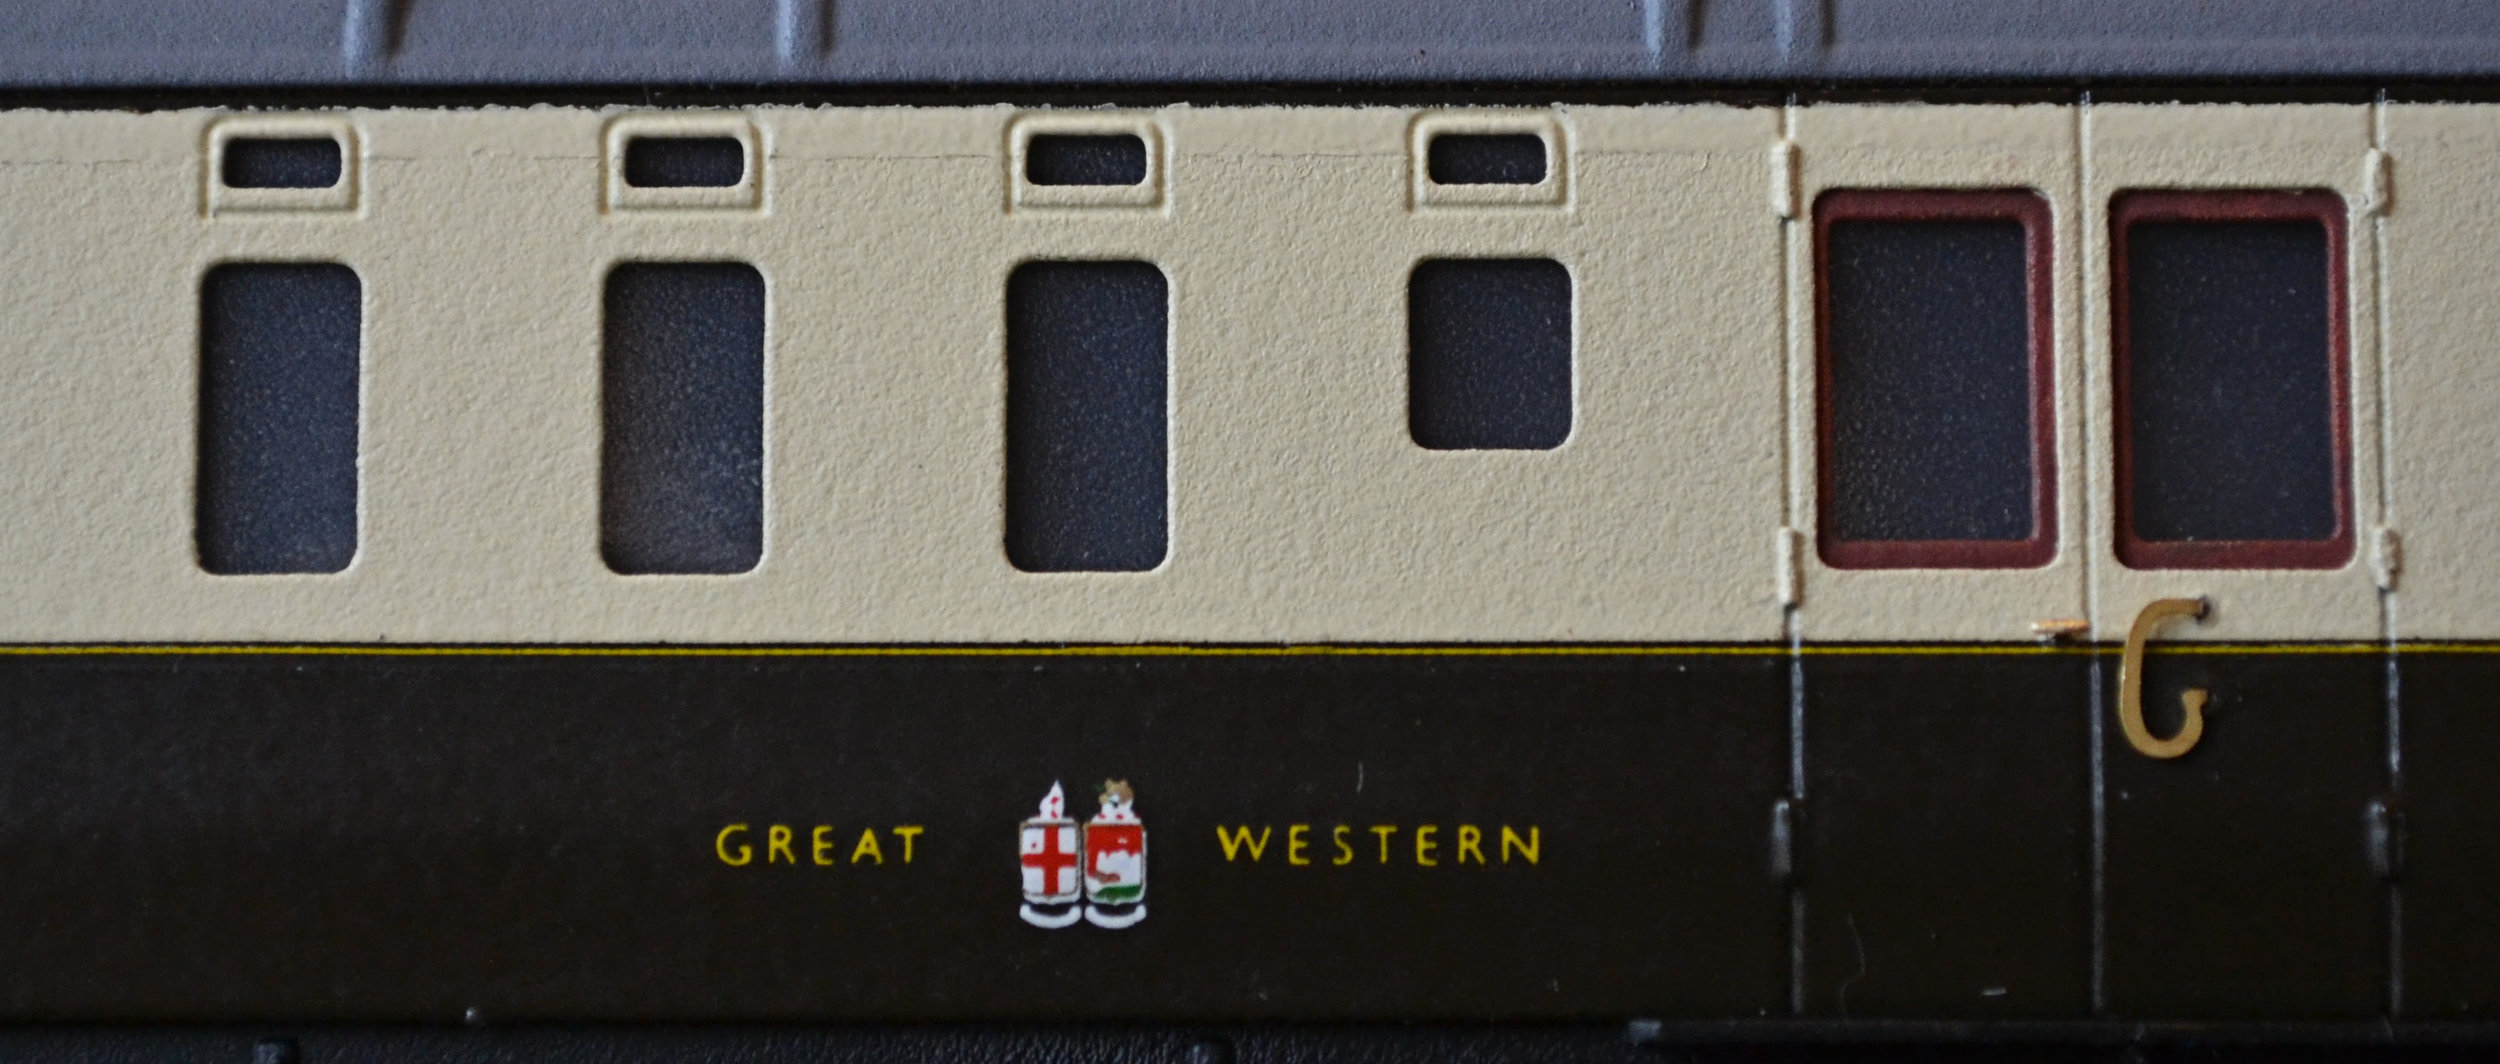
The brass sides and the white-metal parts of the underframe were first sprayed with Halford’s grey primer. Once this had cured, the coach body was given several coats of cream via a Halford’s aerosol [they having mixed a can to the approximate shade for me]. This was allowed to harden for a couple of days before the body was masked up for the chocolate lower panels to be applied. For this I used a Halford’s Peugeot Cafe Noir aerosol. Although the photograph shows otherwise [strong sunlight],this is just a little darker than I wanted but an acceptable shade nevertheless. This required several applications and then it too was allowed to harden for several days.
In one or two places, the boundary between the chocolate and cream was a little ragged, the paint having bled under the masking tape. Before deciding to repaint the entire side, I applied the waist lining to see if this would neaten things up. Fixing the Pressfix lining along the length of the coach was relatively easy, the trick being to apply one end first and then, holding the strip under a little tension, apply the other end. The central parts can then be manipulated with a cocktail stick before they adhere to ensure a long, straight line. This cleaned up the boundary acceptably and, once dry and fully cured, it was overpainted with a coat of Johnson’s ‘Klear’ to protect it from handling.
The cantrails were next painted in chocolate by masking off the coach body again. I did not mask the roof however as it was eventually going to be painted black. A little tidying of the line was then achieved by carefully brush painting in some thinned Halford's cream. The drop lights have also been painted a reddish-mahogony.
Incidentally, the apparent changes of colour in the lower panel above are caused by reflection and not the careless use of different shades of paint ! The slight orange peel effect will disappear completely when the coach has been varnished. Lettering will now follow and the class designations, numbers and other namings will be sealed under a coat of 'Klear' before the coach body is varnished.
With the body lettered and numbered [and then all sealed with ‘Klear’], a coat of Testor’s ‘Dullcote’ matt varnish was applied and allowed to cure for 24 hours. The body was then masked-up for the roof and ends to be spayed. That done, acrylic glazing was applied from the inside, window by window, with the pieces attached by epoxy resin [the kitchen windows were fitted with frosted acrylic]. A handrail was also set in across the large central corridor window. Once all of glue had cured, curtains were cut out and fixed to all of the windows as per the prototype.
The last detailing tasks before final assembly could now commence: fitting the etched brass door handles and grab rails and fabricating steps to be glued under the various doors.
The external brass-work was superglued in place. This caused some very slight discolouration of the paintwork although this was remedied by a drybrush of ‘Klear’.
Final assembly then followed with the end hand-rails being re-fitted last of all. Note that the axle-boxes have been correctly painted pale blue to denote that they are oil lubricated and, at that time, of a non-standard type which required special attention.

For reasons which had nothing to do with any complexity, this build took far longer to complete than originally anticipated. It is finished now however, well worth the initial outlay and provides an interesting and quite different vehicle for my rake of Hornby Hawksworth coaches. It would have been nice to have added passengers but I decided against this as none of the other coaches in the rake have them. But one day, maybe. Well, maybe…