- Recent Kit-builds -
by Tony Richards
Being a somewhat undisciplined modeller, I always have half-a-dozen or so projects on the go at any one time. I quite like it that way though and it allows me to take a breather from more difficult/involved models and finish something more simple, more quickly, before returning to the main task. However, sometimes these jobs on the side mount up and I find that I need to have a concentrated campaign to clear them out to make way for others. I had to build or finish off a number recently just to make room on my desk. These are some of them…..
First, a GWR five plank wagon. A Ratio kit, built straight from the box, with a load added and lightly weathered. I built it years ago but put it to one side for some reason. It just needed lettering and couplings to finish. Adding six numbers in a straight line was rather pushing things a bit though...
The resin load makes the model quite heavy: it runs extremely freely however and so its weight is not a problem. With the exception of the now long-defunct Open C tube wagon, although now long-in-the-tooth, Ratio GWR kits are well detailed and quite easy to assemble. Like all plastic rolling stock kits they do need added weight however. Self-adhesive wheel balancing weights are an easy alternative to adding a heavy load.


And next, a handsome beast which is nevertheless a complete work of fiction: an at-least 35 year old K's white-metal 'Palvan' attending a fancy-dress ball. Bought at a sale for £1 in a dire state, it has been dismantled, cleaned up and given a floor, tie-rods, dummy coupling hooks, vacuum pipes and decent wheels in brass bearings [all of which it lacked]. The castings needed a lot of filing and bending to get them to fit properly and some of the seams required careful filling, but it has gone back together reasonably well. A common Keyser feature [in my experience] is 'identical' castings moulded in very slightly different sizes: this one was no different and the van ends were not exactly mirror images.
It also seems to me that the buffers that came with it, although white-metal, probably belong to another kit as they do appear a little too long: no matter. It should, of course, have BR lettering and numbers, being a van that was introduced in 1951. I quite liked the incorrect LNER livery it came with though and so, after agonising, decided on some make-believe and re-instituted it. It is fearfully heavy, too
Incidentally, Halfords' Red Oxide primer makes a very passable LNER Bauxite. But you knew that already. The lettering is by Pressfix, again. Annoyingly, I had to buy a new sheet to do this one and it's curious that although the letters adhered perfectly on one side they just wouldn't stick on the other. My usual solution [no pun intended] to this problem is a thin PVA / water mix and it worked perfectly once again. For all of its inaccuracies and compromise, I really do like this van and it runs beautifully.
This next offering was a very simple build, so much so in fact that it's barely worth the hassle of downloading a photo, it took little more than a couple of splashes of glue really. I'm fairly certain that it is a Slater's kit of a wooden solebar Gloucester Railway Carriage and Wagon private owner vehicle. It was bought for a quid at a club sale sometime back, in pieces, having fallen apart, but with all of the parts there [except for wheels, bearings and couplings]. Reassembly was little more than a five minute job.
I have added some hinging to the end tipping door - a surprising omission really given Slater's generally good moulding. I haven't yet decided whether to coal the wagon. I may have to however as it is extremely light and even though I attached a self-adhesive tyre weight to the underside for ballast, if empty it could only run at the end of a train or risk derailment [which I think would be taking realism just a shade too far].
I also painted in a repair, a replacement plank. In practice, these would often never be re-liveried and would stay unlettered until the wagon was scrapped [or taken over by BR post-'48 when a number were repainted completely and given a 'P' number to indicate their private owner origin].
And after coaling and a little weathering...

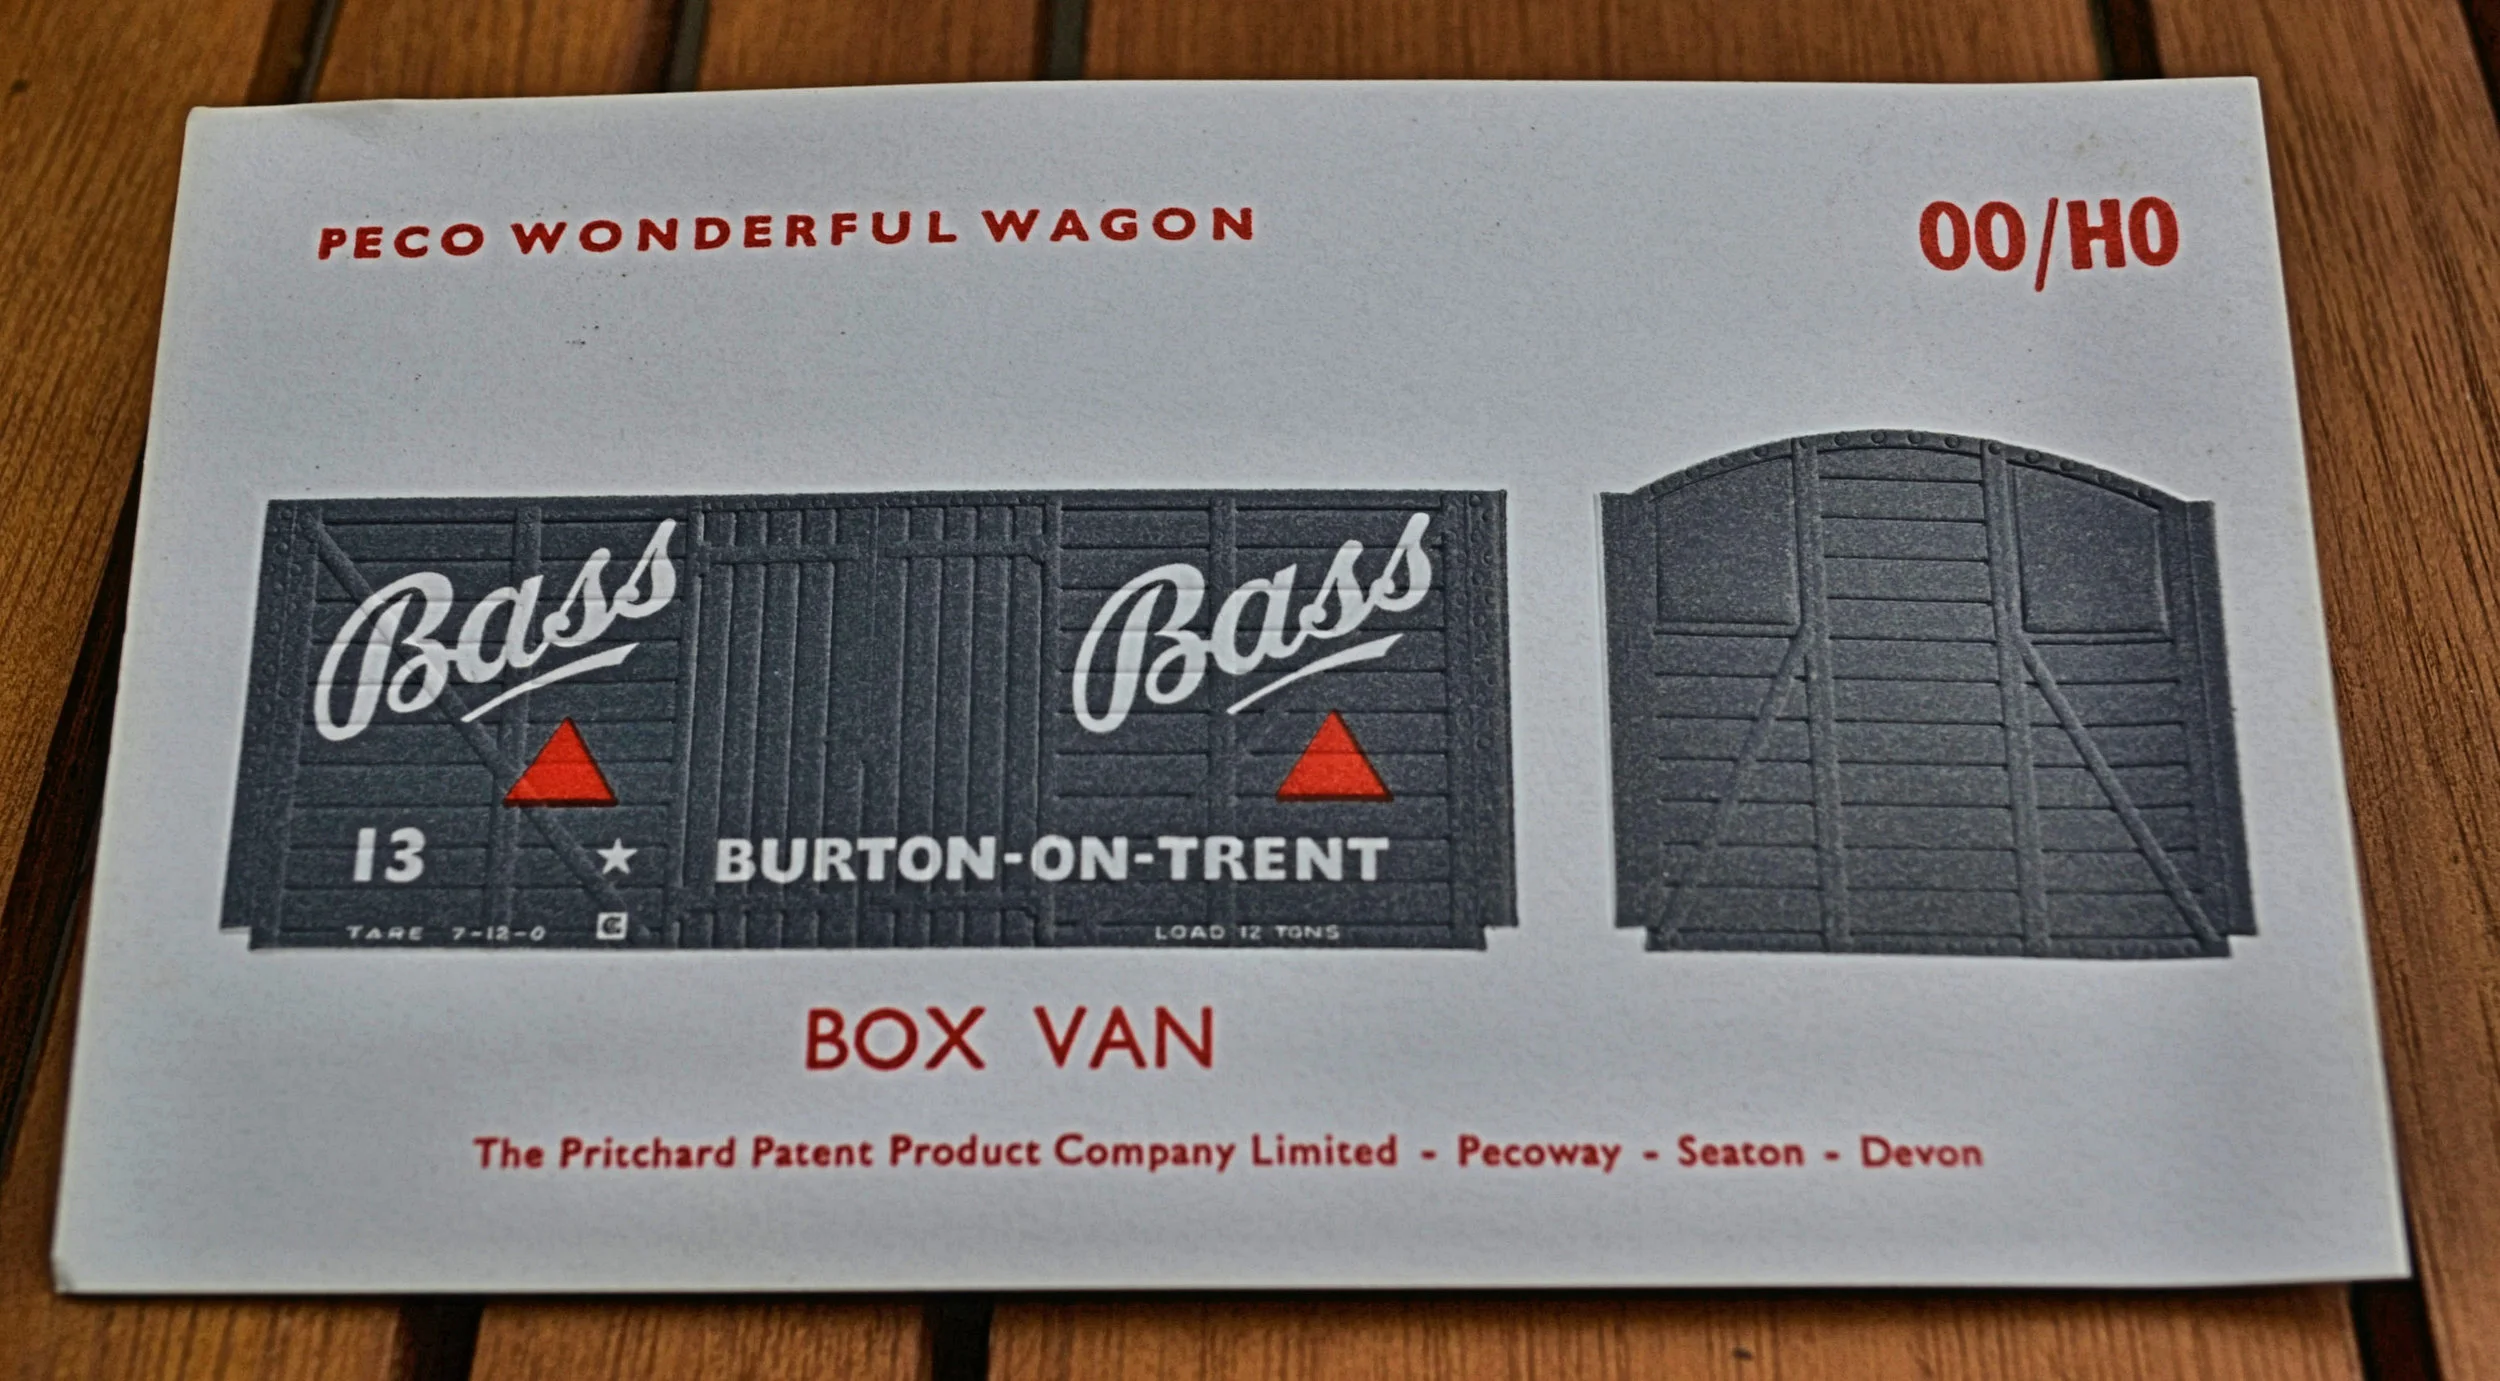
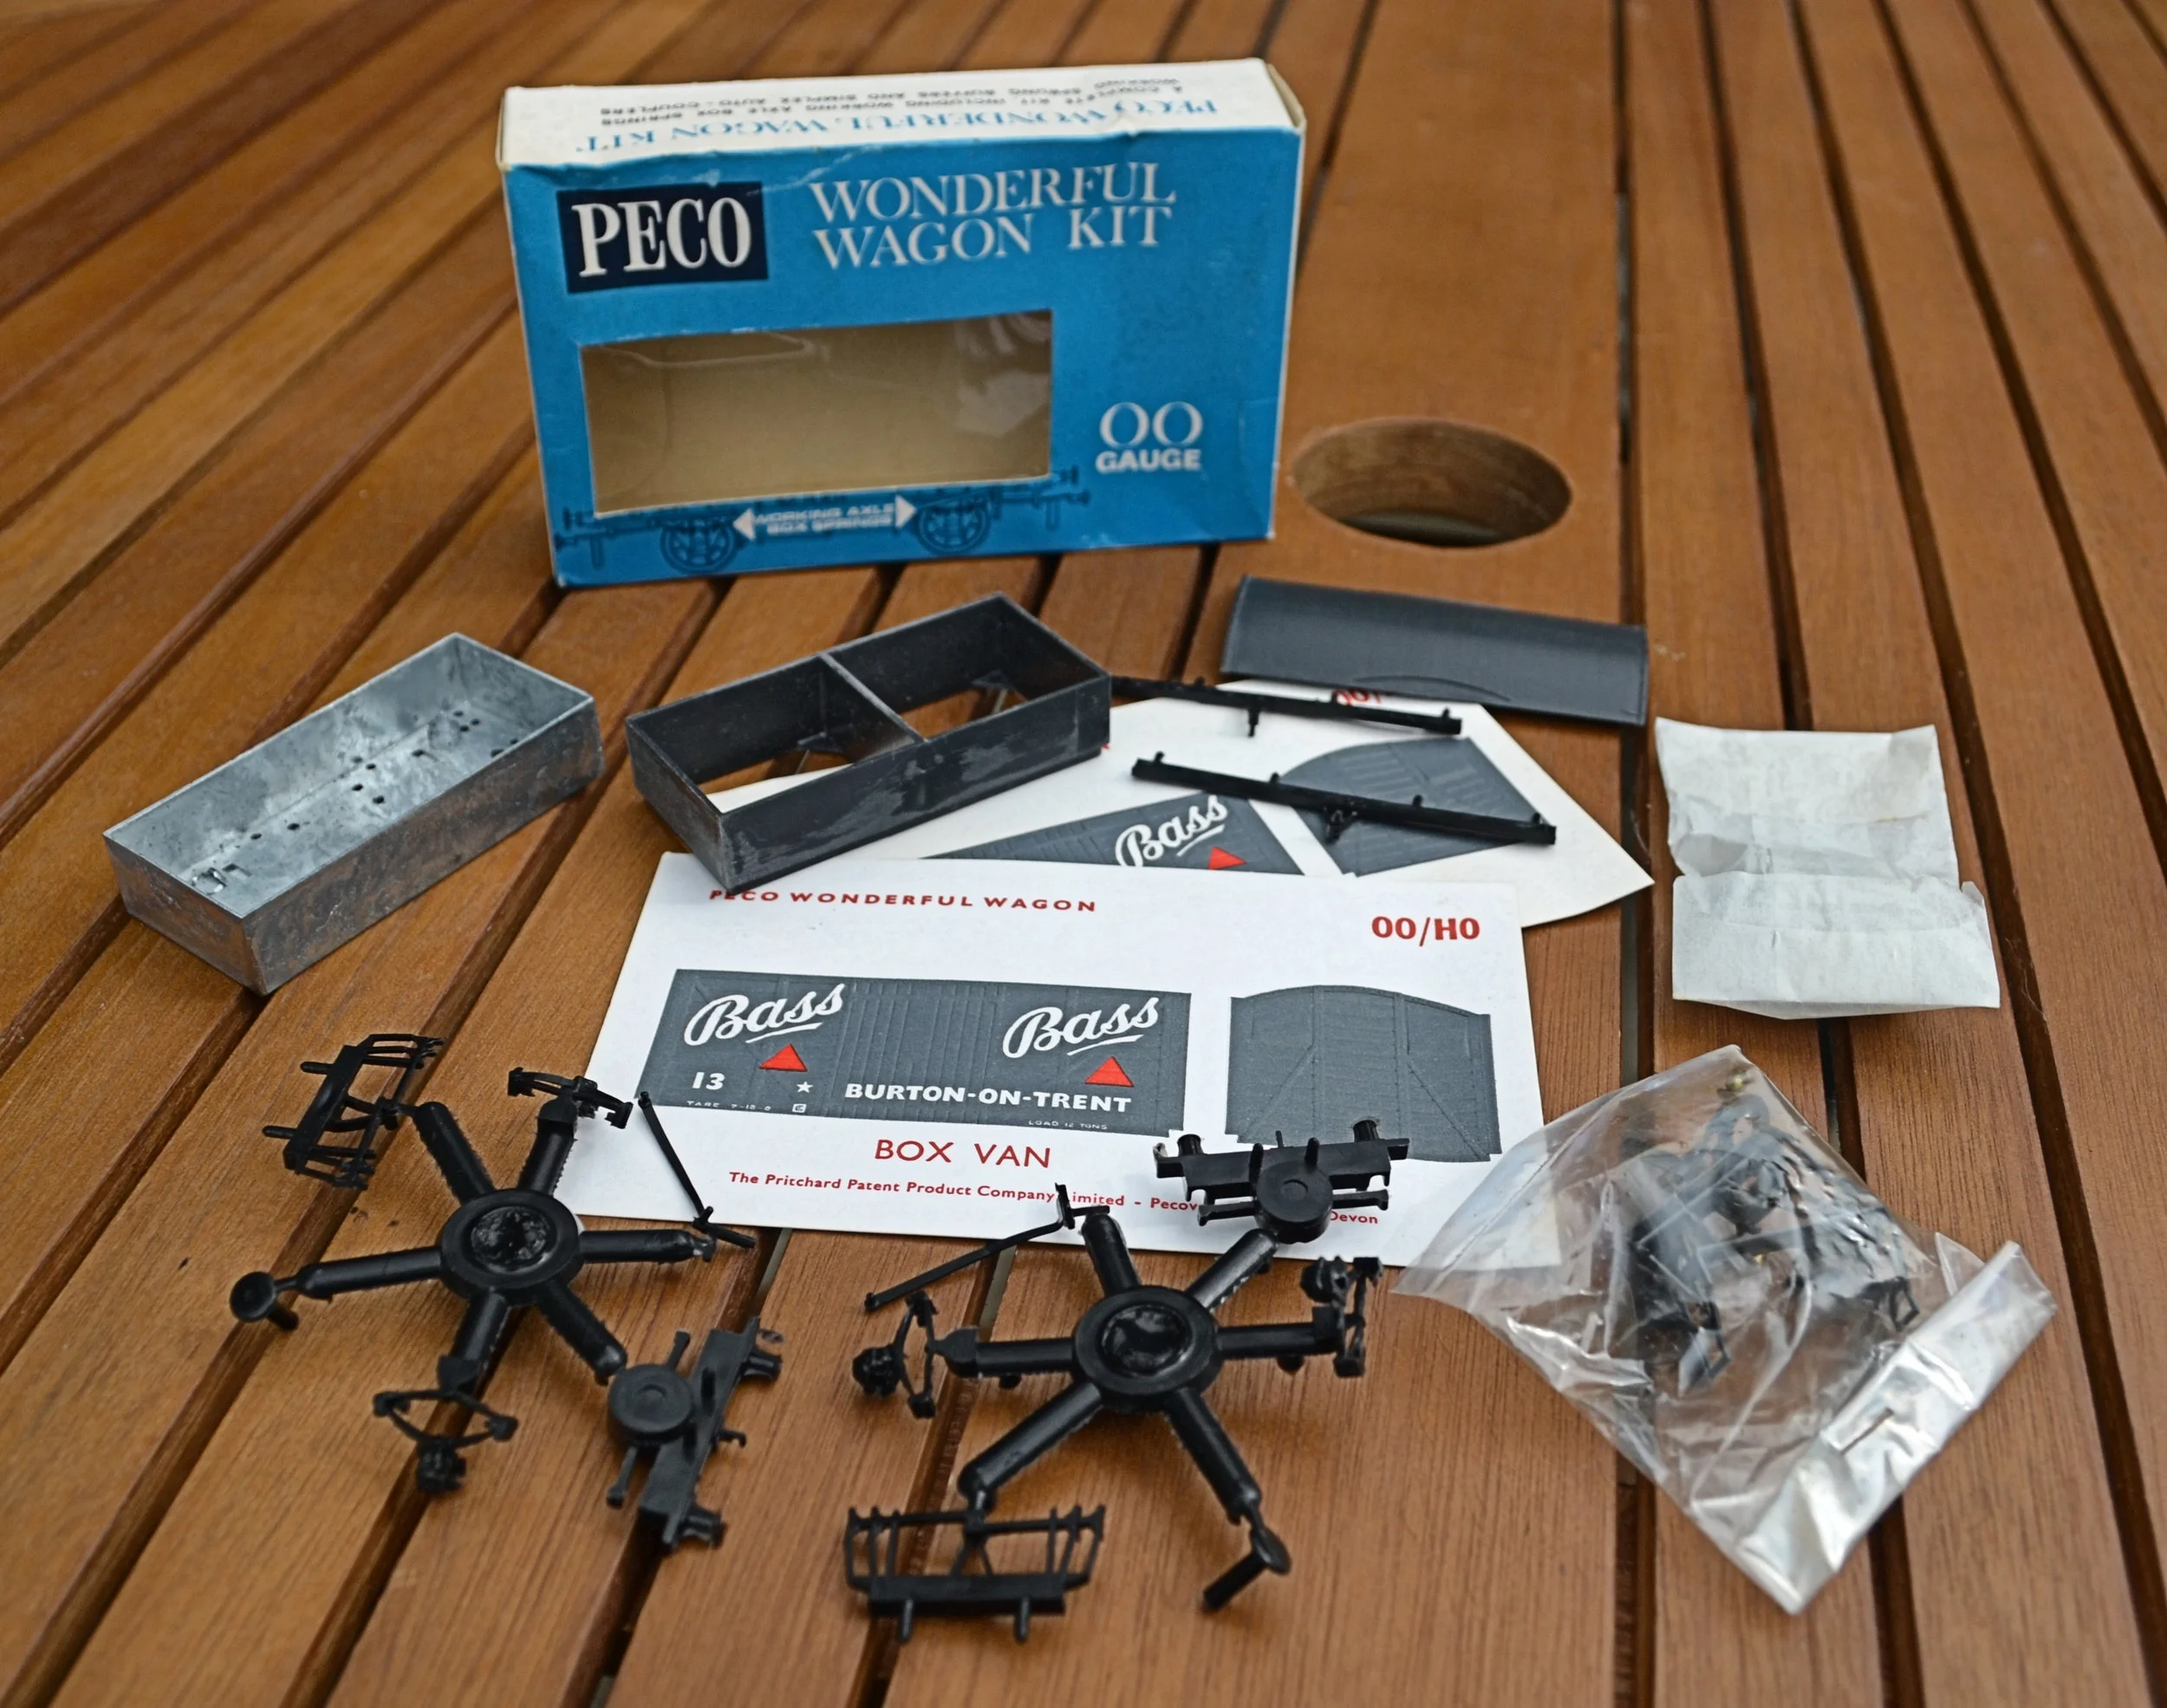
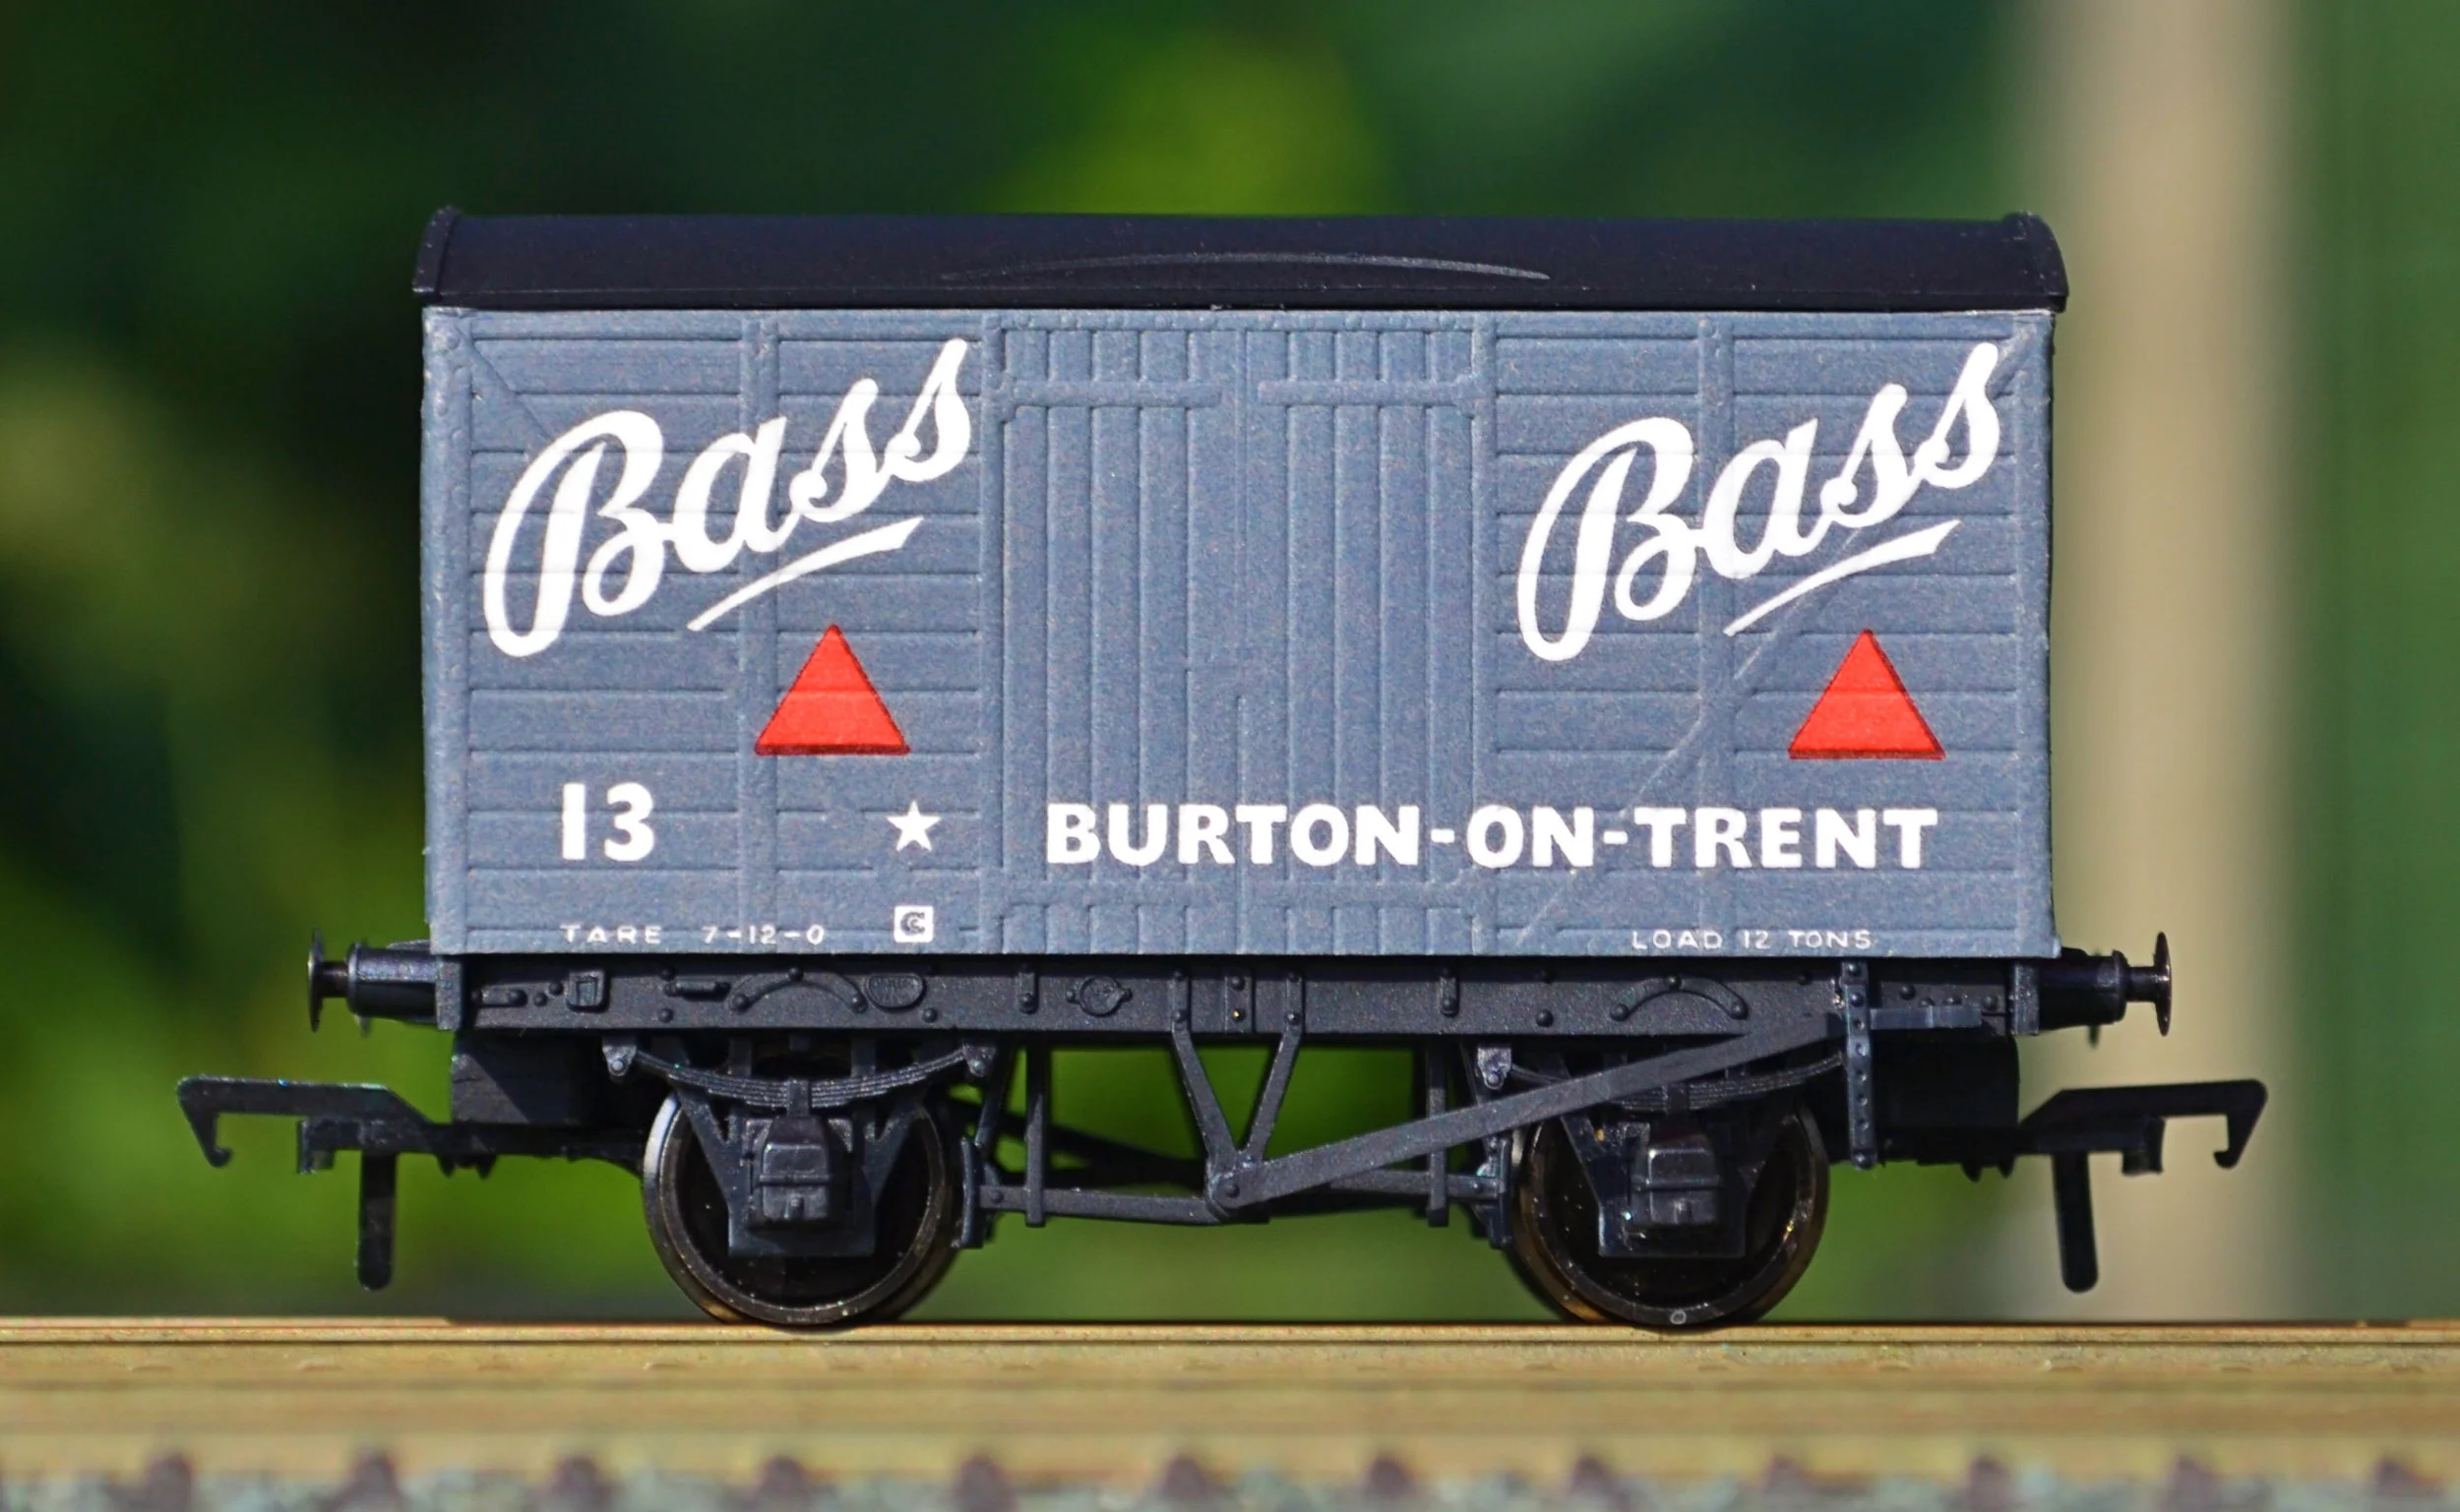
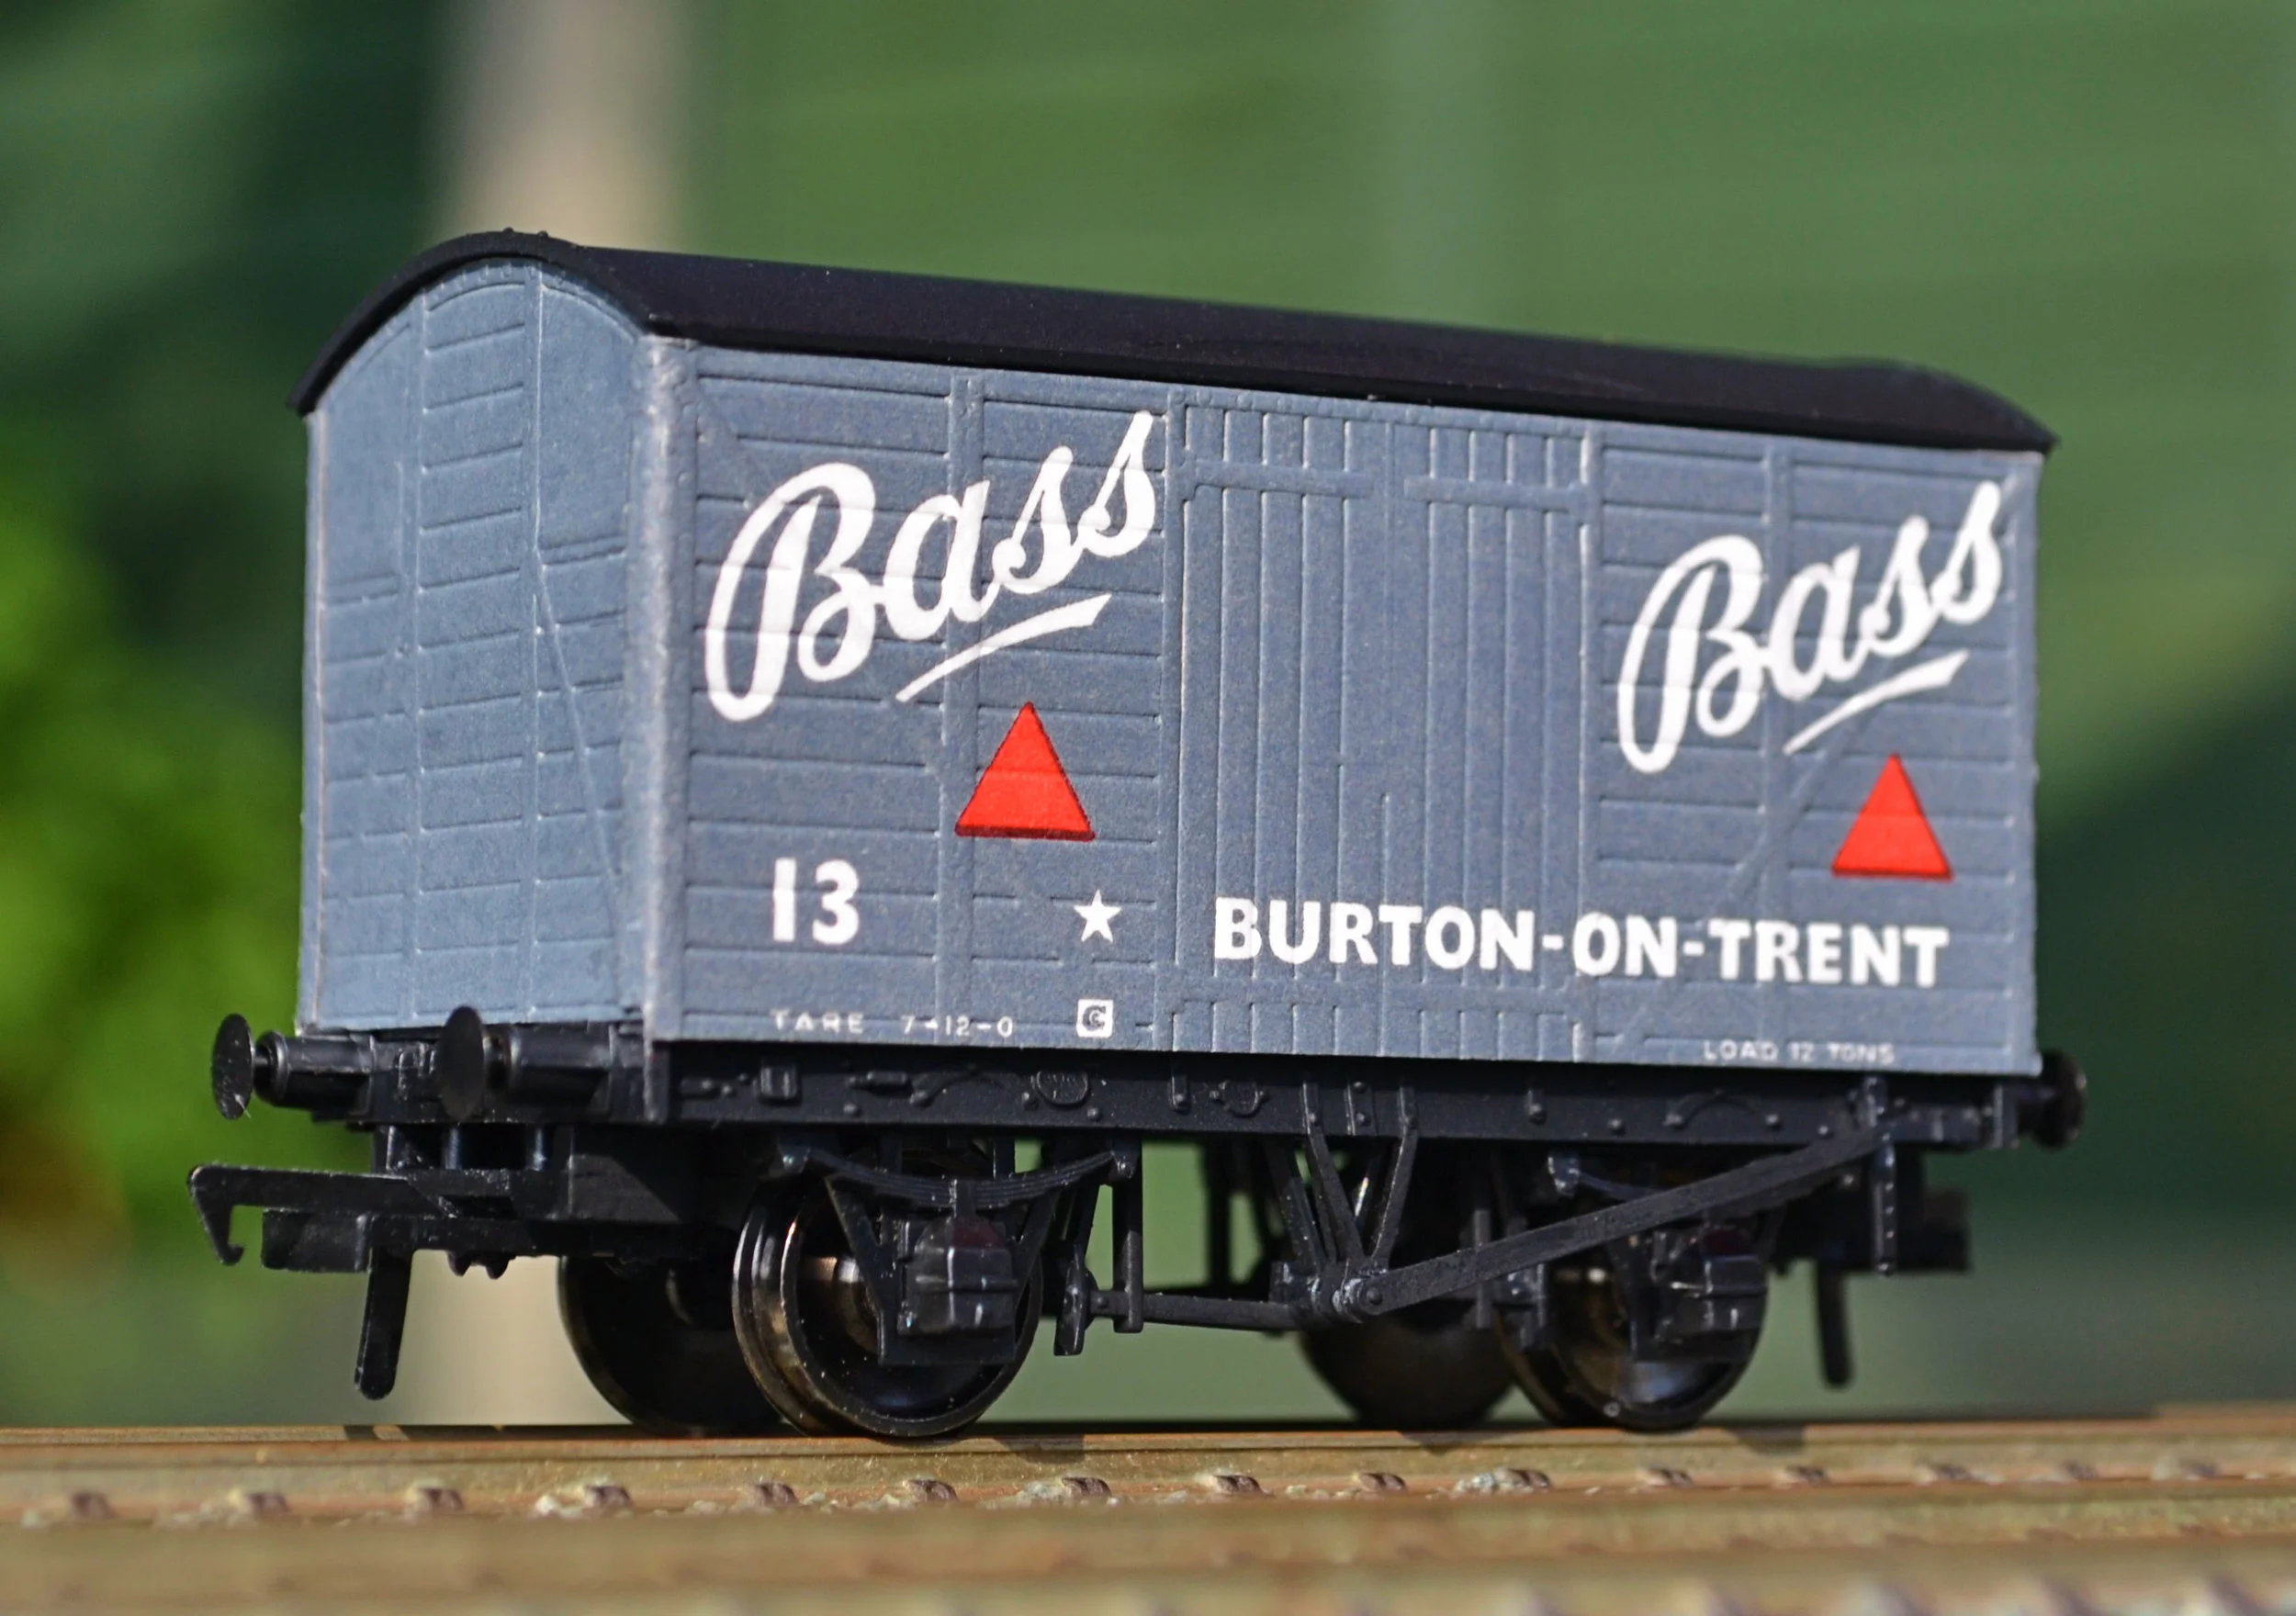
And next it's a Peco 'Wonderful Wagon' experience.....
I'd never built one of these oddities before but if you look at vintage copies of 'Railway Modeller', you'll see train-loads of them, hauled by GEM-bodied Jinties on Triang 0-6-0 chassis, thundering up embankments built of Plaster of Paris and dyed sawdust, passing Biltezi stations peopled by Dublo passengers and screeching to a halt by some overscale Crescent signals. You'll get the idea.
One of the earlier examples of multi-media kits [although Ratio beat them to it with their wooden bodied coaches], it comprises card, Mazak and polystyrene and polyethylene-type plastics. I think that it will require four and possibly five types of adhesive to construct it neatly: epoxy resin, PVA, liquid polystyrene, impact adhesive and maybe some superglue. Built to accept Simplex or Trix-type couplings only, a solution for that had to be found too. The roof is nicely textured.
The white-metal lower body is common to Peco’s trucks and box vans, the latter being built up with a polystyrene insert.
These kits must have been nice little earners for Peco for a while but, I guess, began to fail to compete with increasingly more realistic and to scale Hornby and Airfix products. They are an historical curiosity now but no worse for that.
I'm not sure that I'd build another of of Peco's 'Wonderful Wagons' but this was an interesting if historic exercise: these kits go back to 1954 pretty much unchanged [although the earliest ones had plywood parts for the body and they needed a lot of trimming to fit]. They must have been state of the art once. They are now state of the Ark.
This one runs extremely freely after attention was given to bearings and wheelsets. It did require five different types of adhesive in the end and the fold-around of the printed sides at each of the ends was quite difficult - PVA came to the rescue. The brake levers stand too proud of the chassis really and the buffers aren't quite right either. But for less than a quid.....
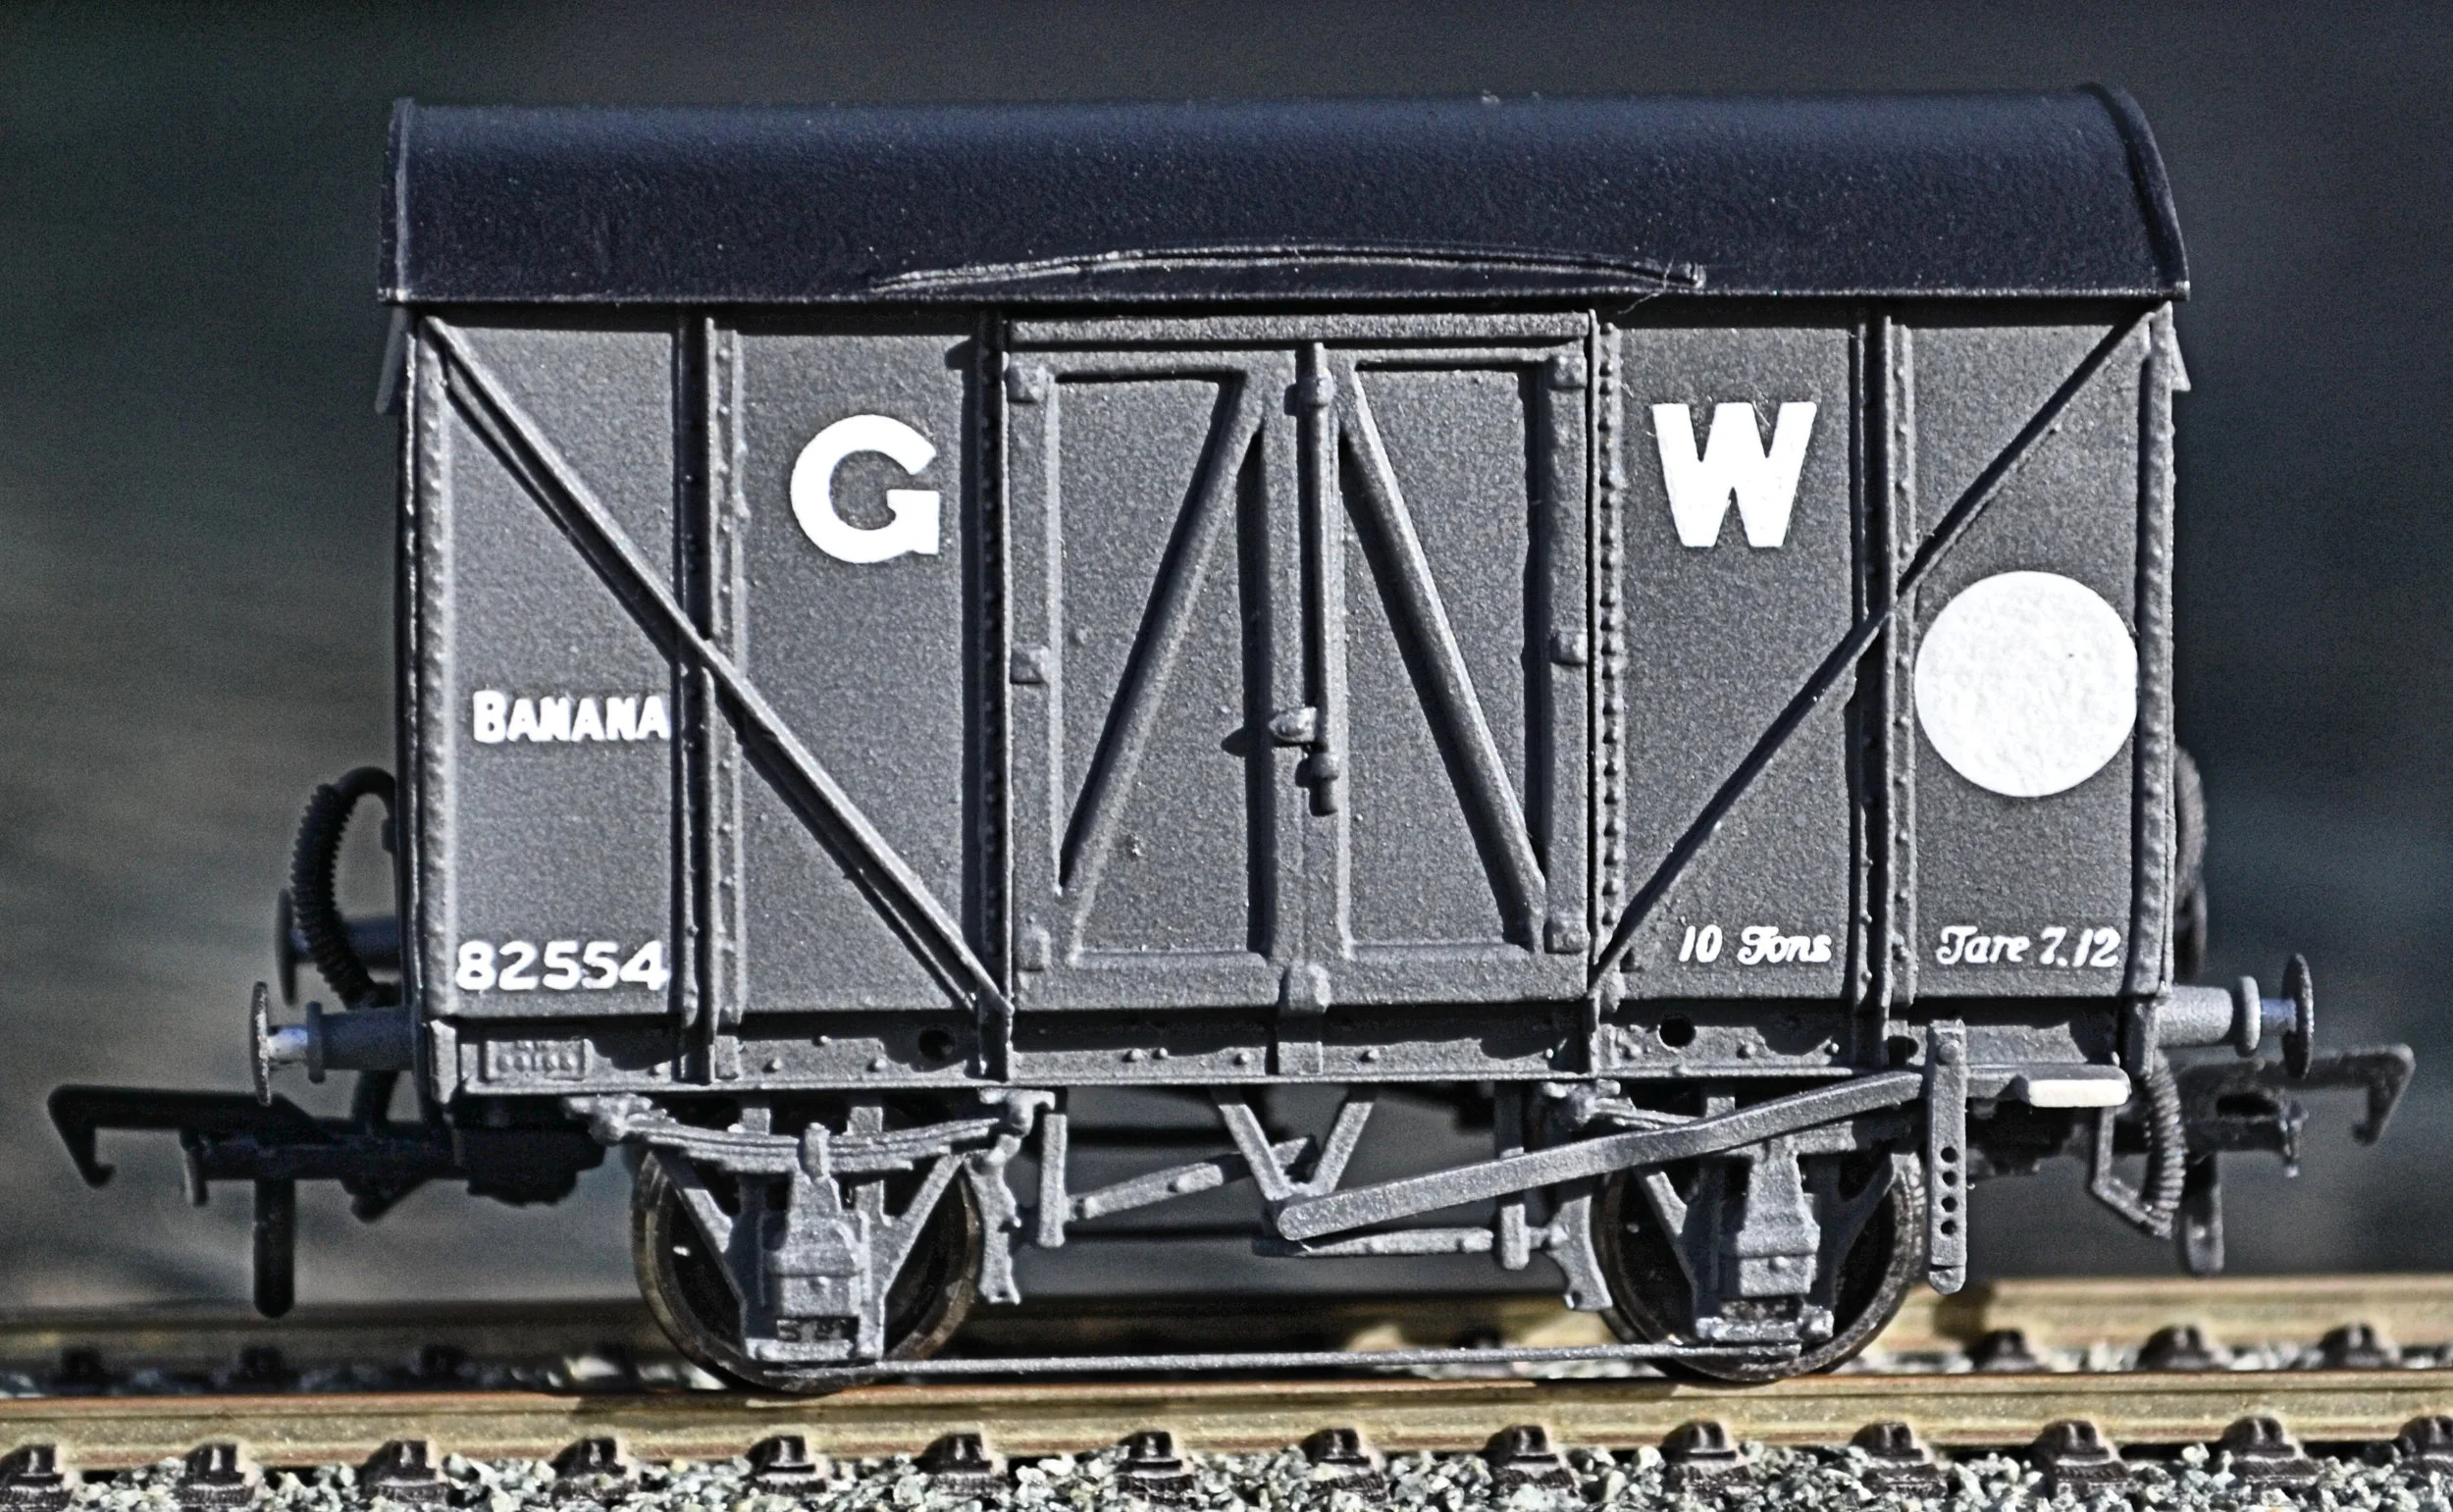
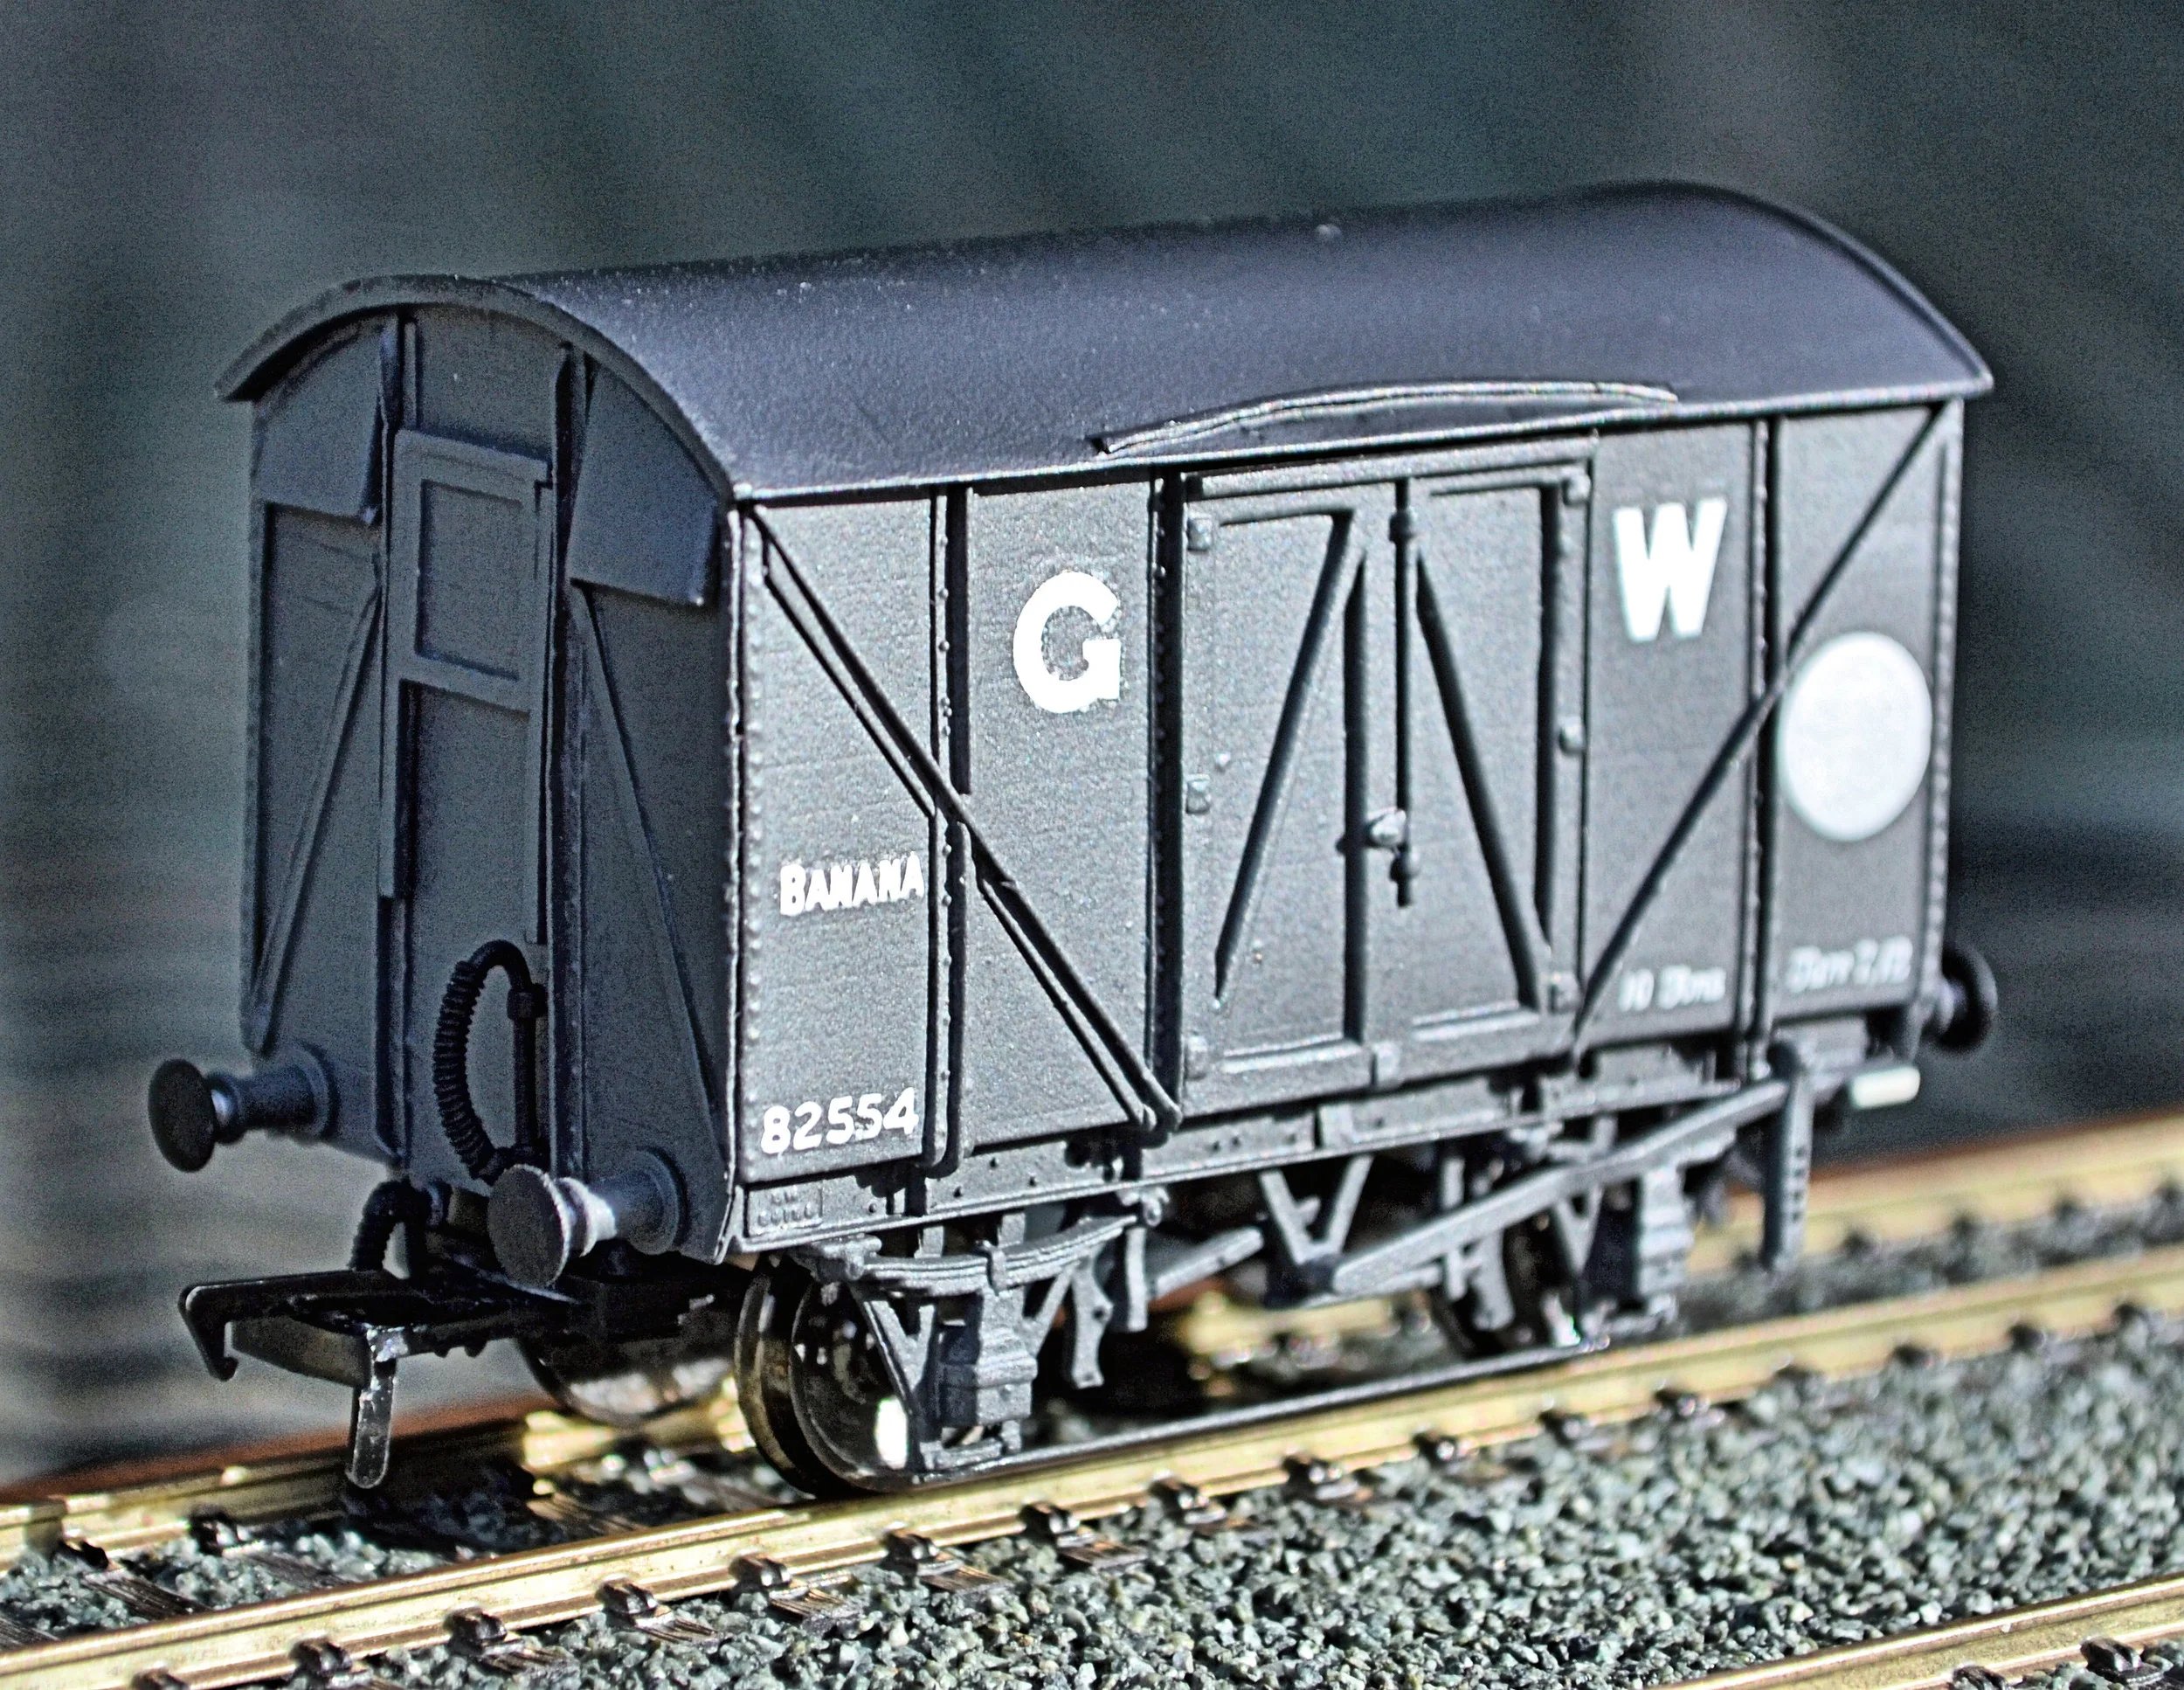
And now another product from the stable of N&C Keyser, a GWR steam-heated Banana Van. Difficult to date but certainly more than 30 years old, I acquired this kit still wrapped in its tissue paper in an immaculate period box. For once, for K's, this kit went together reasonably easily although a truly phenomenal amount of metal needed removing from the roof and the ends required some careful filing and manipulation, too. It is built as supplied although I have added a floor, replaced the wheels [and inserted brass bearings], given it some tie rods and added some pipework. These white-metal kits are so heavy that they always run smoothly as long as you fit bearings and can get all four wheels onto the track at the same time !
Really these should run in rakes I think, but I've no plans to build another. However, I have to admit to enjoying the simple challenges presented by these old K's kits and have another boxed one waiting: an LNER 12 ton box van.
And well, in spite of an earlier intention to never build another Peco ‘Wonderful Wagon’, here is a model of a Worthington brewery van. Actually, I didn’t build this one but I did restore it. Acquired with badly corroded wheels, a broken roof and a detached side, I re-wheeled it in new bearings as described in the Bass van account above, and carefully reattached the side. The other side was not removable and although I was able to clean off some of the excess glue applied by the original builder, it is not quite as tidy a job as the restored side. The roof is another old Peco part and has been cleaned up, painted and glued in place. Bachmann couplings have been attached in place of the originals and the shiny plastic chassis toned down. This van runs extremely smoothly and the sprung buffers and axle-boxes work well.
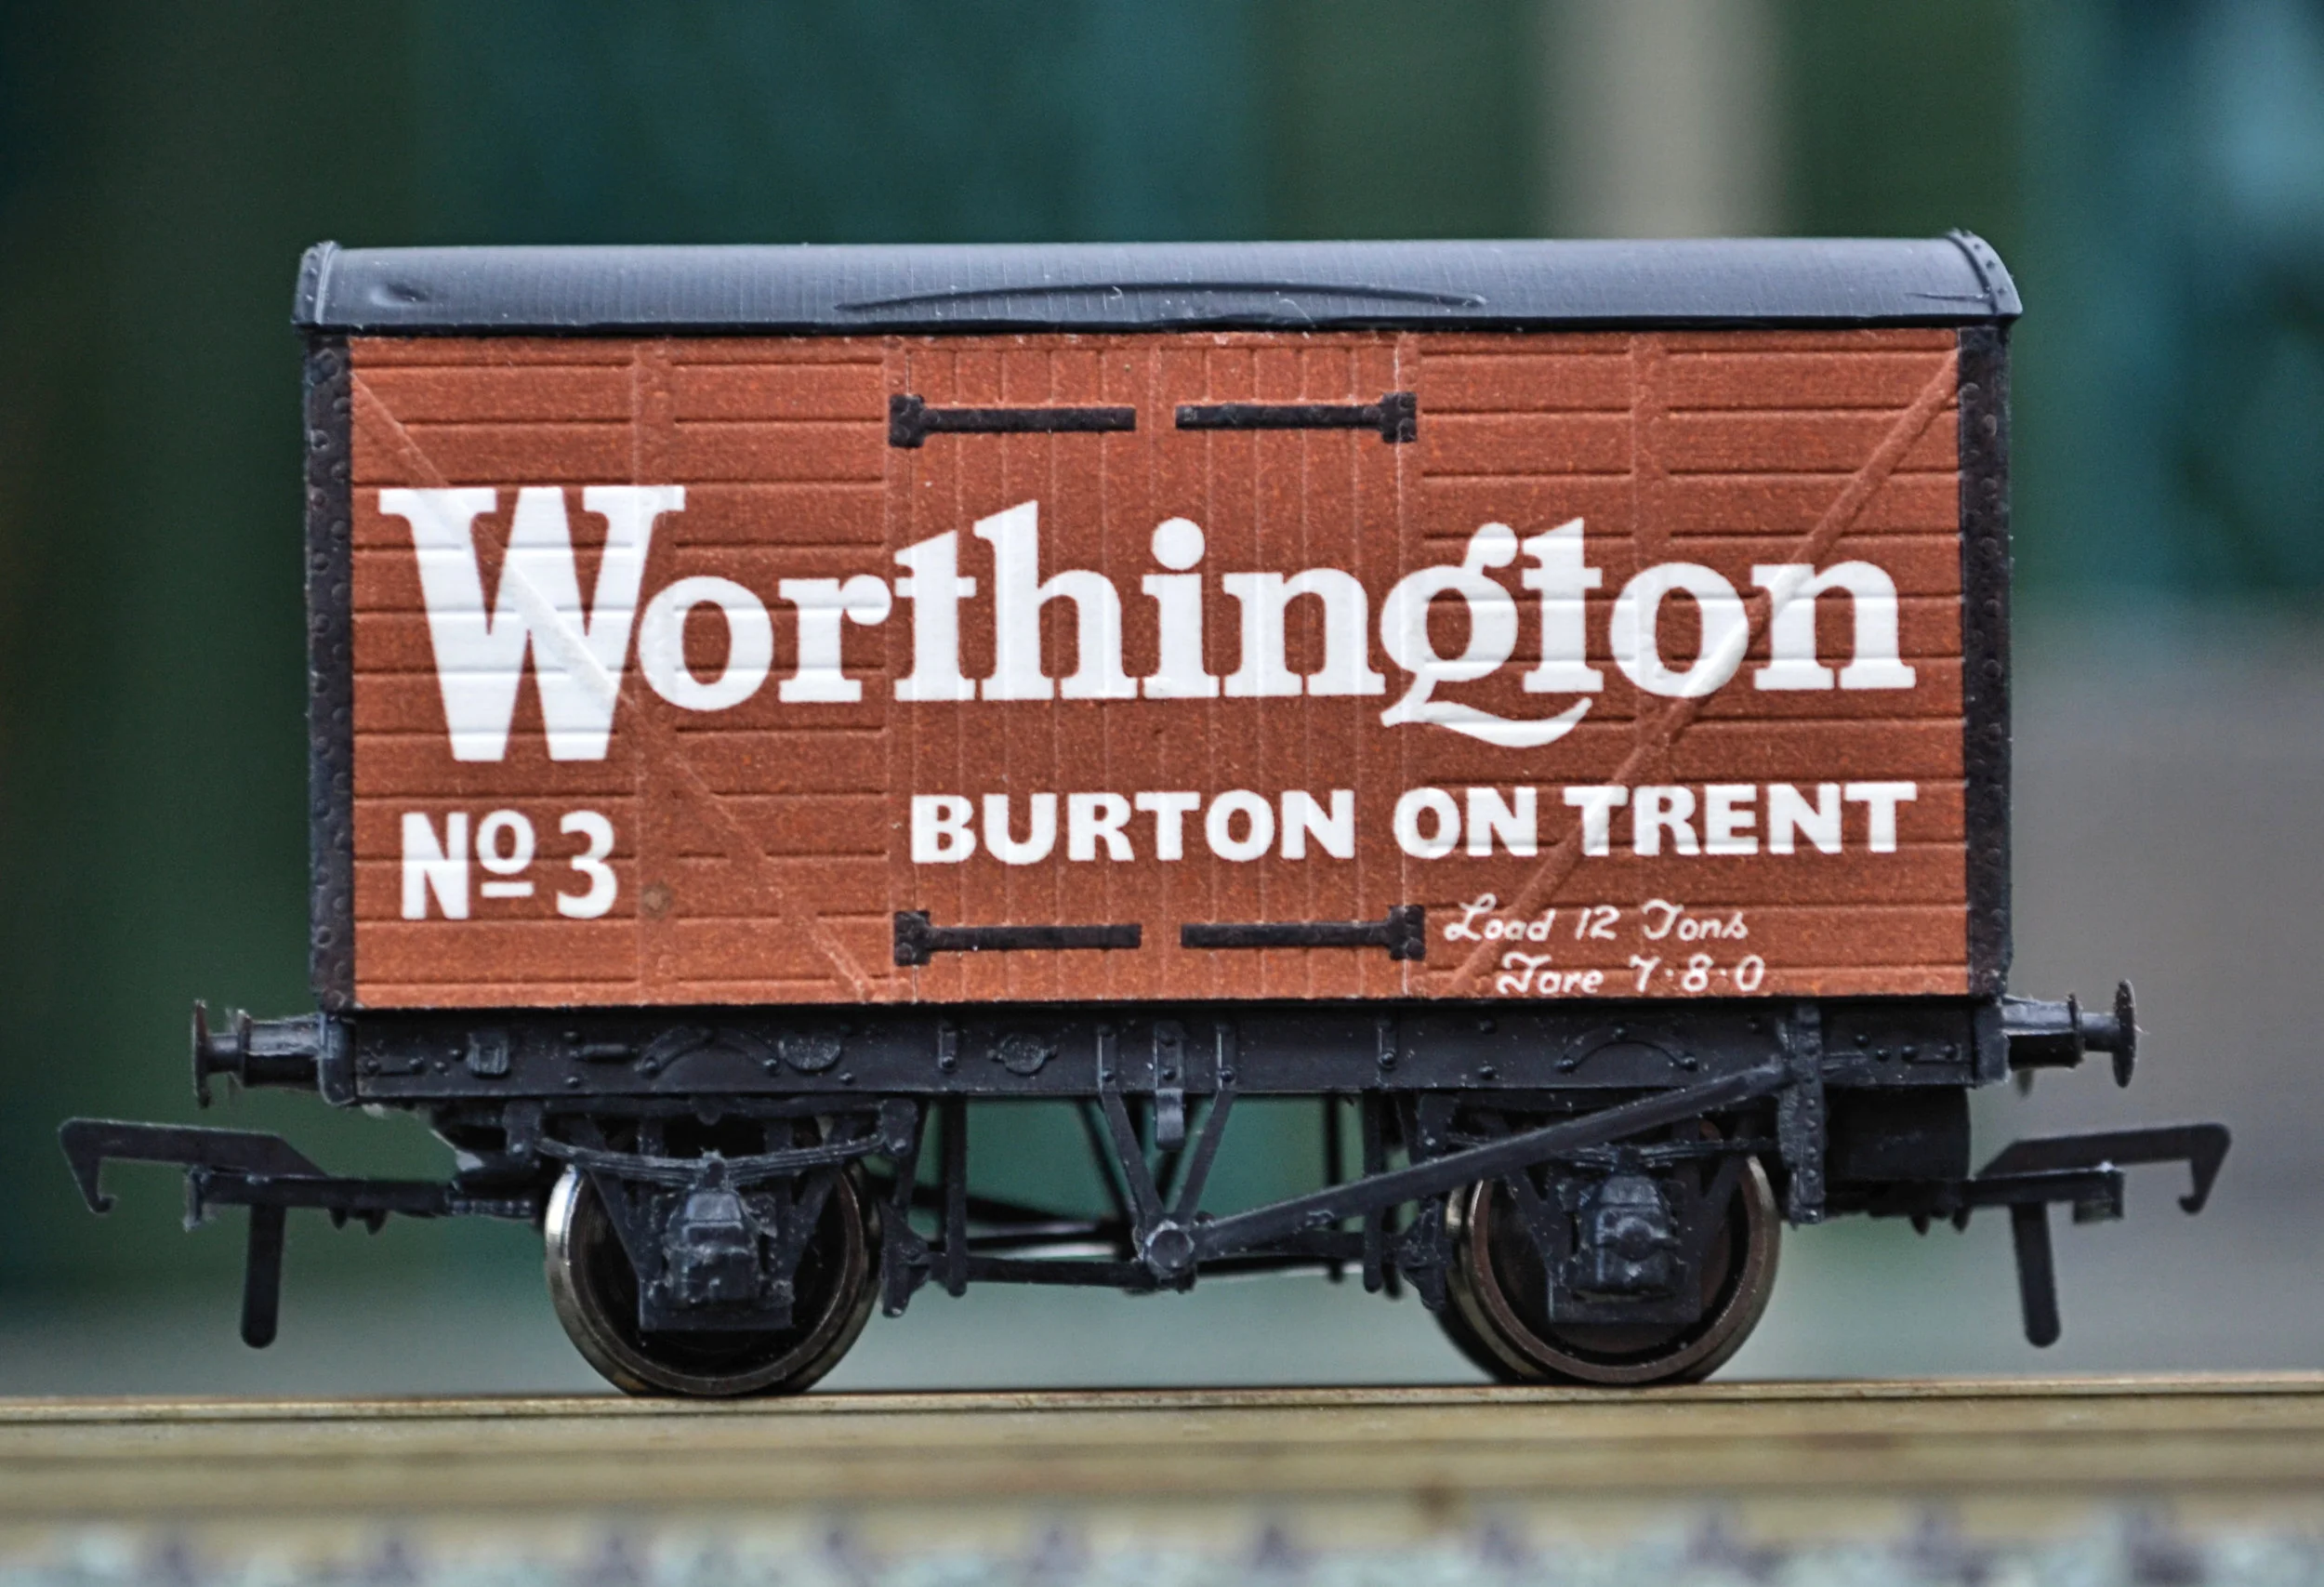

I know that these aren't everyone's cup-of-tea but they have a delightful vintage air and as long as great care is taken in attaching the paper sides, they can look quite convincing. If we don't rescue them, they'll disappear completely eventually, lost to a mass of out-of-the-box replacements.
The usual problem encountered with second-hand Peco vans involves very poorly folded-over paper ends, the original builder having relied rather too heavily on lashings of some ghastly adhesive to hold the fold in place with the consequence that it has leaked out everywhere and spoilt the appearance completely. There's little to be done in those cases [unless you can obtain replacement sides] and I'm constantly surprised by just how bad these bodged jobs are: a carefully scored fold, held in place with PVA, provides a invisible joint.

At the time of writing [late 2016], relatively uninteresting, unbuilt Peco Wonderful Wagons are selling on eBay for £20+, unrealistically over-valued and highly unlikely to sell. Consequently, an opportunity at Warley to pick-up an attractive and local Lime Wagon, boxed and unbuilt, for £4.50 was eagerly pursued. One can see from the box art that this was an earlier Peco release although I cannot say with certainty when it was produced. I’d guess at late ‘60s / early ‘70s however.
The kit went together moderately easily, runs very smoothly and its sprung buffers work well. In this instance, the 'working axle box springs' was a bit of a fib however and I could not get them to work satisfactorily, probably a consequence of the punched metal W-irons being slightly too thick and the openings too narrow. No amount of filing remedied the problem but no matter though, and yet further proof that 'old' does not necessarily mean 'consign to the bin'. The embossed card overlays were not all that easy to apply either, and the gable-ends required a great deal of careful cutting to achieve a snug[gish] fit. The crude wheels supplied with the kit were disposed of and new metal units were inserted in their place, running in brass top hat bearings.
So, was it worth the effort ? I'll let you decide, but remember, it only cost £4.50...
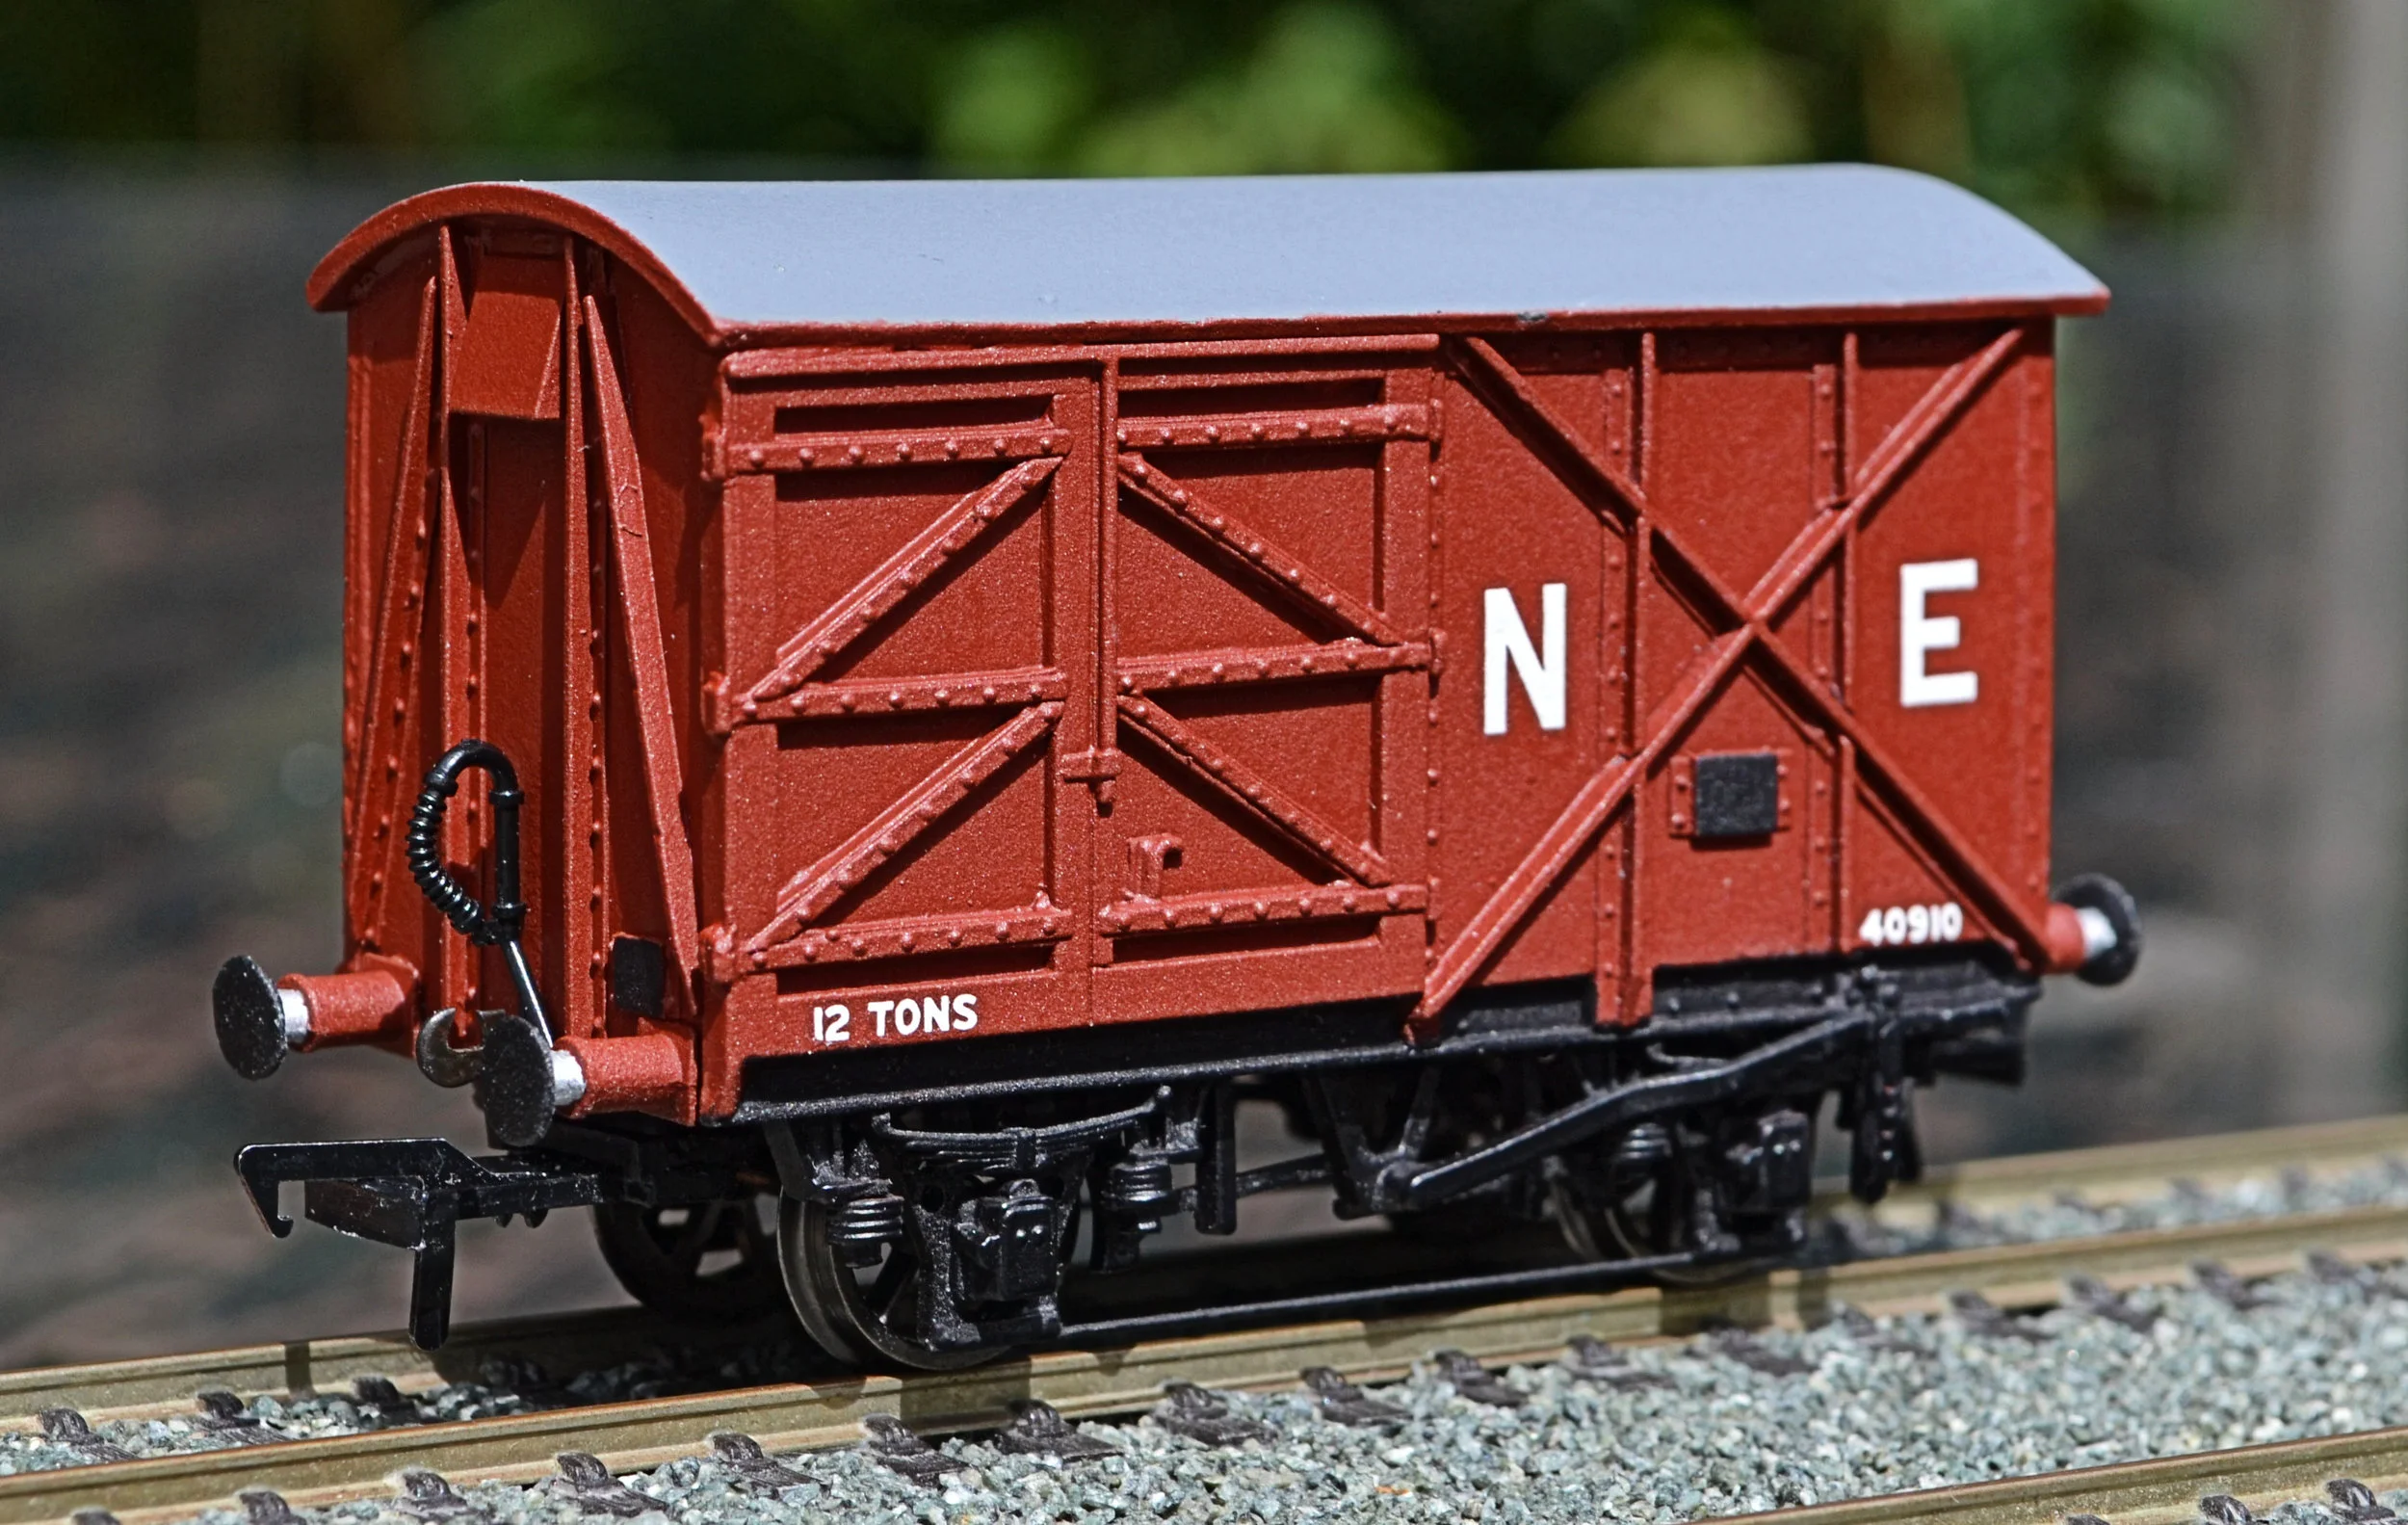
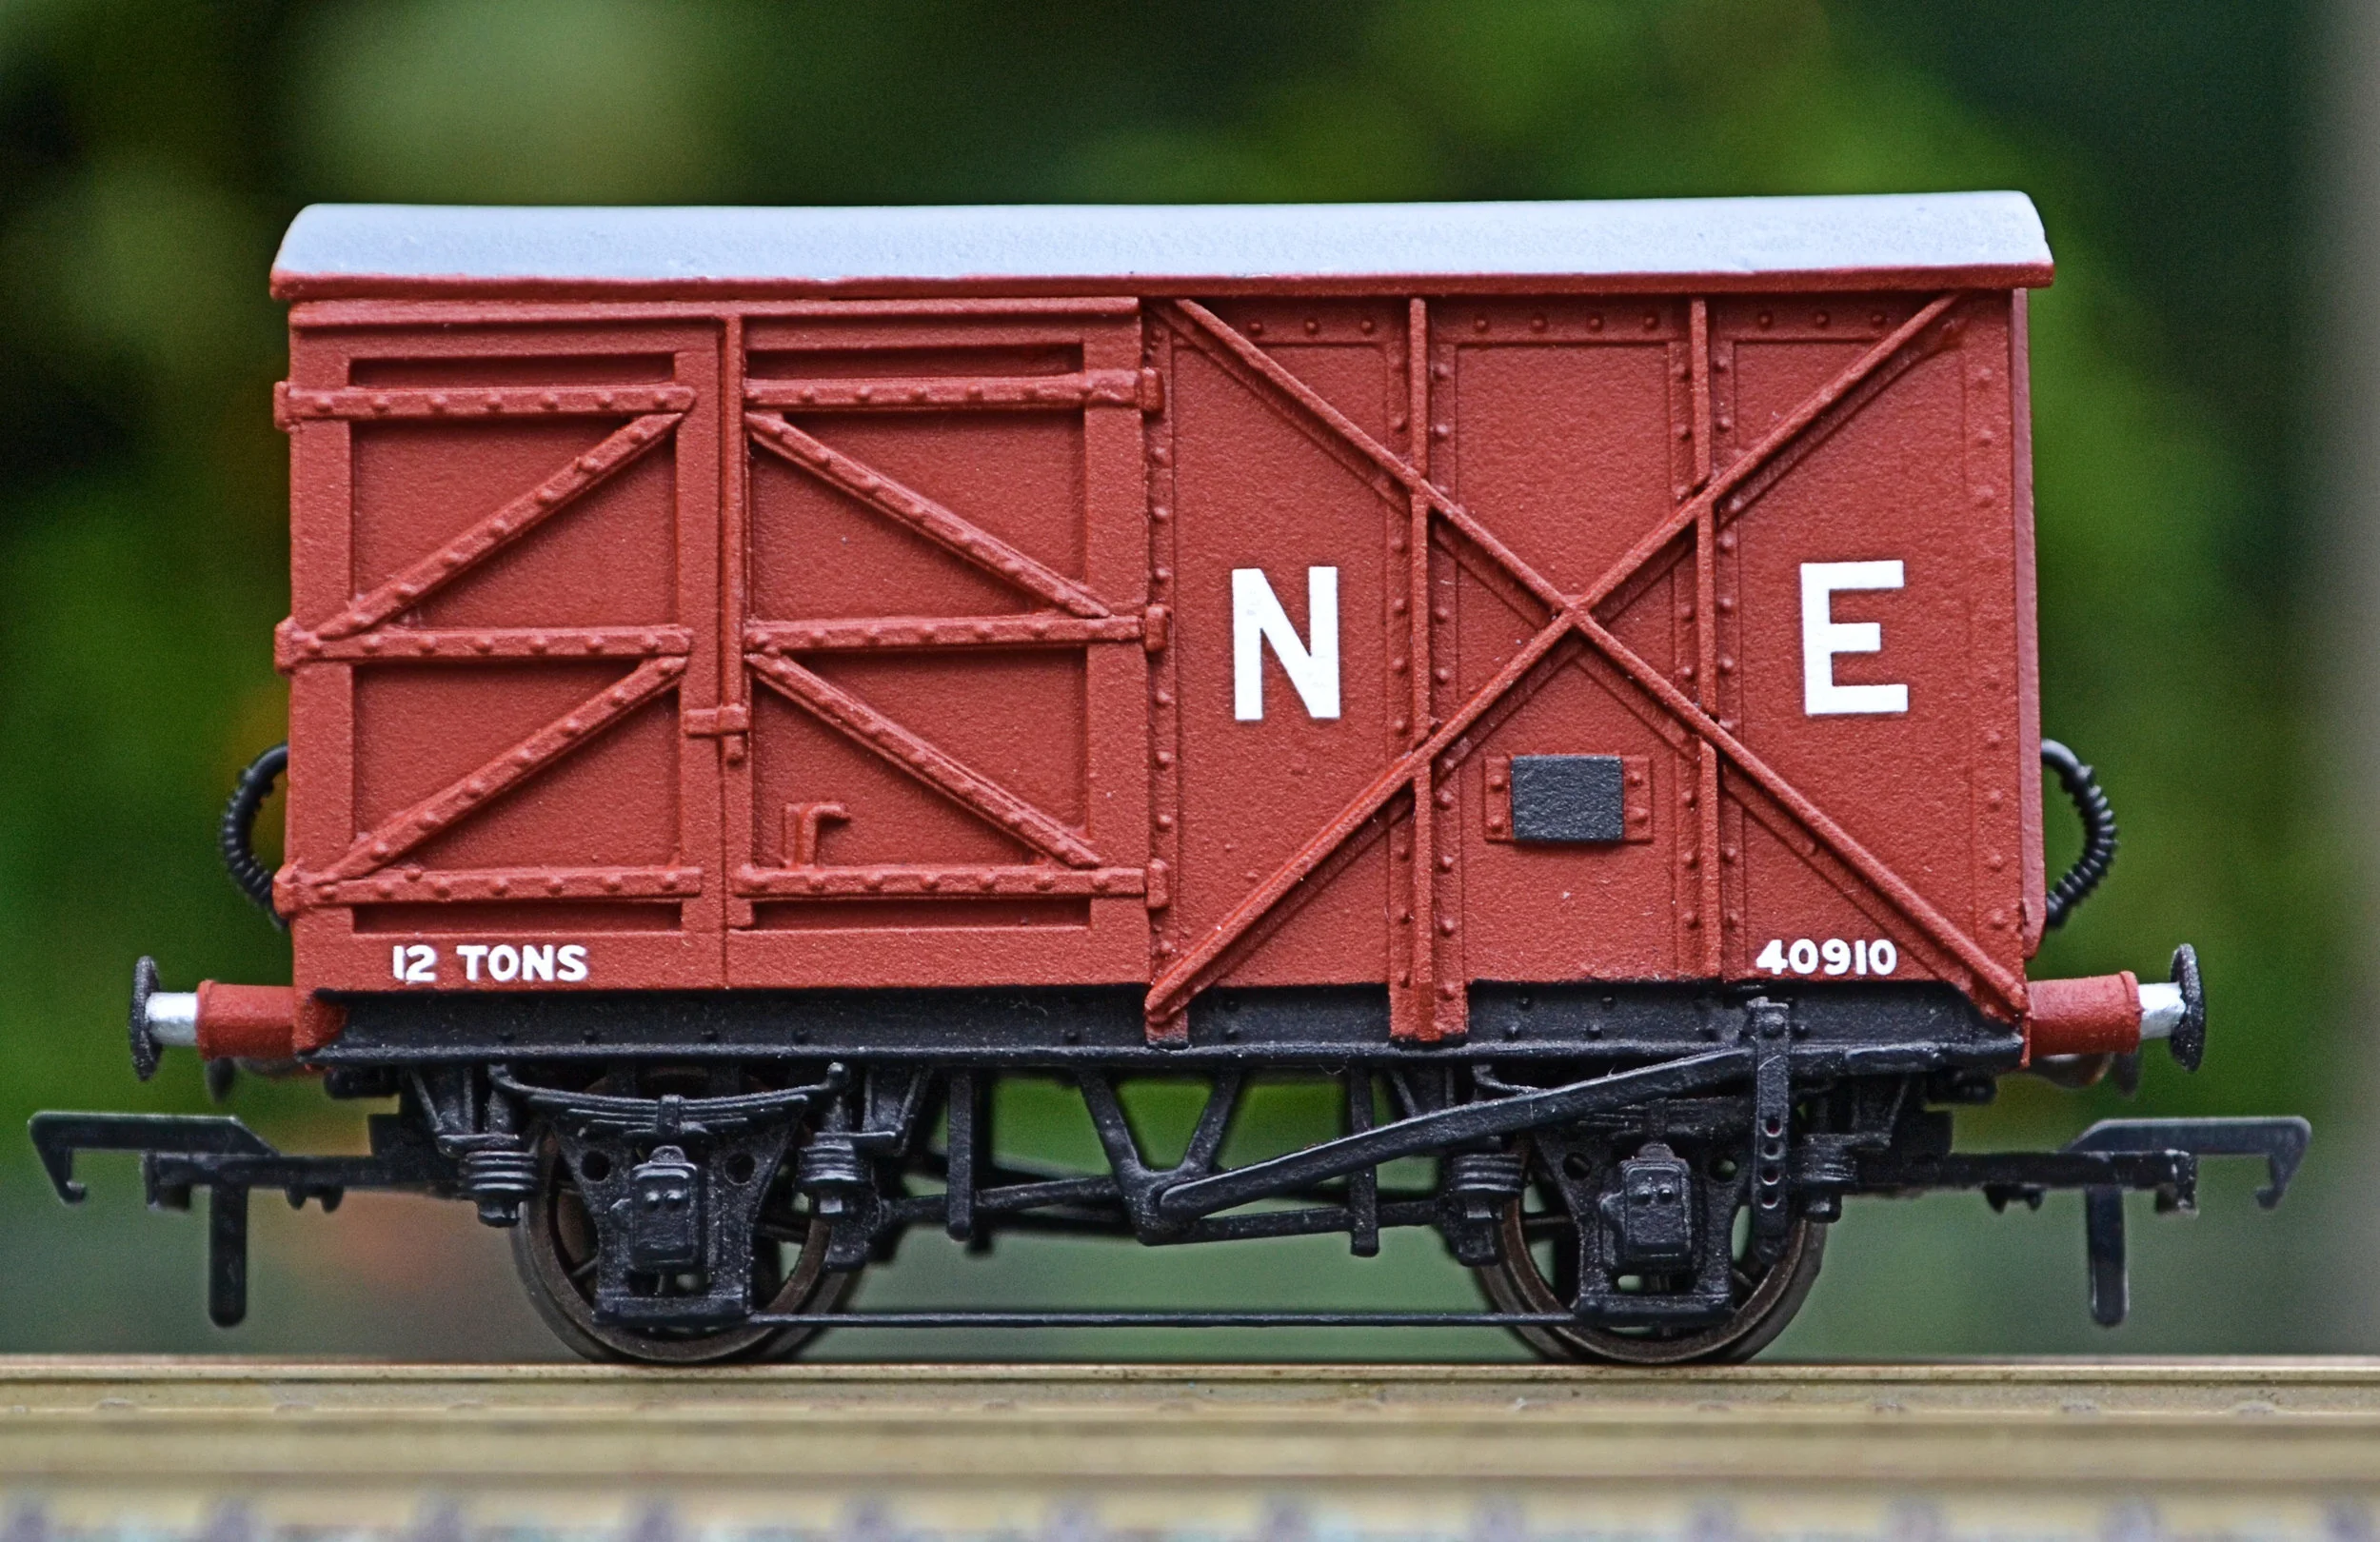
The van opposite is yet another of Messrs N&C Keyser's white-metal goods vehicles, this time an LNER 12T box van with vented corrugated ends, built to Dia. 102. This 30+ year-old kit went together extremely easily and I think that it must have been one of the earlier examples as the castings were very crisp with almost no flashing evident. As always, I have fitted a floor [I just don't know how these could be built 'square' without one], tie rods and replaced the traditionally awful wheels which came with the kit with some Alan Gibson ones, running smoothly in brass bearings.
The van's running number is prototypical. The underframe is not, I fear, but it is still quite nice.
I have to say that I have really developed a liking for K’s kits. There is huge, in fact colossal, satisfaction in assembling or restoring these old offerings to create something akin to at least a silk-ish purse from the proverbial swine’s ear. It's a great shame that good restorable or unbuilt examples of K's goods stock do not become available at sensible prices more often. This one was bought via eBay for £6, post free. An absolute bargain.
In due course, this model will receive an additional coat of matt varnish to reduce the satin sheen further.
This van can be seen in its unmade state at the head of this section.
Very much a break now from goods stock, and a re-build too, of a model I first constructed over 30 years ago. It is a Ratio kit [still available] of a Midland Railway Clerestory Brake. I originally painted this in LMS maroon but dropped the model soon after and set it aside for a decade or so. It was later re-built and painted in GWR 'Shirtbutton' livery and ran briefly before, again, being set aside. Recently I took it apart to reassemble it more neatly and chose the late '20s GWR livery with a weather-beaten finish. It runs with an improved Triang Clerestory Third as a partner, masquerading as an absorbed coach taken into stock by the GWR at the Grouping: not entirely implausible really [although those windows are a bit of a give-away....].
These Ratio kits are easy enough to build although the bogie components are quite fragile until fully assembled. It runs on metal wheels [essential really, never use the awful plastic offerings that come with these kits] and has been weighted as it was quite light.
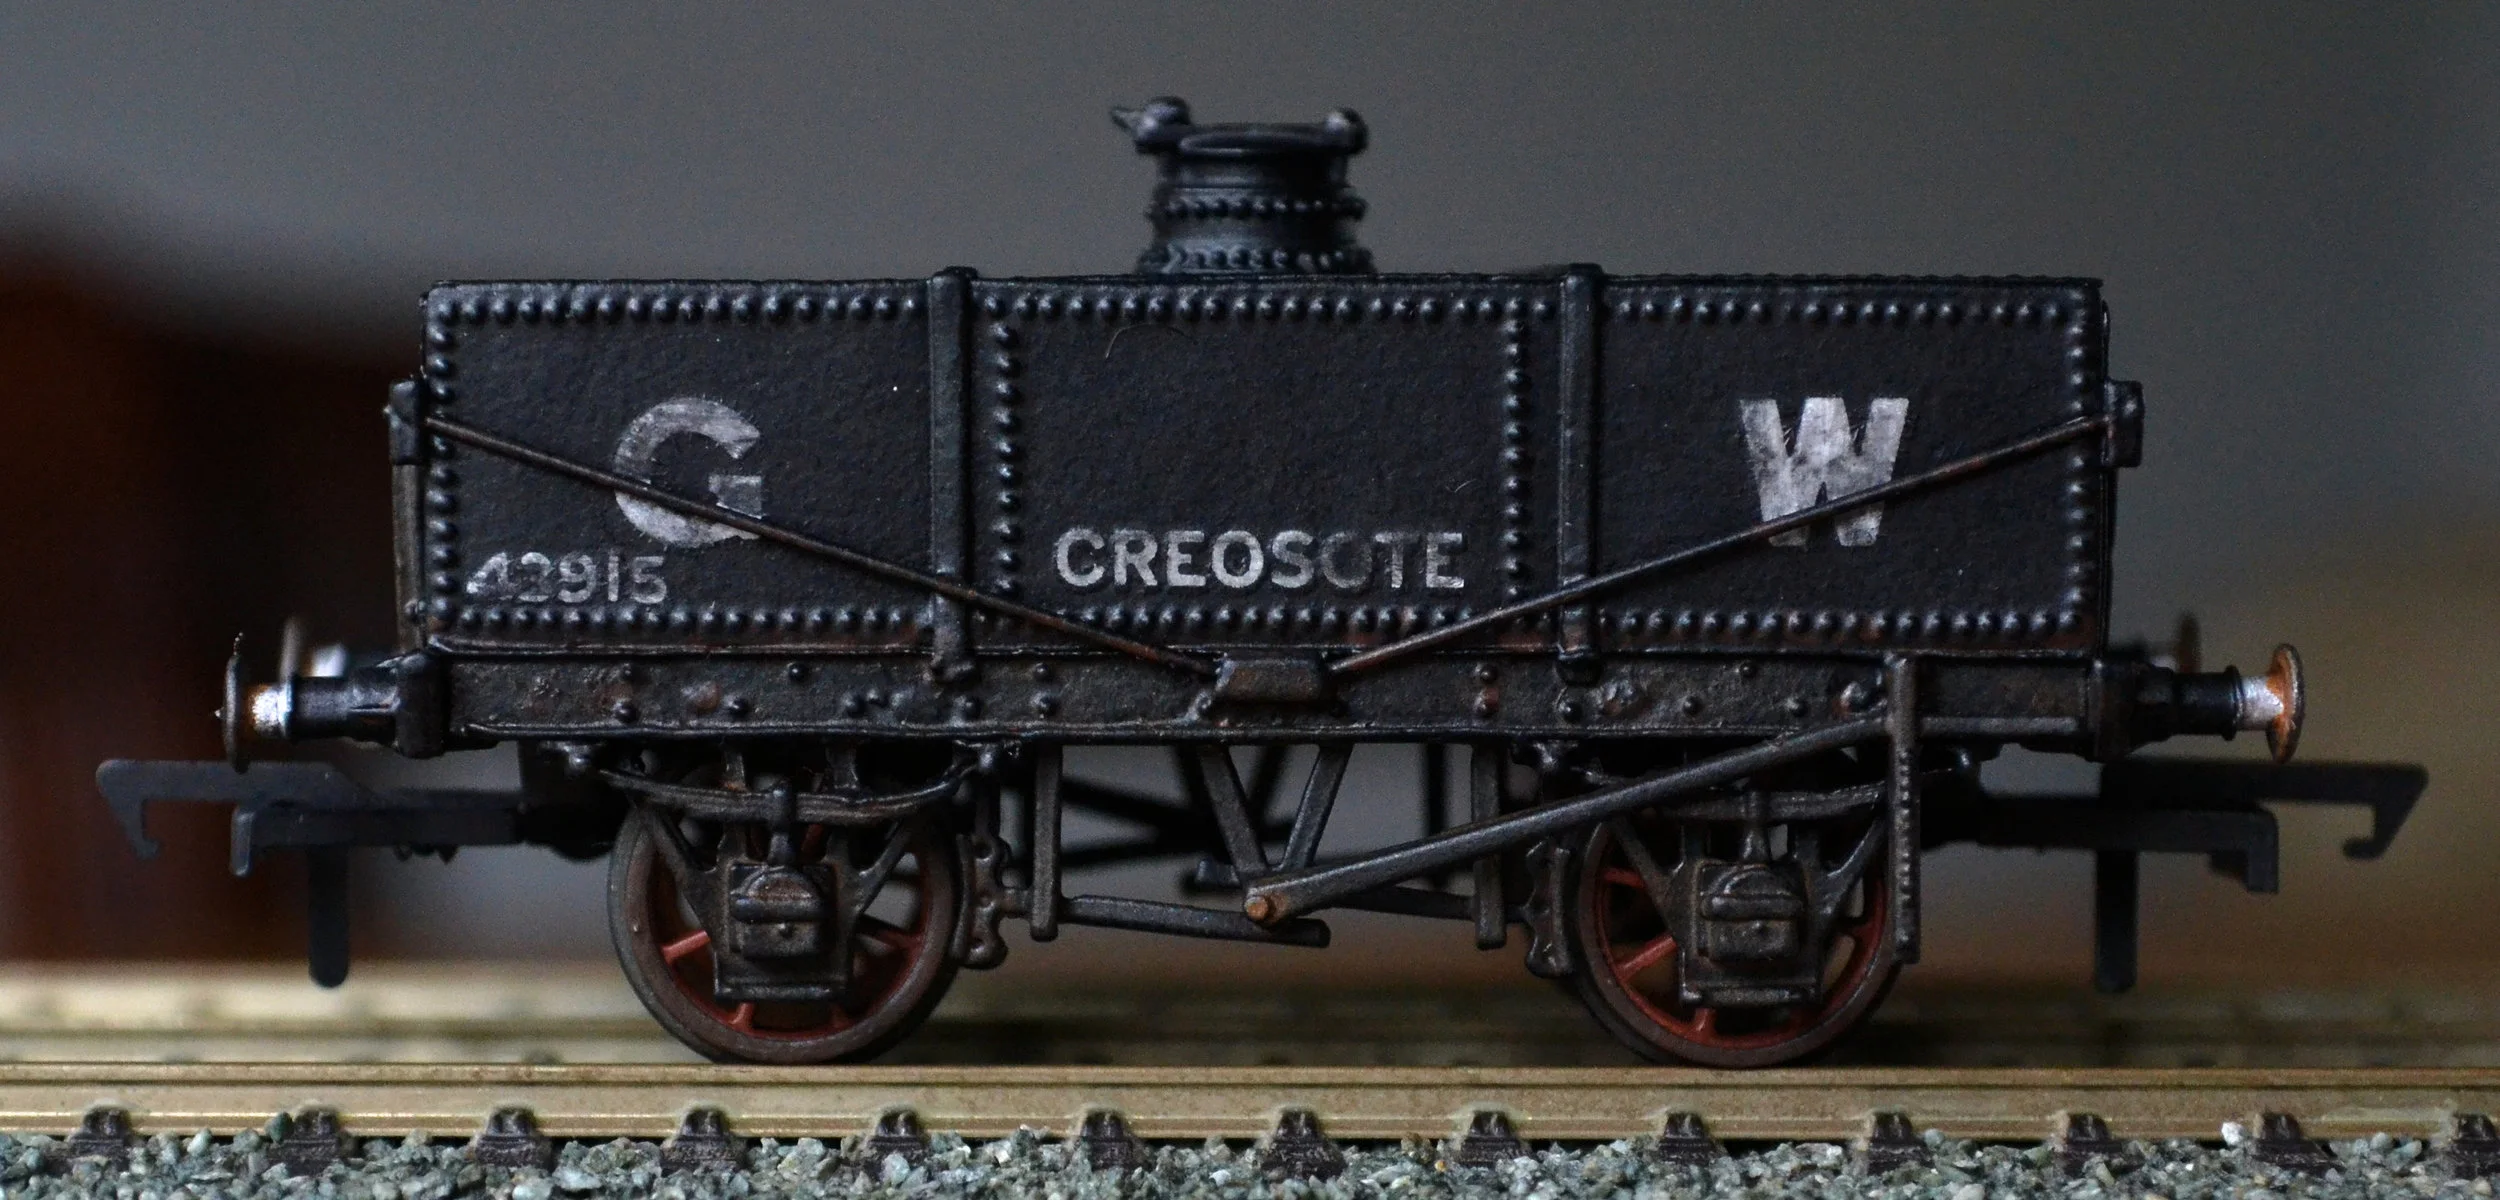
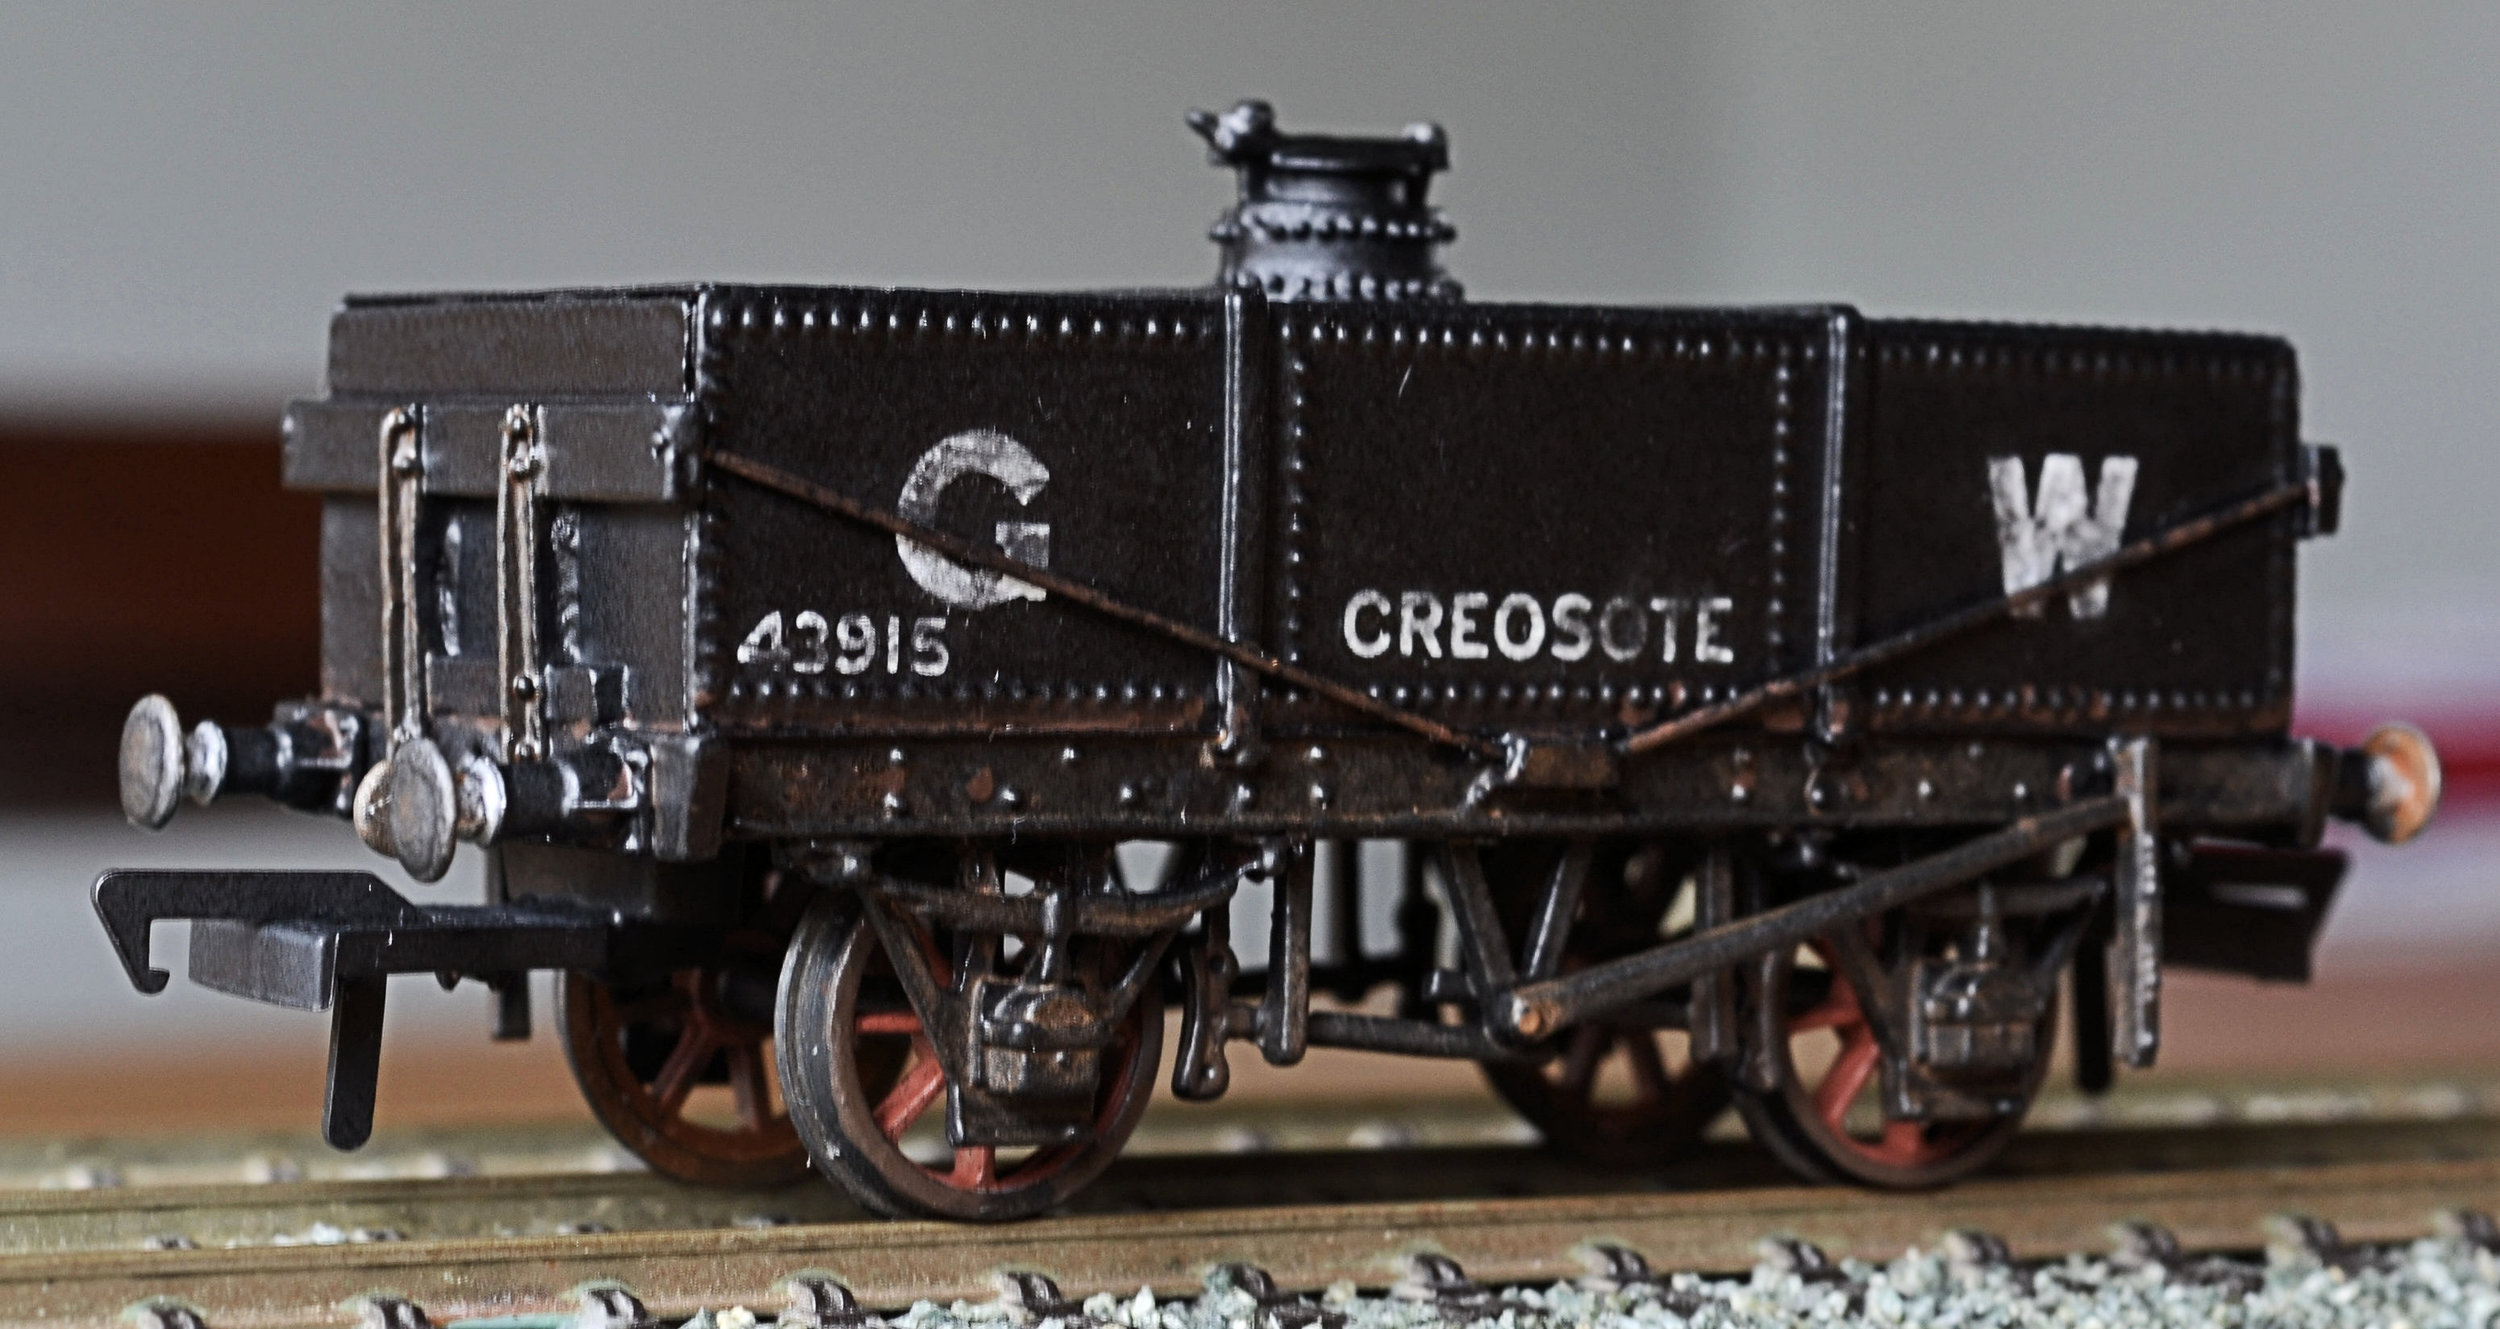
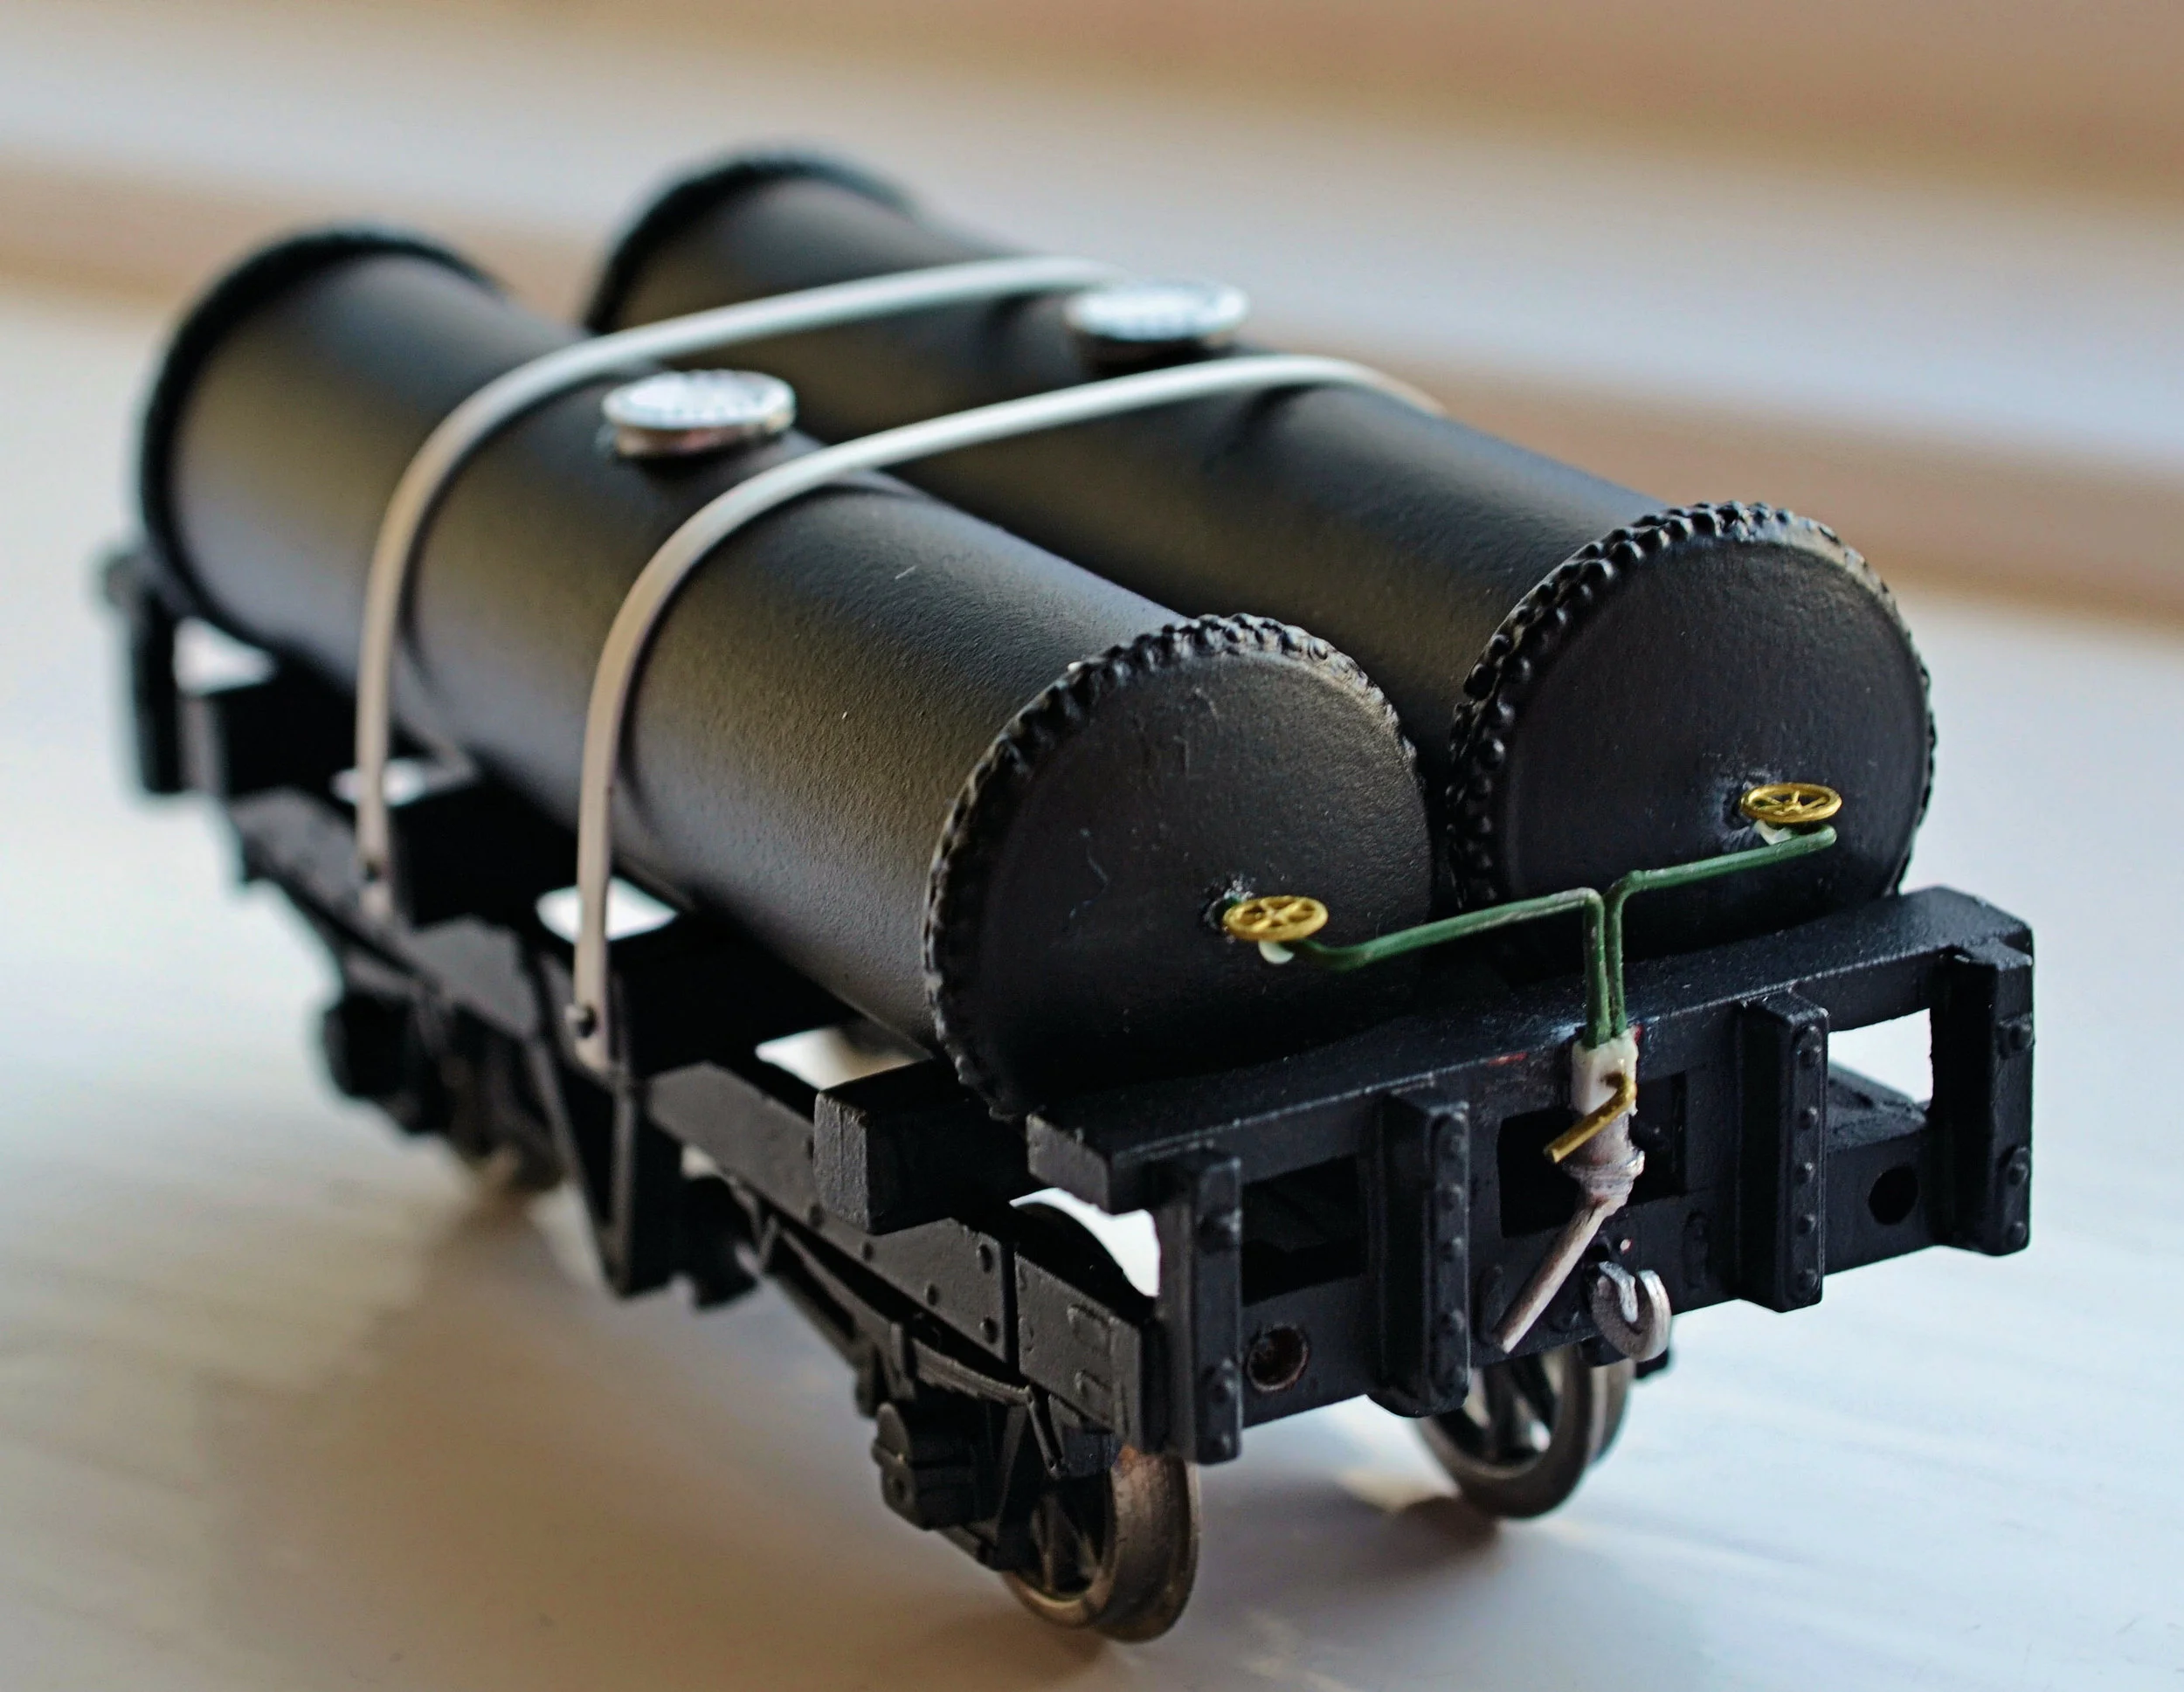
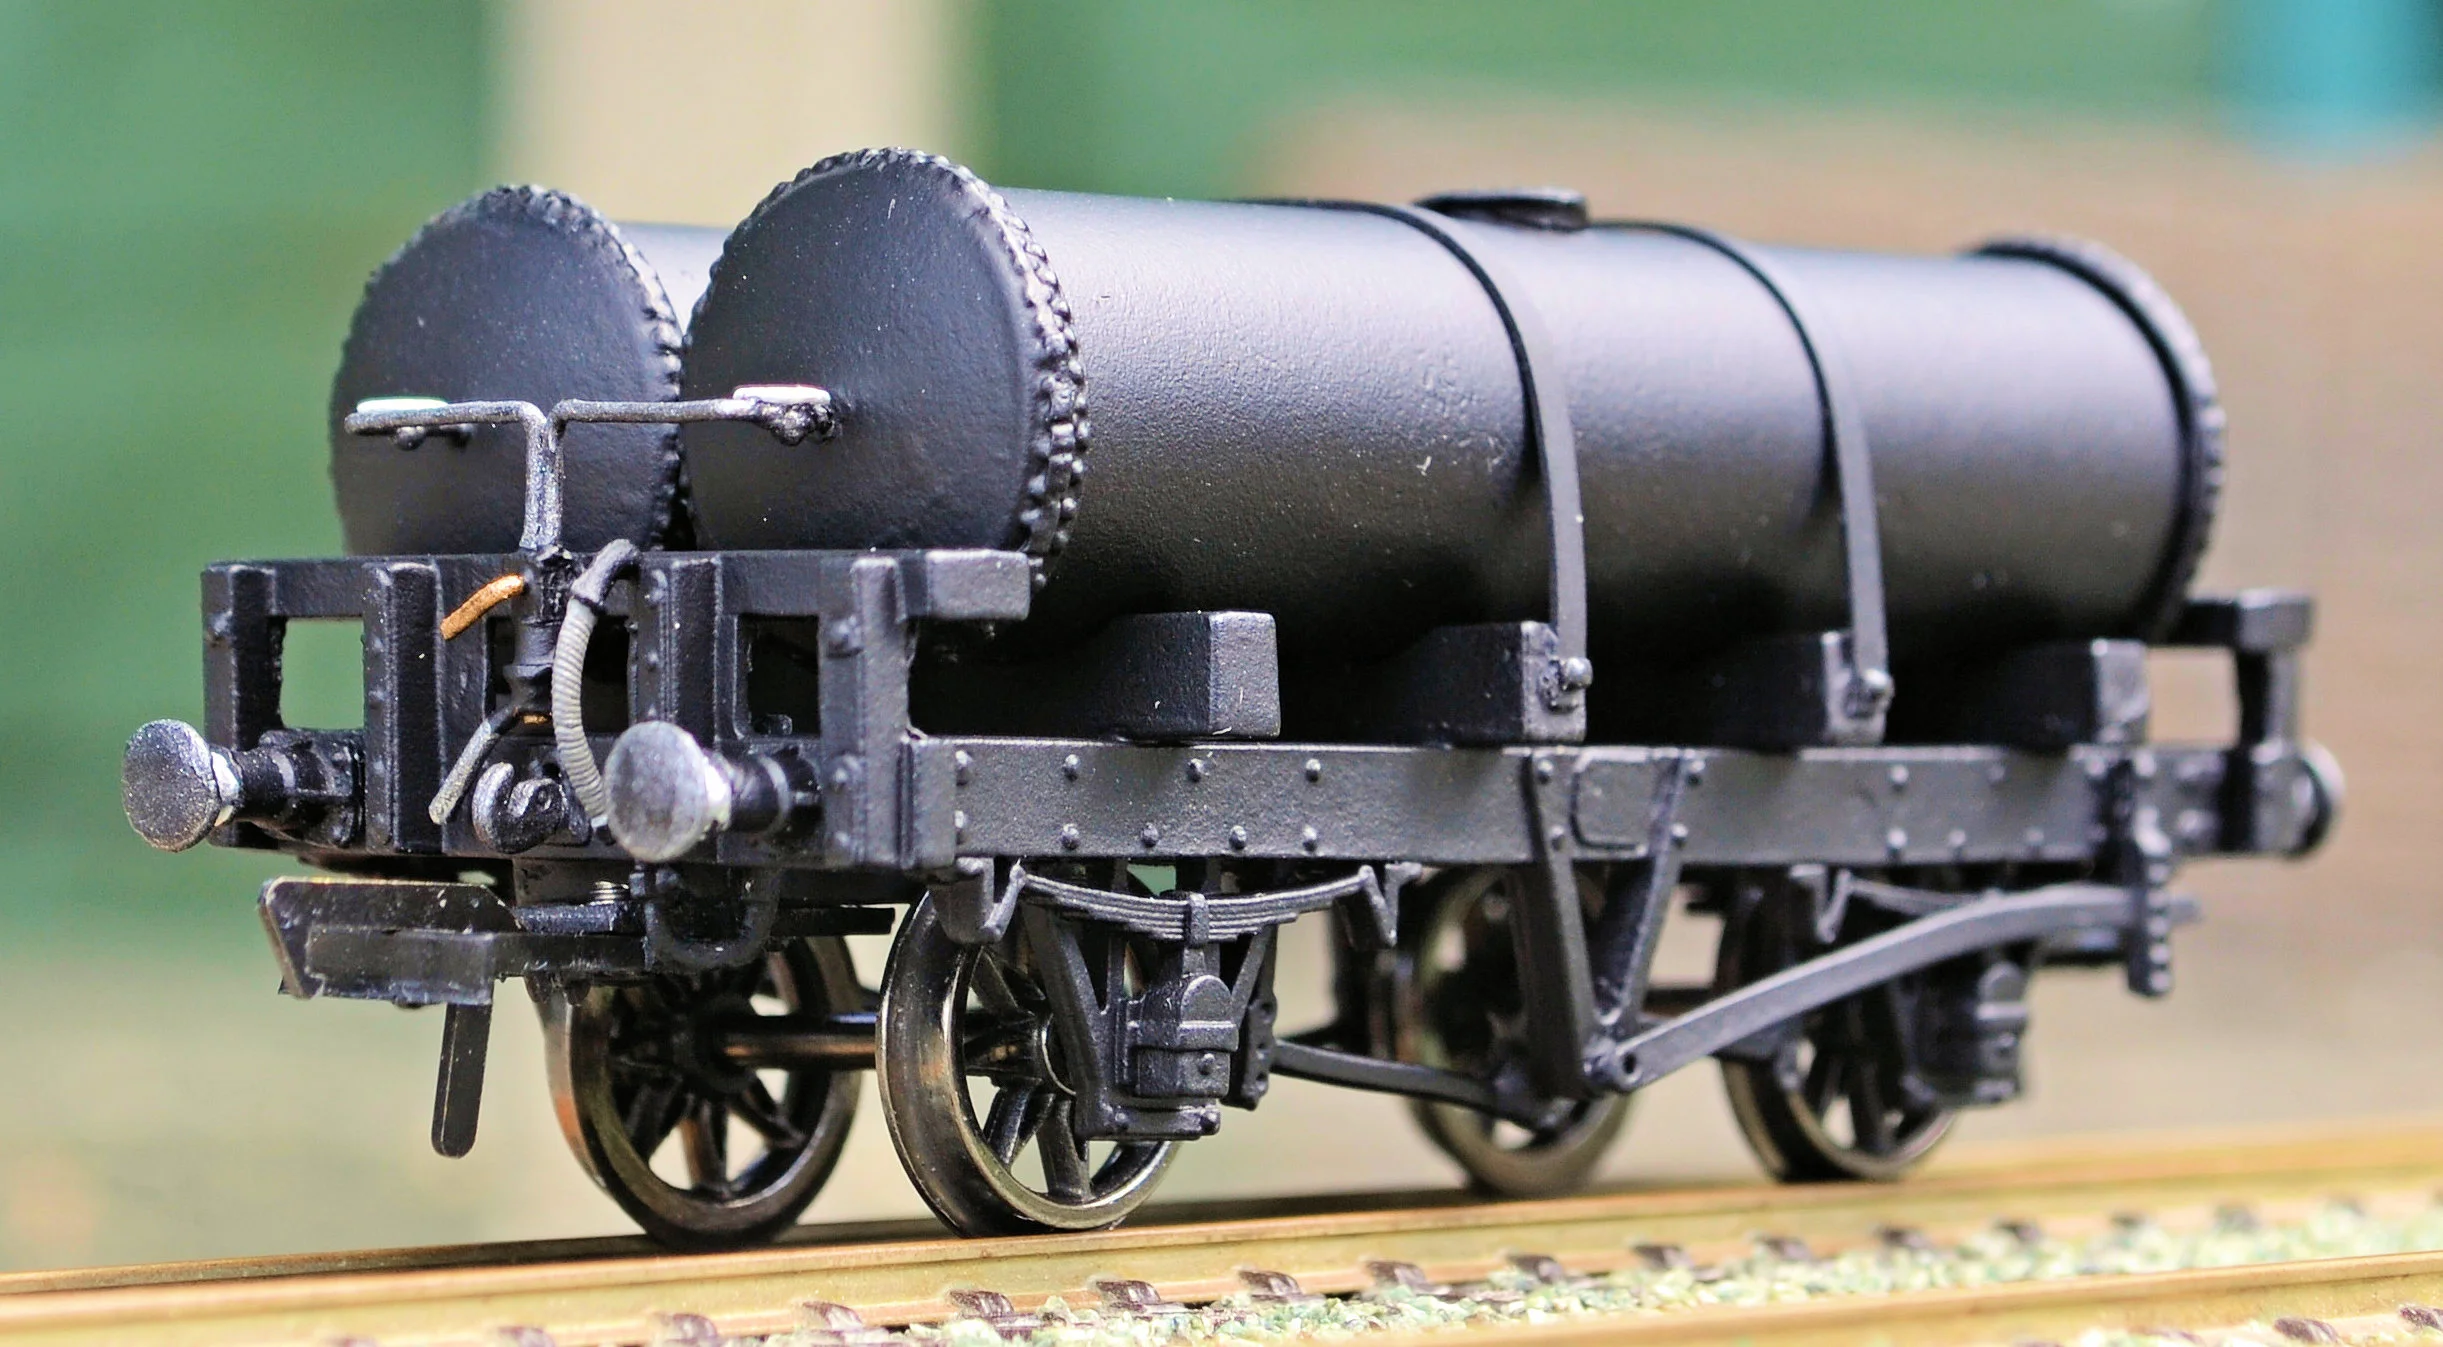
Waiting for some drier weather to paint the Ocean Mails coach body, I turned to a white-metal quickie recently acquired. Advertised as Keyser wagon kit it was, in fact a South East Finecast kit for a tar wagon. It arrived in five pieces, sides, ends and a top, enough to construct a vintage tar wagon although bracing, a floor, buffers, brake-gear and wheels would need to be added.
The castings were clean enough but fitting them squarely was time-consuming and a lot of filing was required. Similarly, smooth running was difficult to achieve and the brass bearings needed reducing to accept the axles. The end frames and a bracket at the centre-bottom of each side were carefully drilled out to accept bracing rods [fine brass wire] as per the prototype. Brake gear was a mixture of white-metal and plastic from the bits box, as were the buffers. The floor is plastic card.
Once assembled, the issue of livery arose: black, of course, but what lettering? Having no private-owner transfers, I opted for ‘GW’, and the wagon runs as one which would have carried coal-tar or perhaps creosote to a sleeper depot. The final livery chosen was fictitious, but not altogether incredible. The model now awaits weathering.
Dating this kit is difficult as it is still in production. The prototype is extremely vintage however, pre-dating cylindrical tankers and is probably late-Victorian / early Edwardian. Incredibly, similar wagons were still running on British Railways in the 1960s.
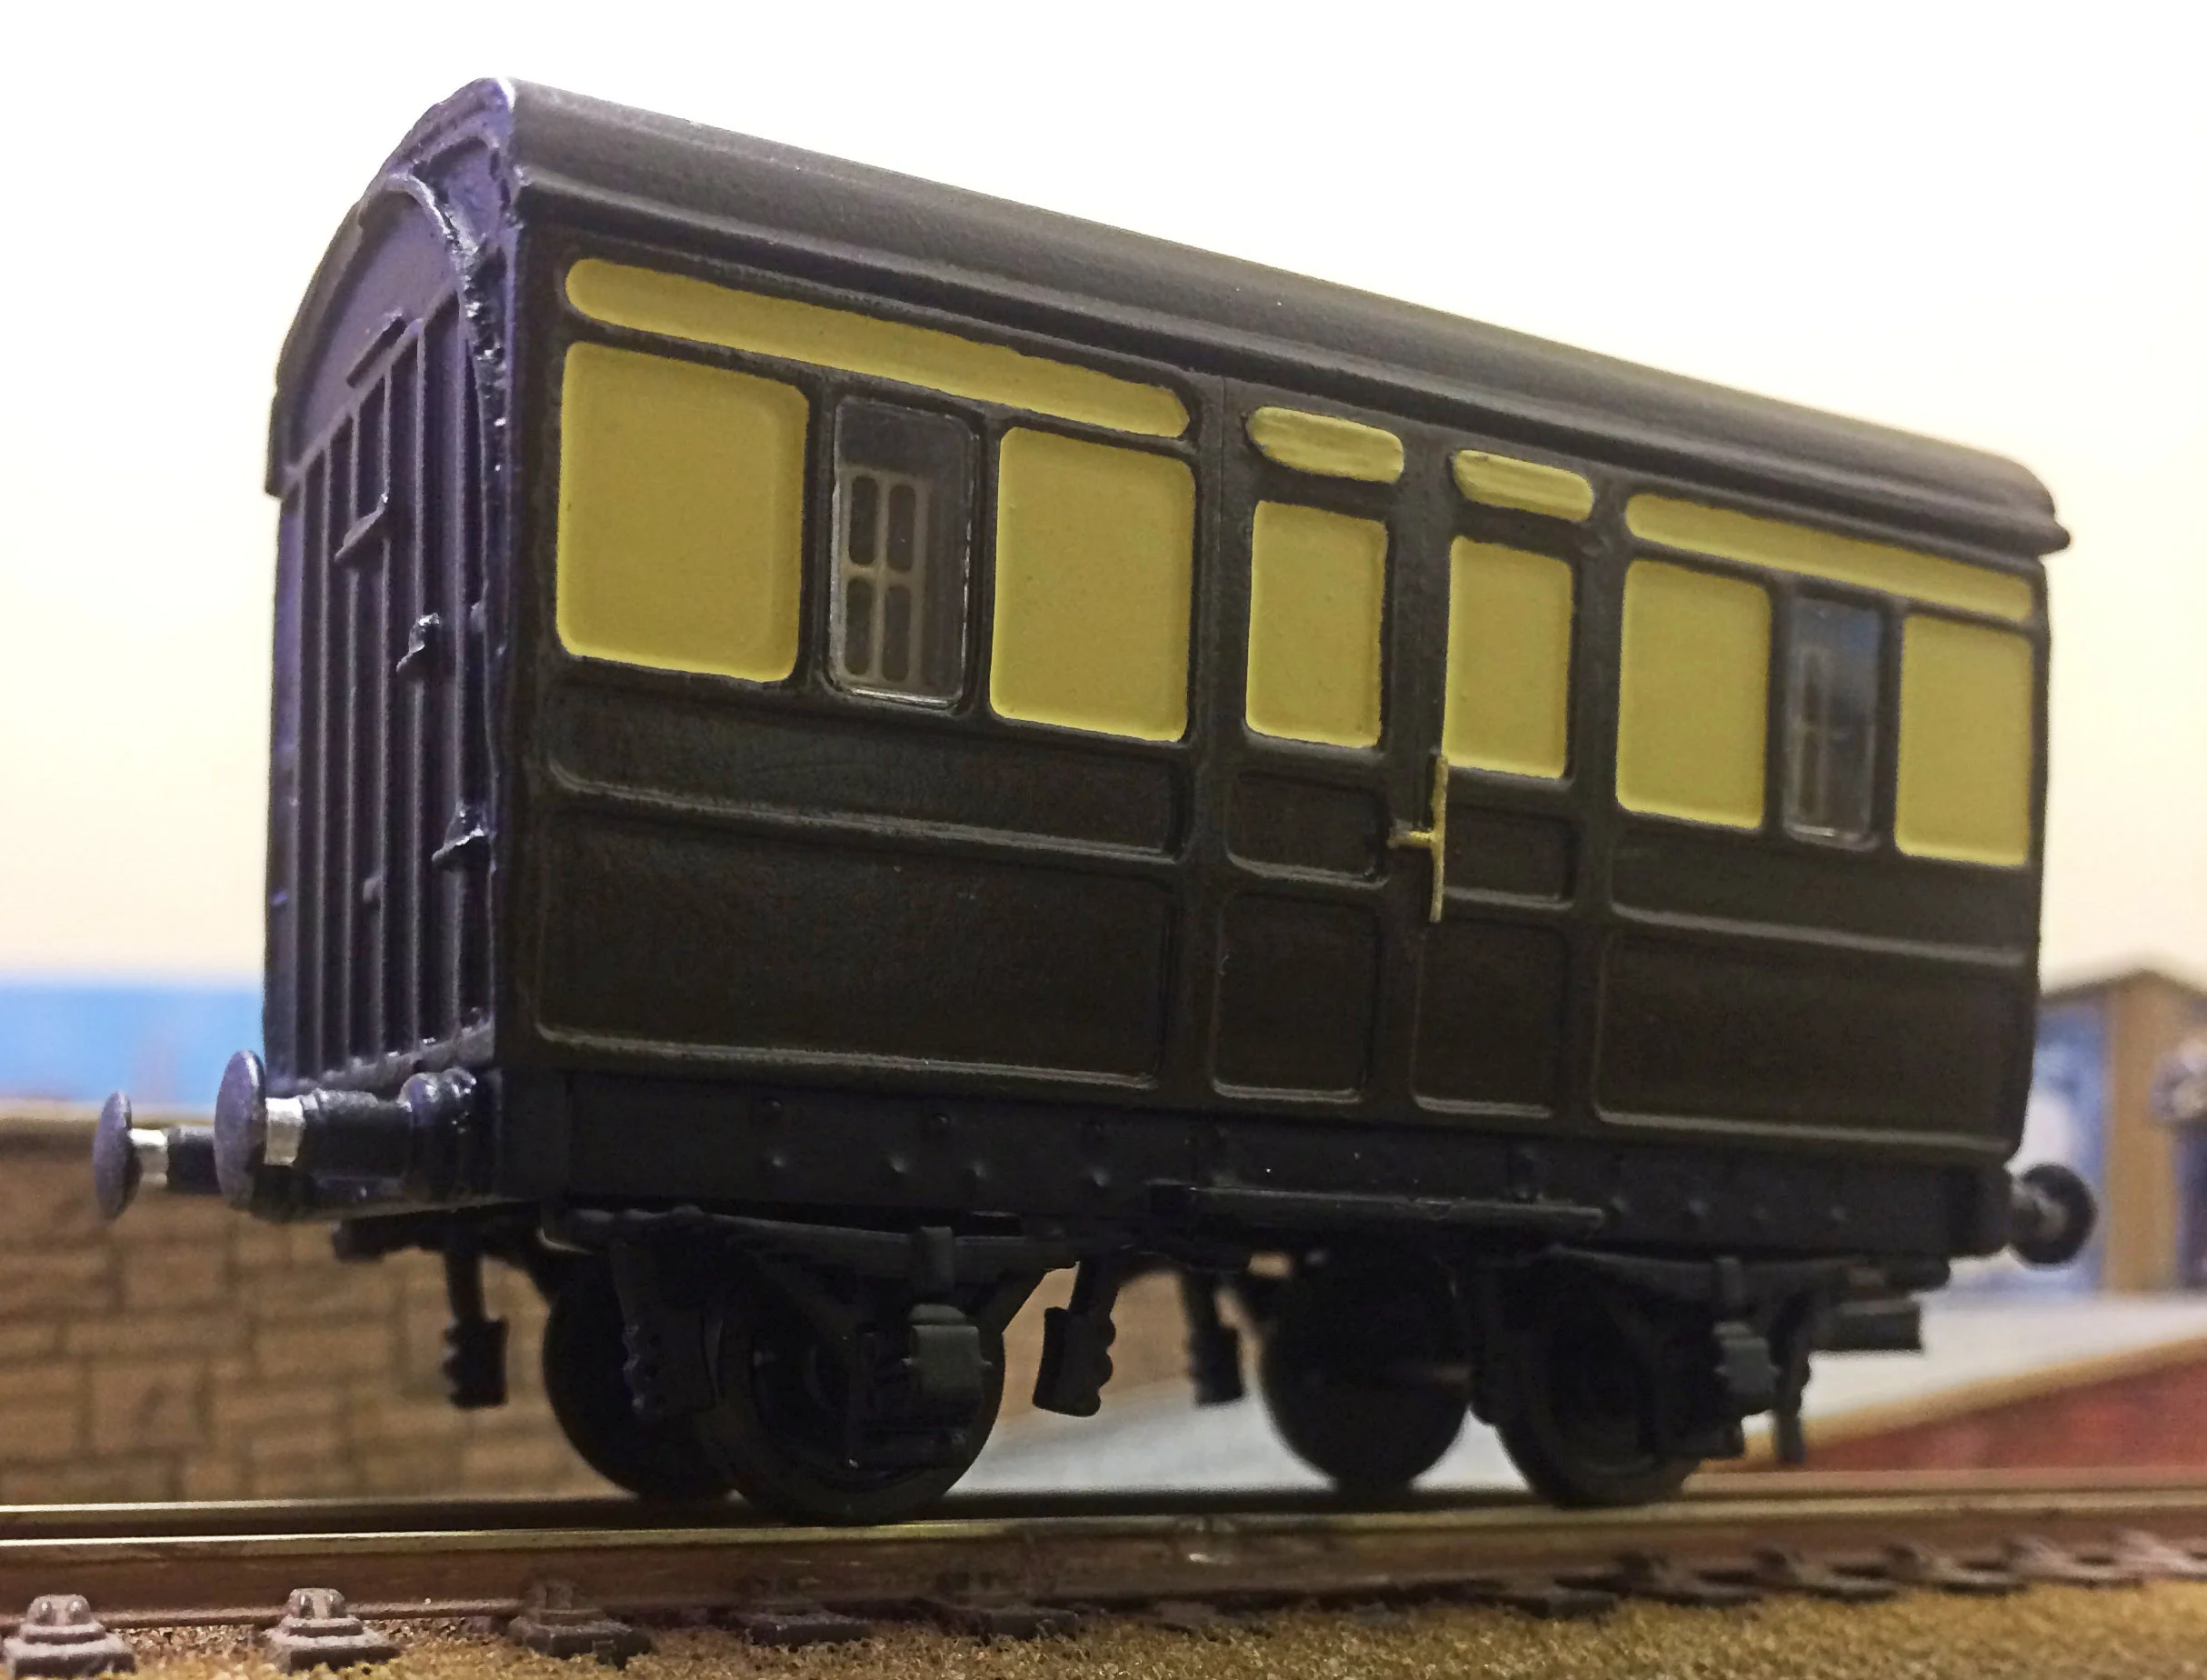
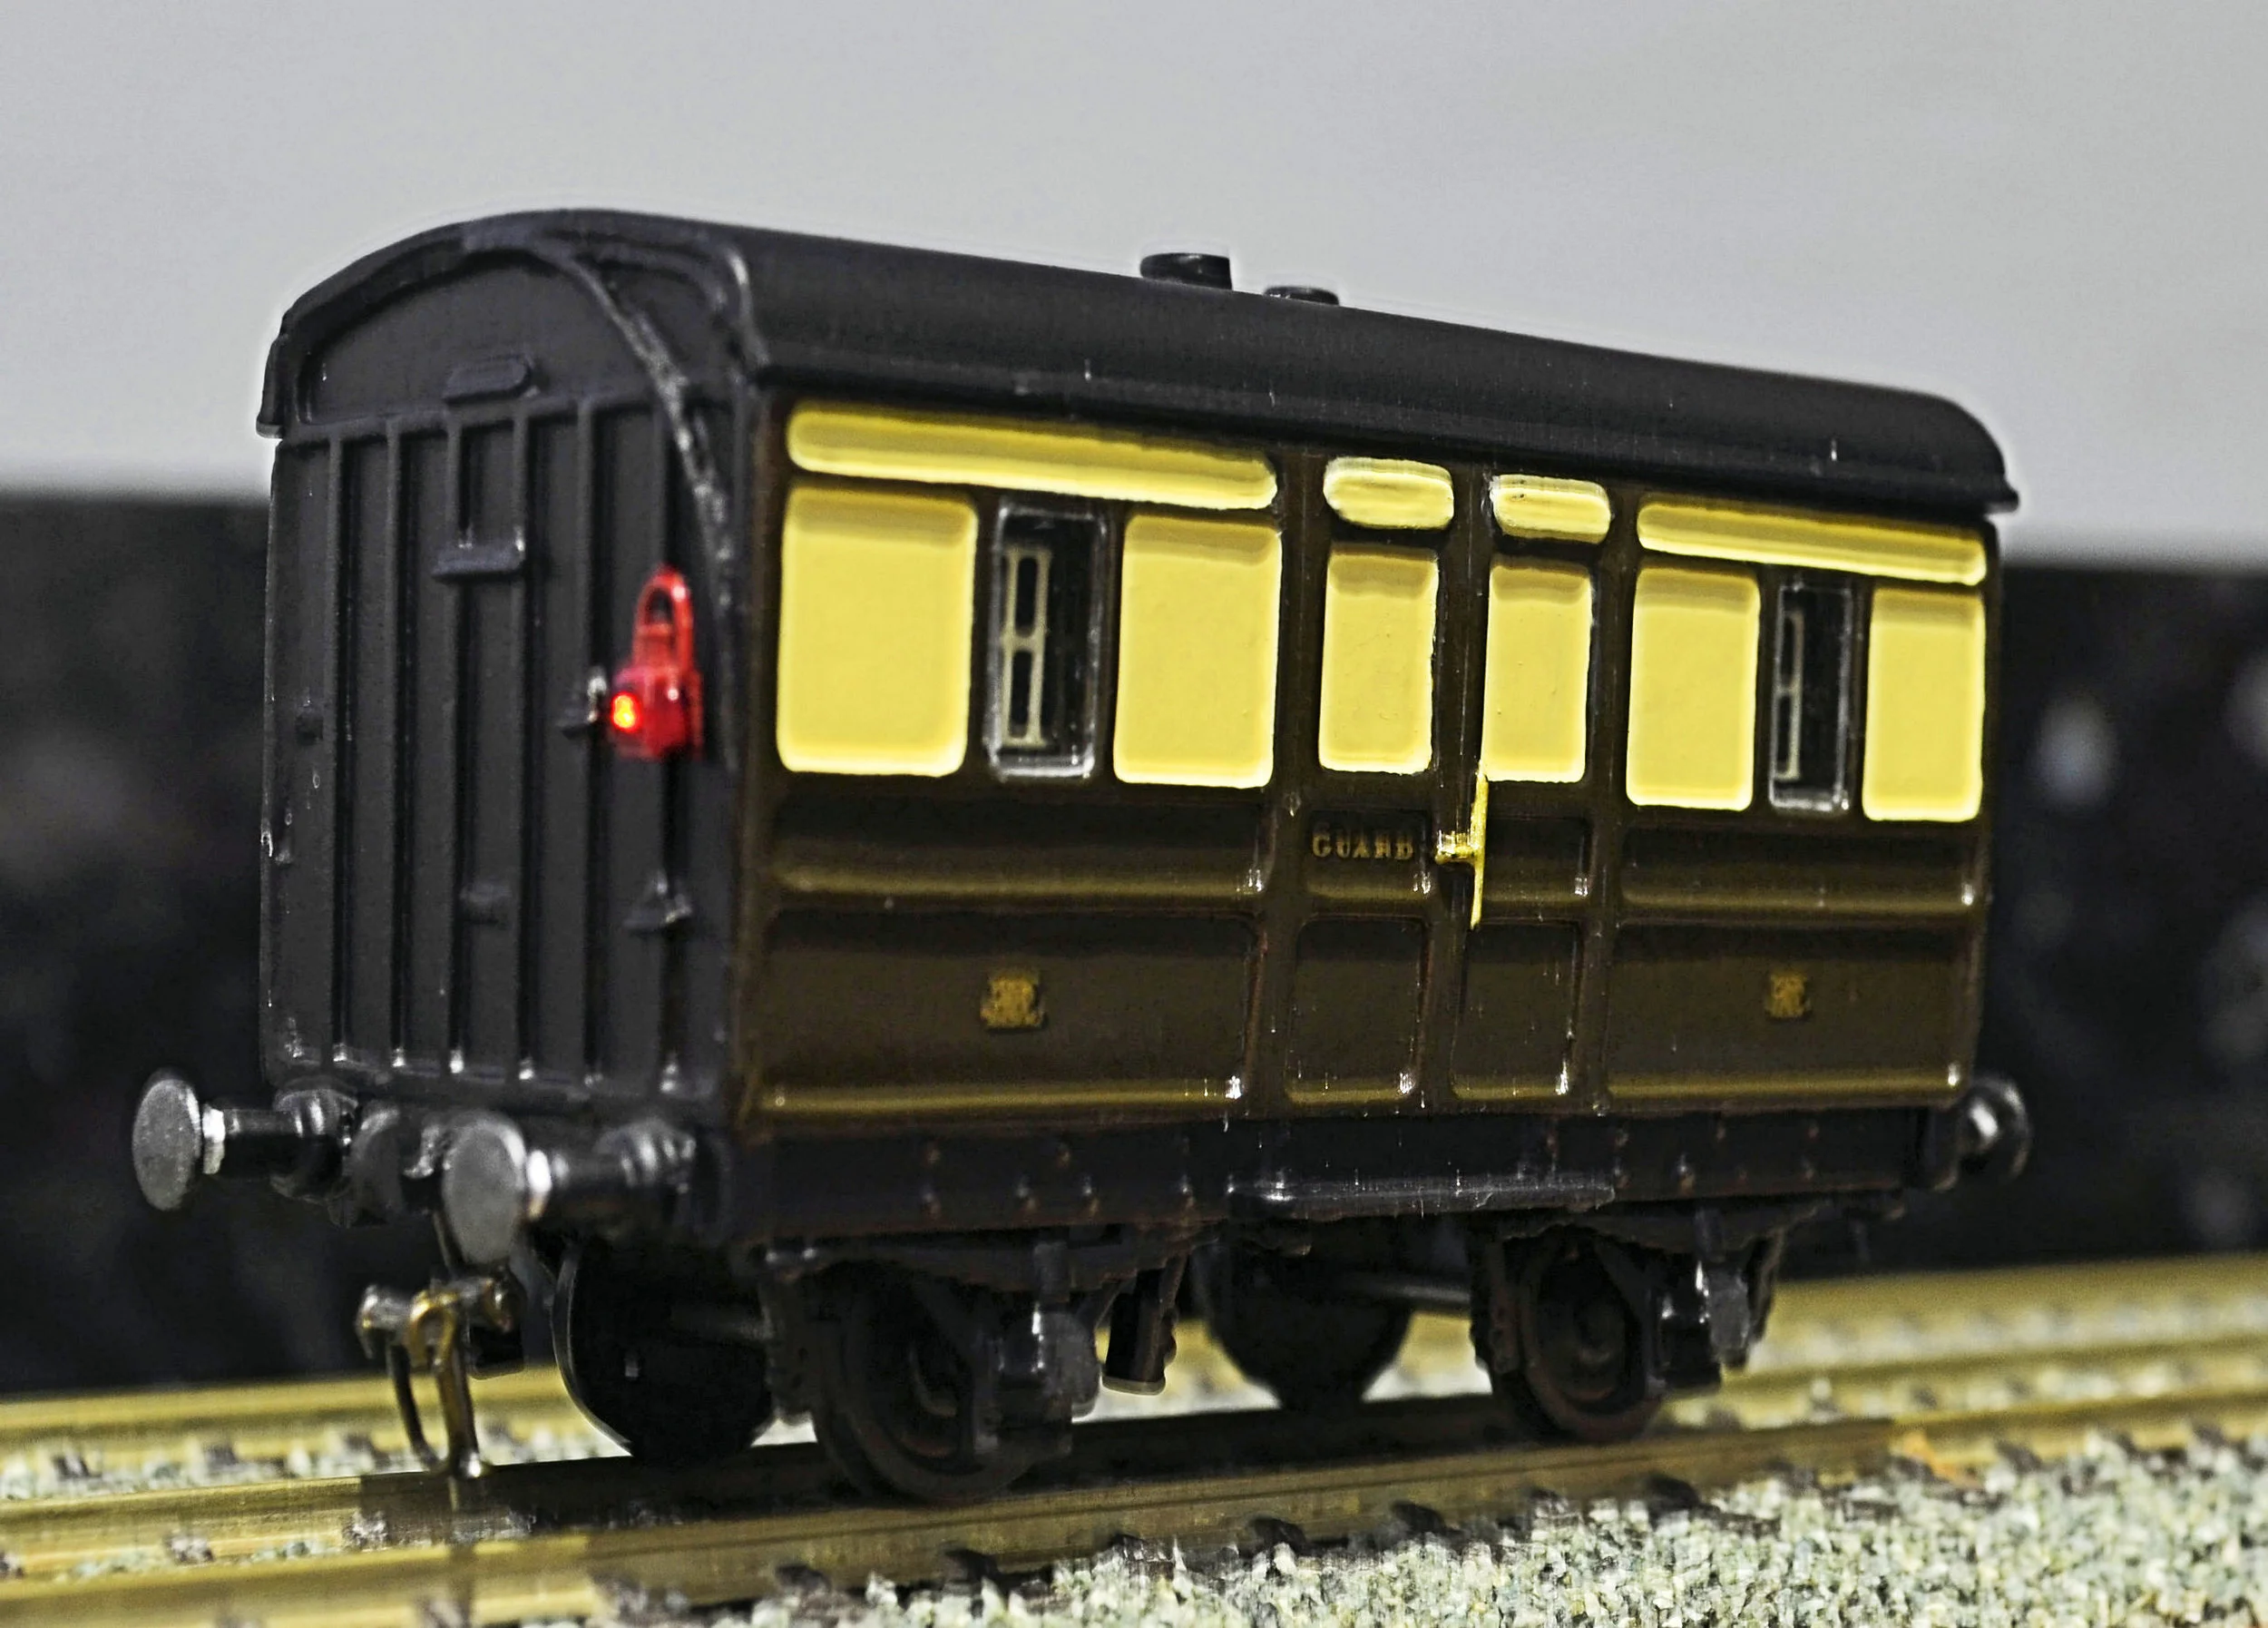
The next build involved a South Eastern Finecast white-metal kit of a London, Tilbury and Southend Railway Bullion Van. I imagine that as well as carrying bullion, these little vans were also used to convey wages around the system. Although this kit is, surprisingly, still available, mine was quite old but is impossible to date.
The kit is extremely simple: just a handful of main body parts with buffers and brake gear: the builder provides the wheels and bearings, makes a floor and adds any other detail they wish. Simple did not necessarily mean easy however and, in this case, the roof required a great deal of careful attention to re-shape it and remove a significant amount of metal that had been cast because of a worn mould. Once everything had been cleaned up however, it all went together easily enough.
Smaller wheels than normal were fitted to ensure that the van / coach buffer heights were reasonably constant. This was not an ideal solution but it works well enough in practice.
The only additional detail that I added was flush glazing and more-to-scale window grilles. The van has been painted as a GWR 4-wheel full brake, to accompany some equally vintage coaches which have been commented upon elsewhere on my workbench. The photos show the original window arrangements before detailing and the finished van.

Final details now added and I am genuinely surprised by how much the model has been lifted...

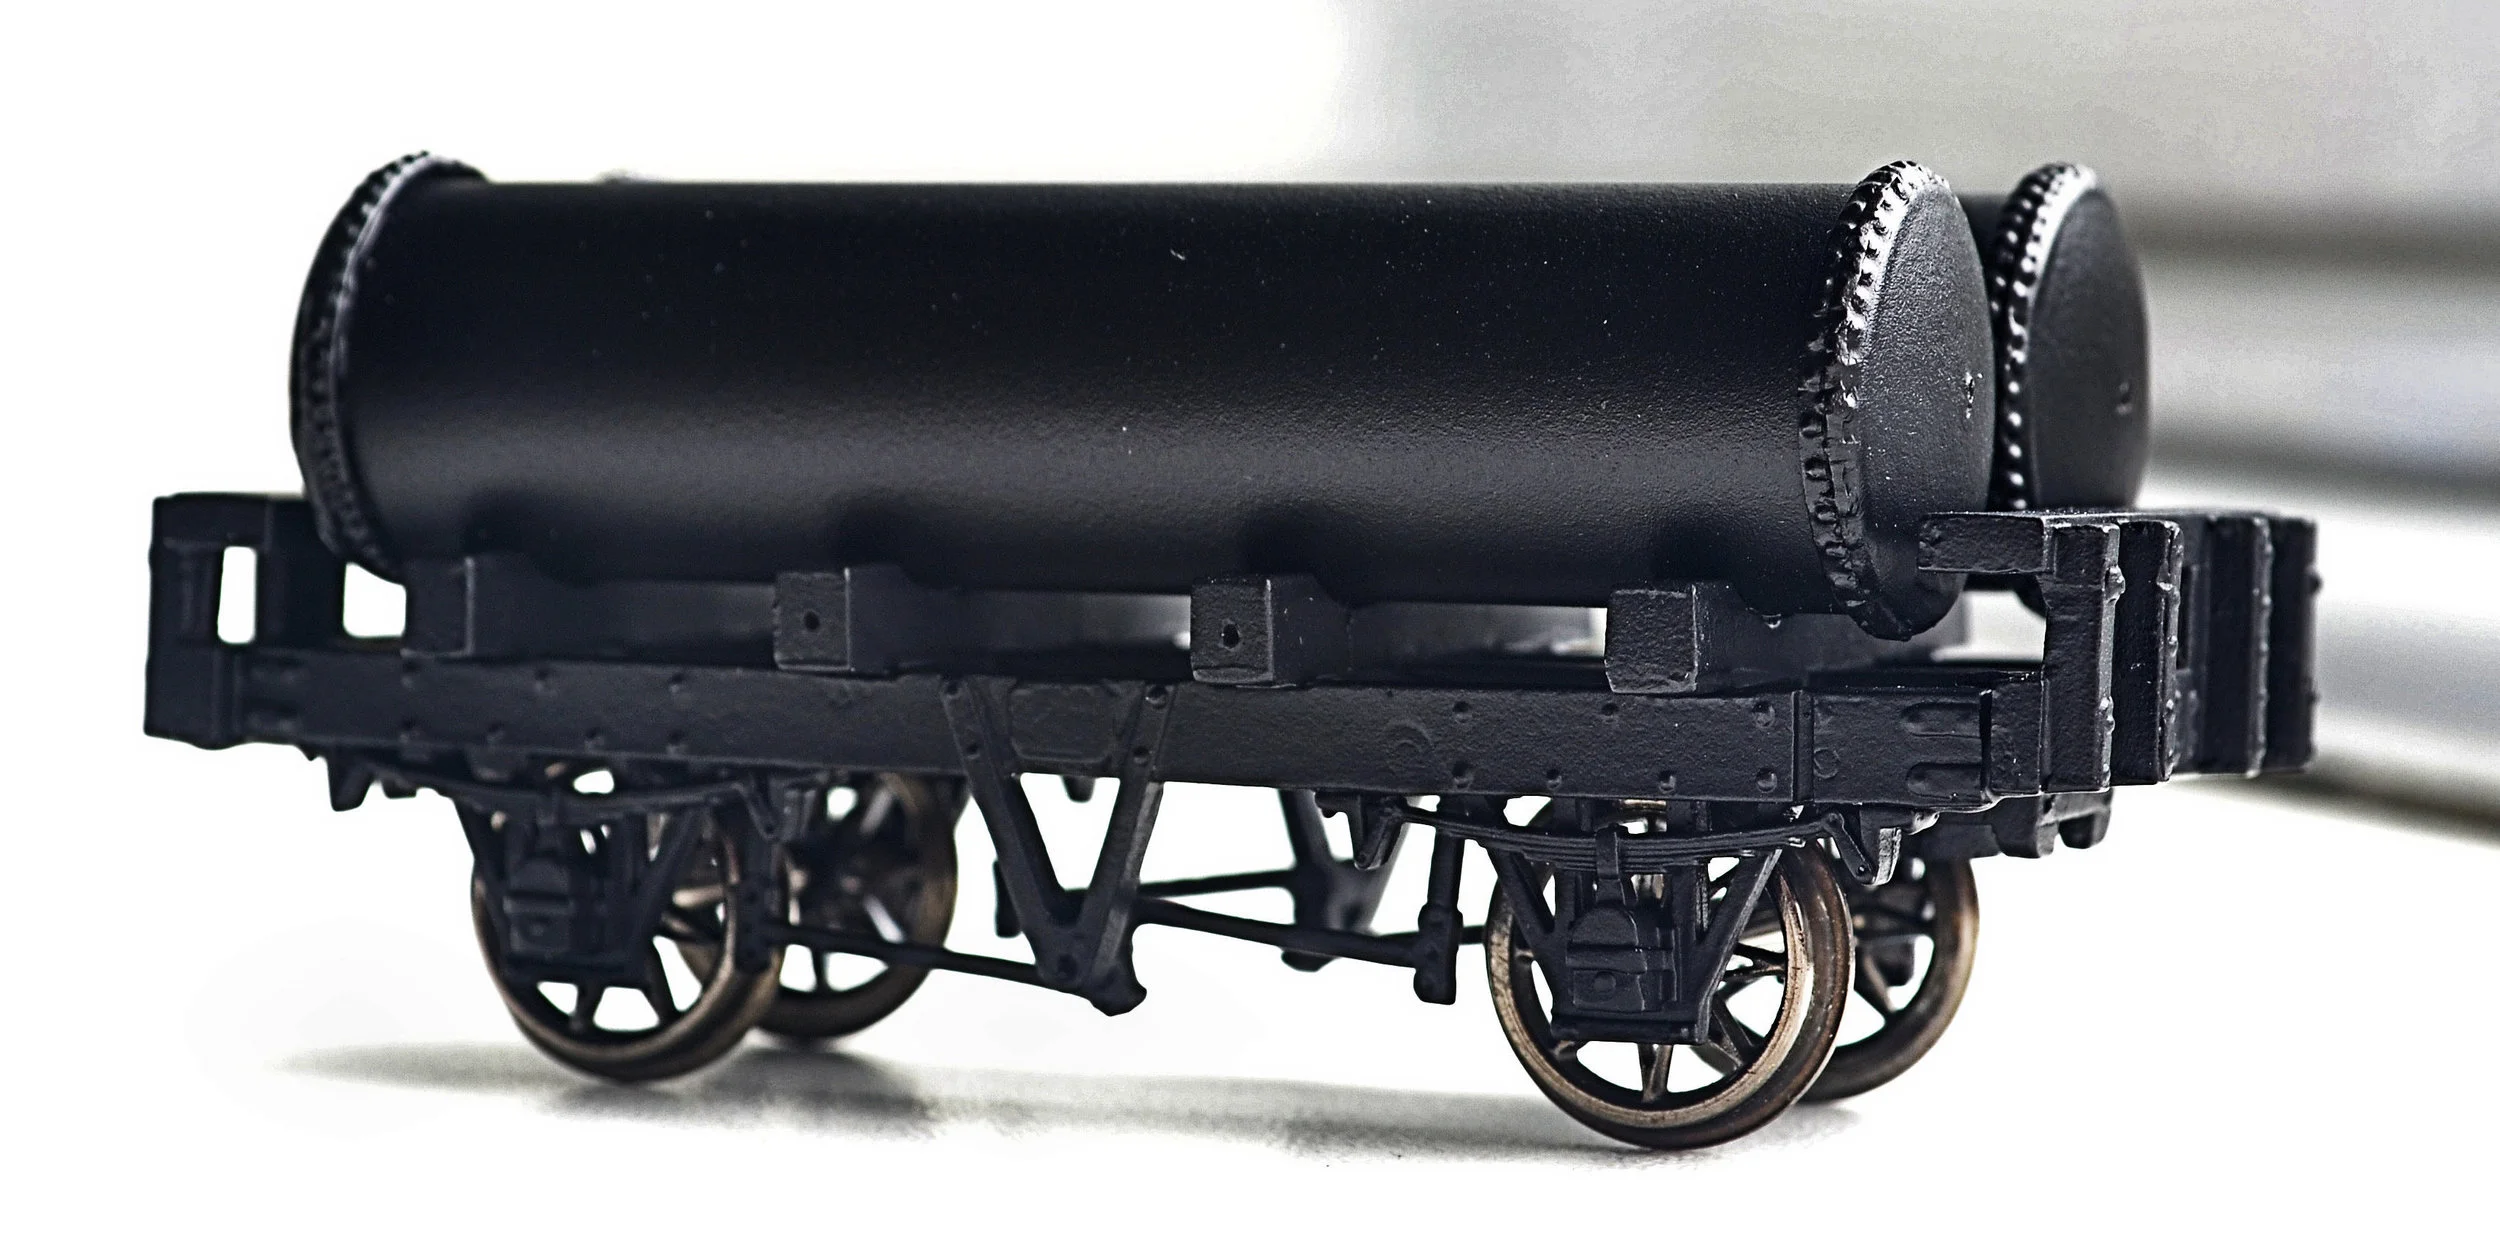
I decided to start on this next model a while back, an ex-Wills but now SouthEastern Finecraft model of an M&GN [apparently] gas tank wagon. This is perhaps questionable however as regardless of Wills' original description, the wagon has been fitted with GWR oil axleboxes and is more probably a generic rather than specific model. This is the third of SE's white-metal kits I've knocked together and whilst it has few parts it has proven to be quite the most frustrating and fiddley one to date.
There is no r-t-r alternative for these wagons although Horny did market a tin-plate one in O gauge many decades ago.
The instruction [more an exploded diagram really] seemed quite straightforward but I found the model impossible to construct following them. Working out another method for assembling the kit was easy enough but the amount of cutting, filing and reshaping required was astonishing. Each solebar took three hours to prepare. The yoke for the tanks required a lot of attention and the tanks themselves, at 15mm [plastic water pipe], were too small and required a wrapper [glossy photographic paper] to increase their diameter. The tank end-pieces were pretty awful too but I reckoned that when everything was sprayed matt black, most of the defects would be less visible. Happily, it sort of came out that way too.
The left-hand photo below shows the initial part-build. Because of the method of construction, it was necessary to paint the castings prior to assembly. The body requires buffers, couplings and brake handles still and their castings await cleaning up. You may also notice that I have drilled holes in the tank ends and also the cross pieces of the yoke: the former for me to scratch-up some piping, valves and hand wheels and the latter for me to attach some strapping to secure the tanks in place. This additional detail should improve things considerably. The final job will be to add some GW lettering to the tank sides and then varnish and weather.
The right-hand photo shows tank strapping, couplings and pipe-work added. I originally attached some strapping made up from thin brass strips and 'bolted' them onto the frame with adapted n-gauge track pins. The following morning I found that the tension had been too tight and it had pulled the tanks away from their epoxied fixings! So, they were reattached with super-glue and thin plastic strip was used in place of the brass for the strapping. Everything will need painting again but the blemishes will disappear under a coat of matt black. The pipework for the gas take-off was not based on a prototype as I couldn't find any photos. It looks credible enough though. I tried to construct the valve housings under the valve wheels with blobs of epoxy resin. Time - and paint - will tell......
There's still a way to go with this kit however.
All railway companies which ran gas-lit coaches would have had these mobile reservoirs dotted around their system, some well into 20th C. This one will pose as a wagon absorbed by the Great Western after the first Grouping.
Now awaiting lettering, varnishing and weathering, and then lettered and weathered...

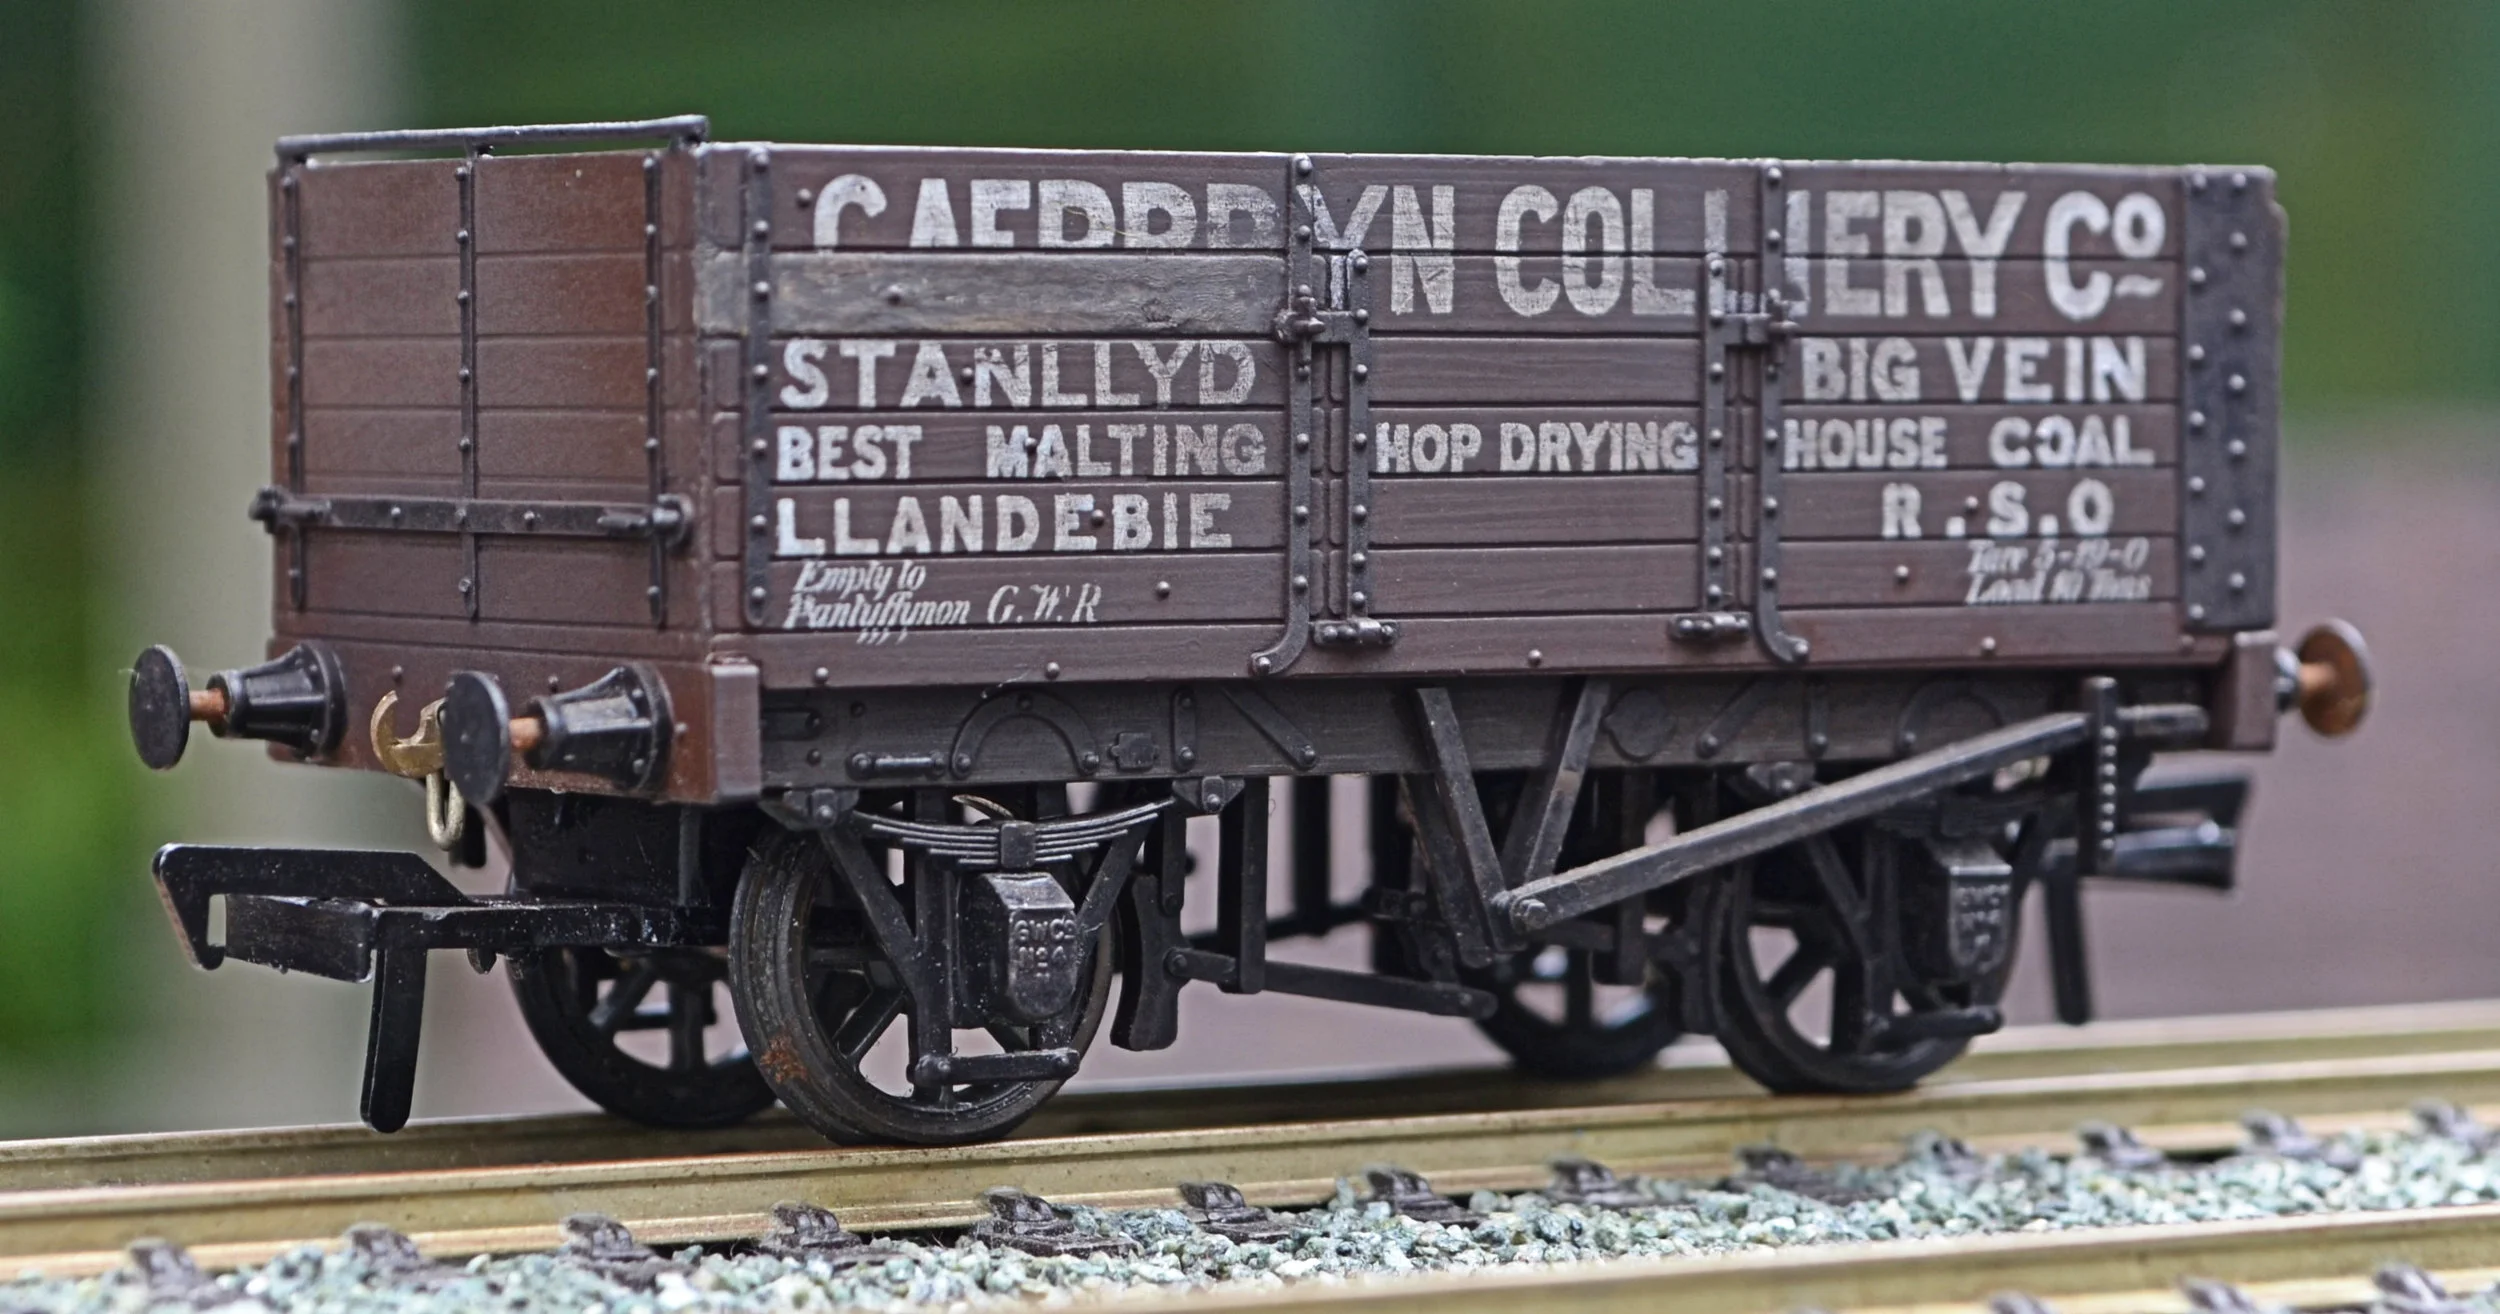
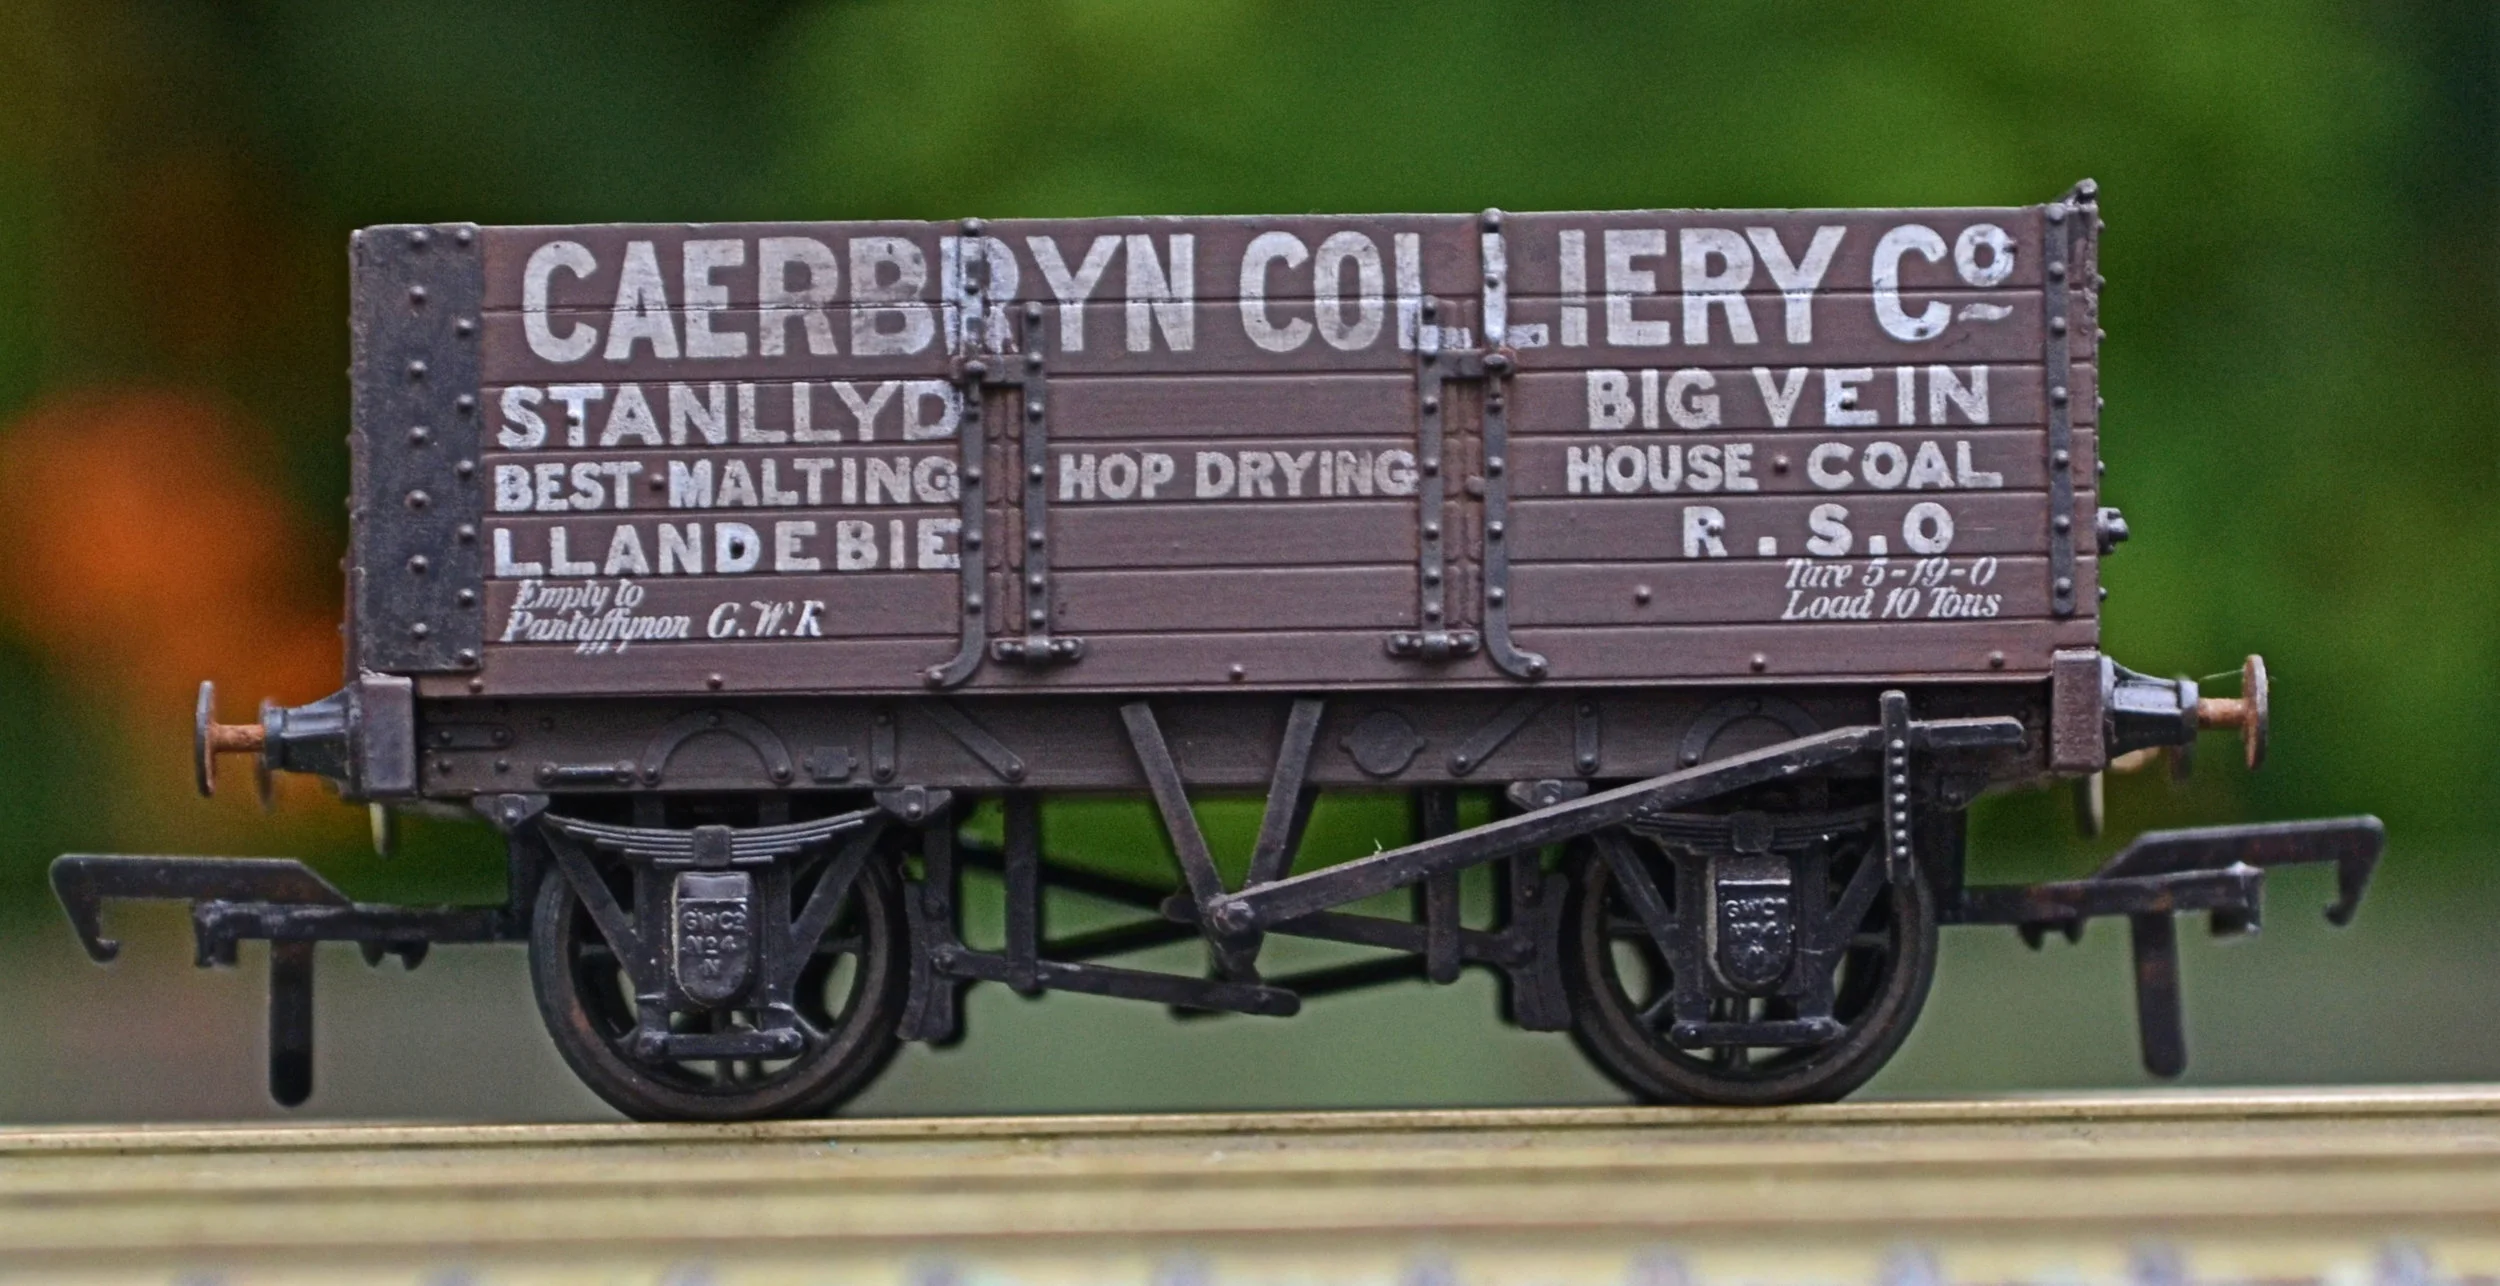
Next is a Slater's quickie, a Charles Roberts' 7-plank private-owner coal wagon. These Slater's wagons are widely available on eBay and come with pre-painted and printed sides and ends. They can be expensive [I've seen them at £18] but you shouldn't need to pay more than a tenner including postage if you shop around and are patient. This one was £4.50. An easy assembly, well within anyone's ability, it is extremely free running. This wagon is braked on one side only.
Although the body is painted, the underframe is not and once assembled it looks like the photo on the left, below:
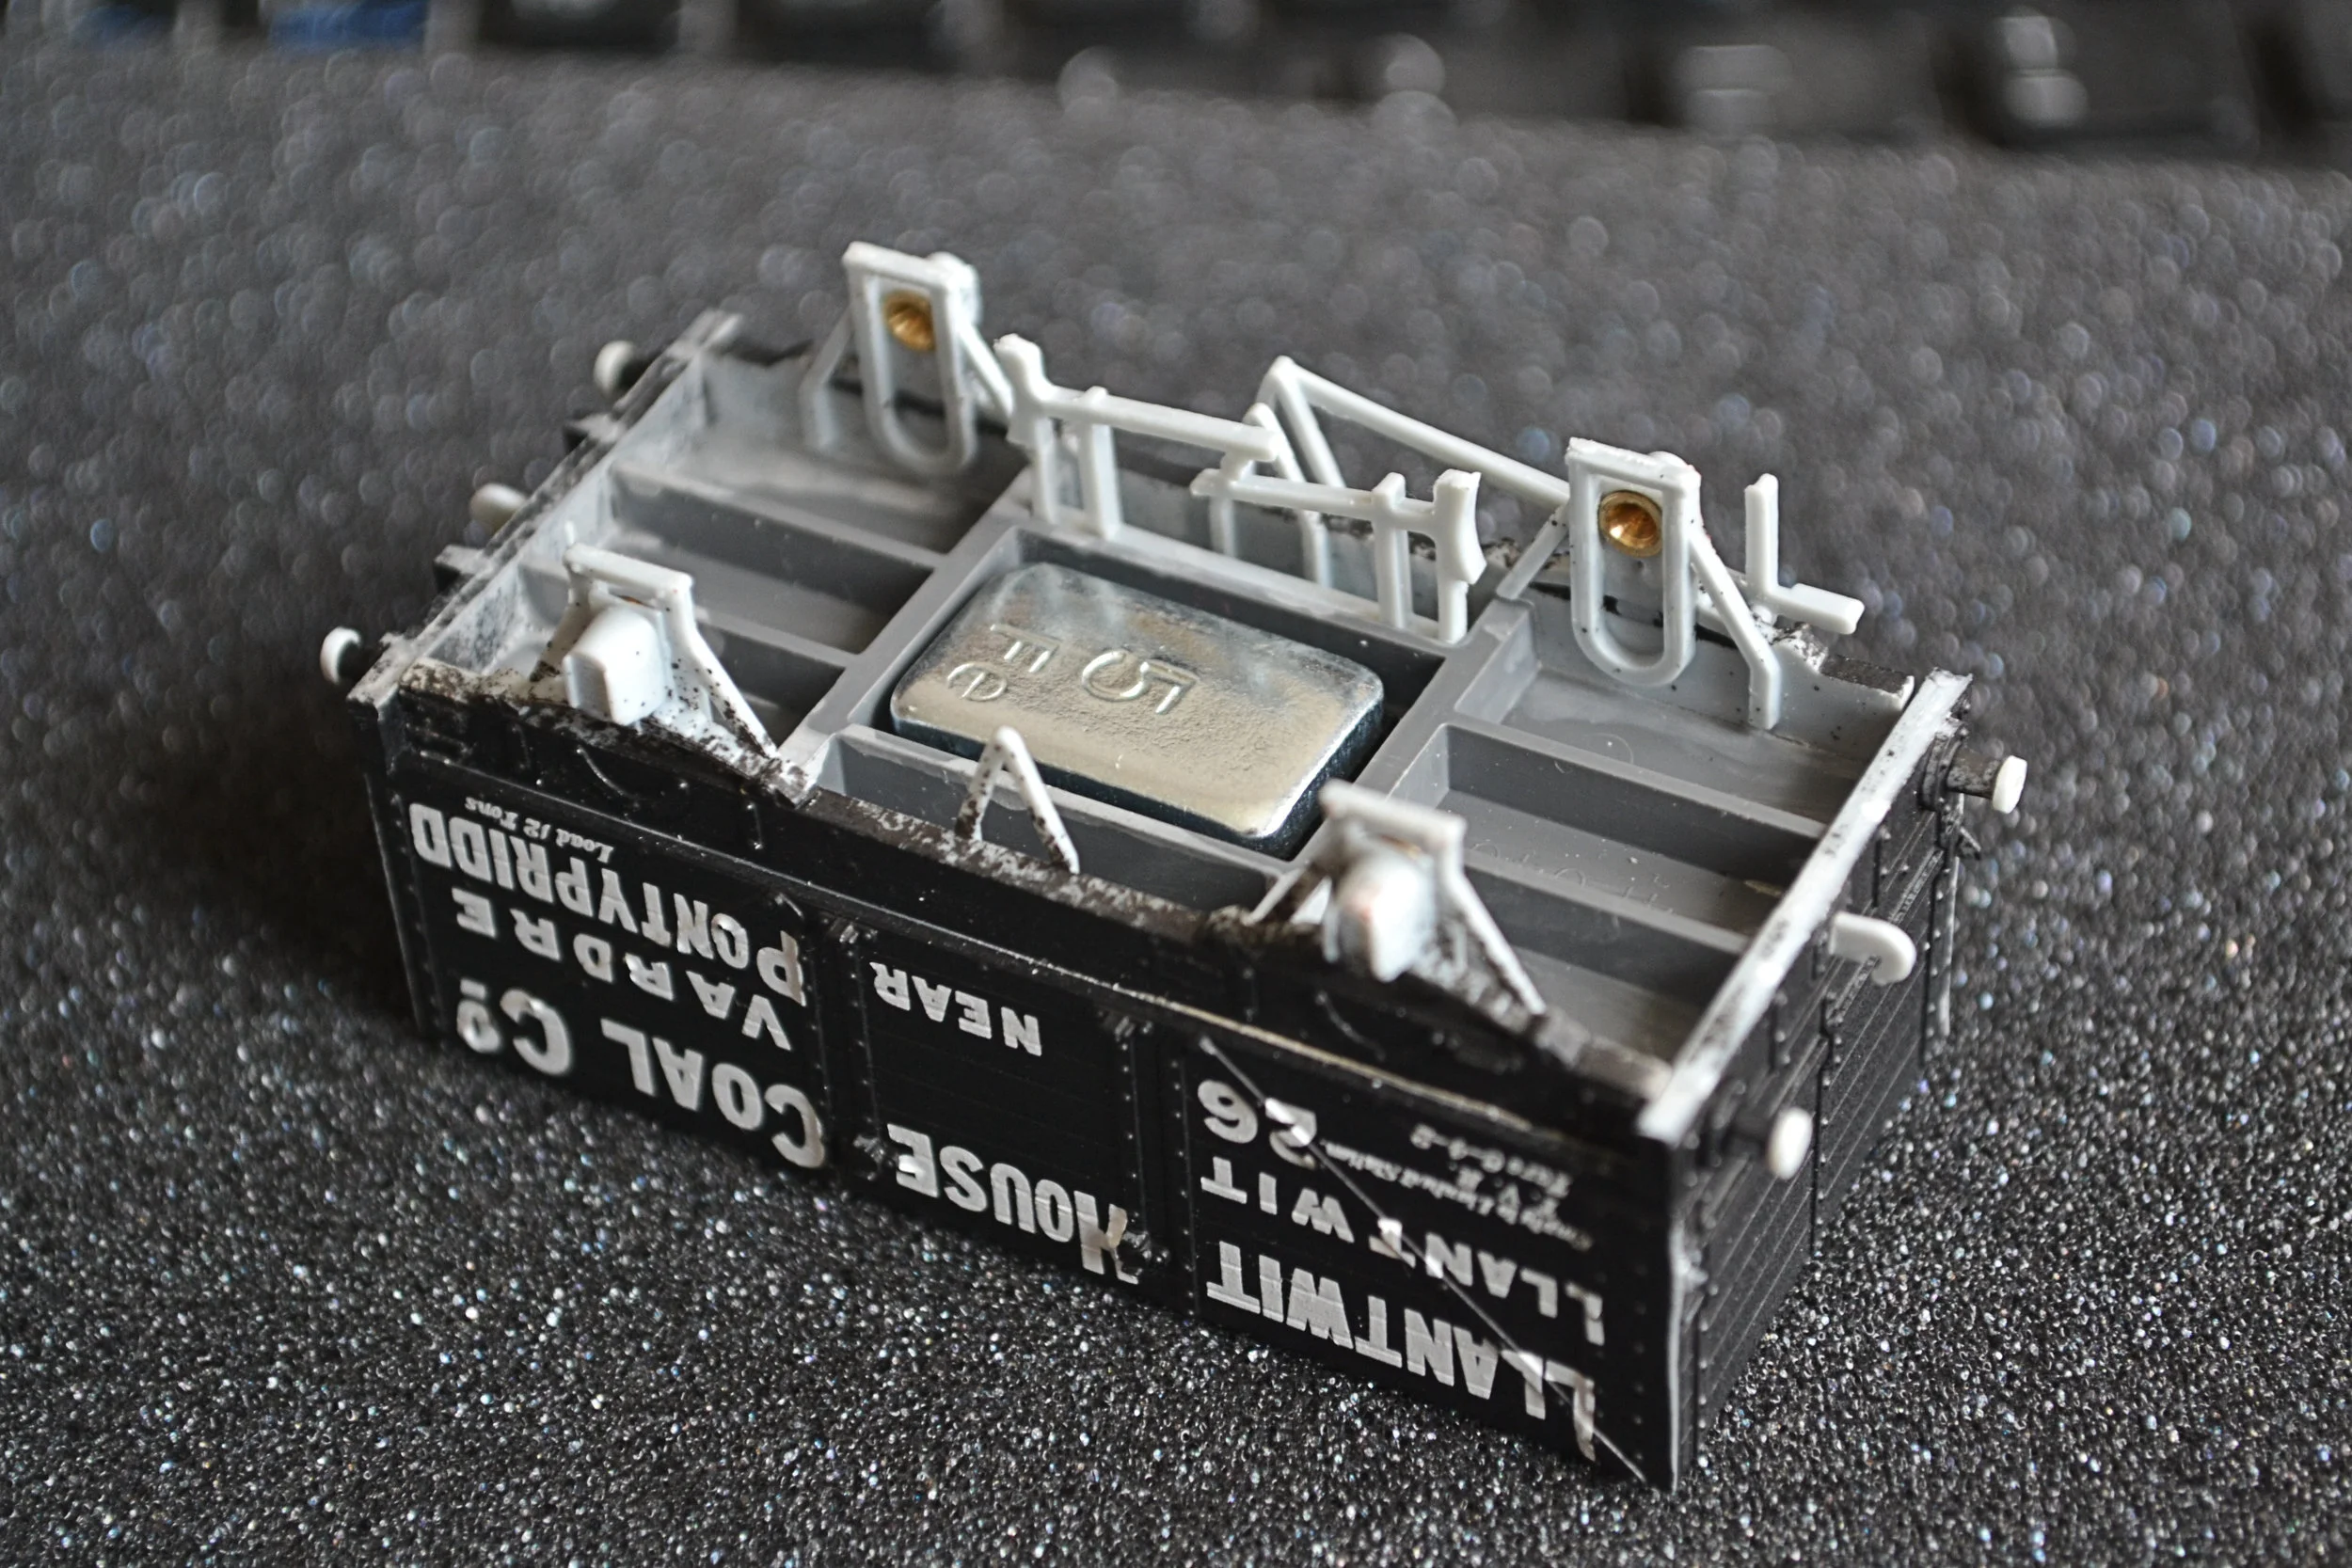
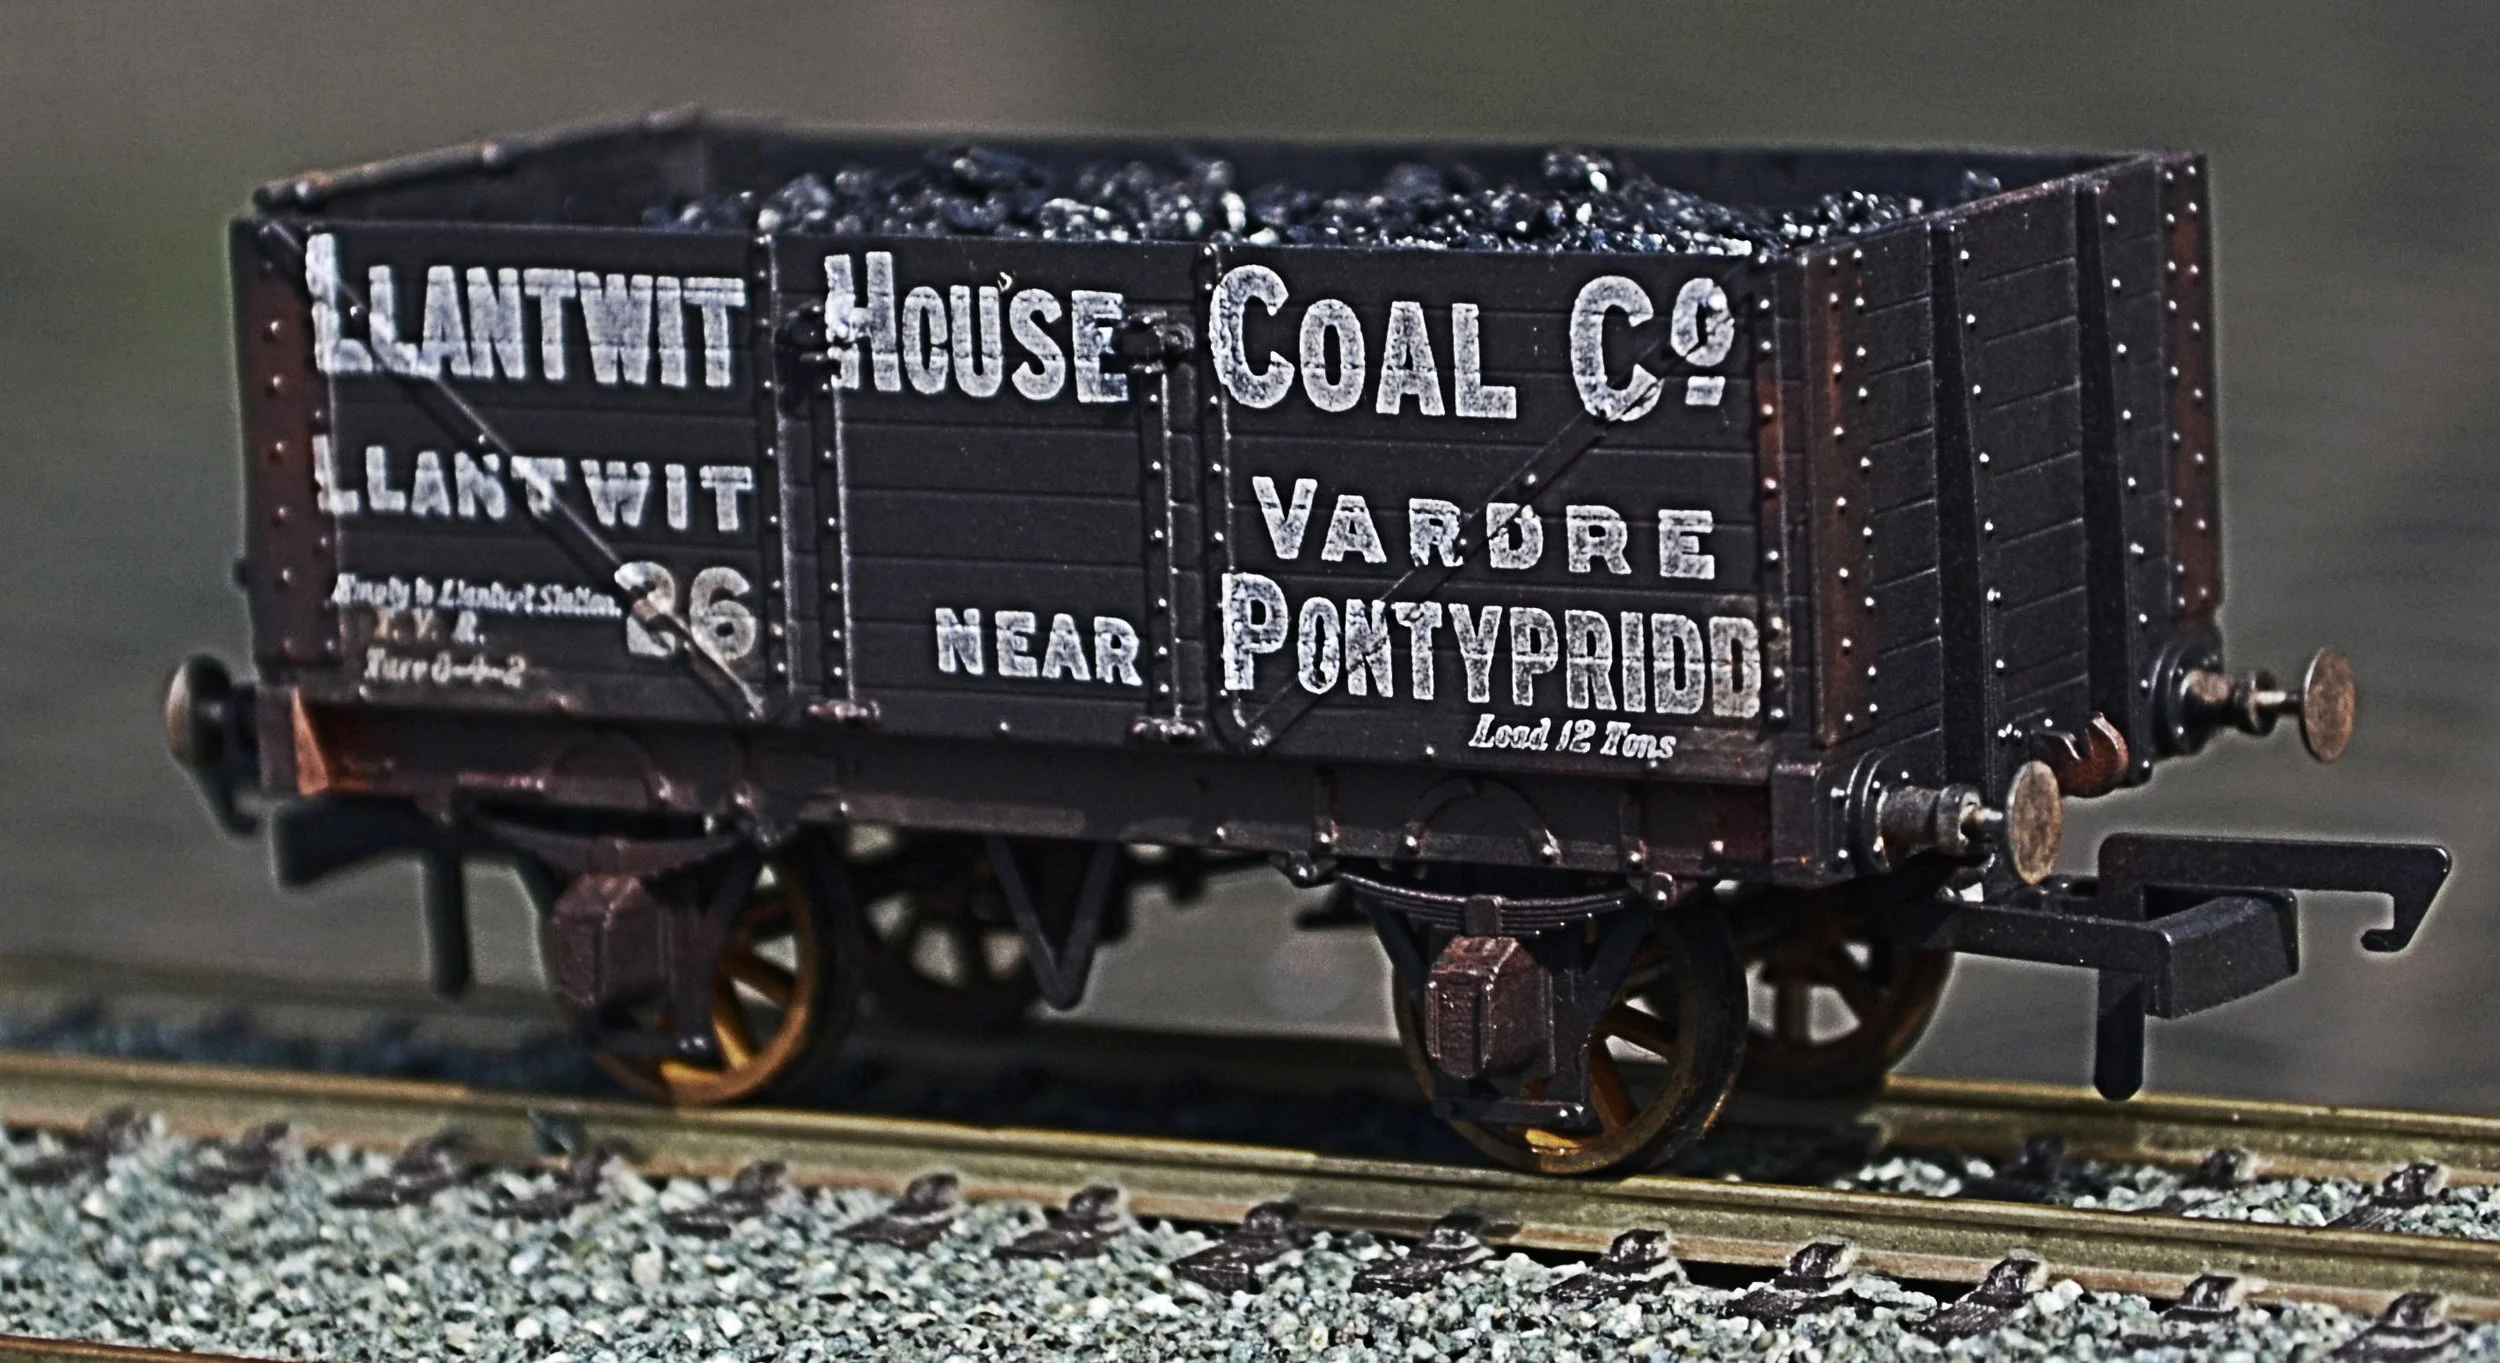
Once construction was finished, I attached a self-adhesive tyre weight for ballast and masked off the printed sides before spraying the model with Halford's matt black auto paint: a perfect match. Coal was added and the wagon than weathered. The finished product is at the above right. Below it is coupled with an earlier build;

The next quickie is a Cambrian model of a GWR 40ton bogie coal wagon. The GWR built 27 of these large coal wagons during the first decade of the 20th. Century, the last surviving until the very early ’50s.
Large bogie mineral wagons were not particularly common anywhere in the UK before nationalisation but, as examples, the Caledonian built at least one bogie iron ore wagon [later used by the LMS and available as a Ratio kit] and the LNER had similar sized brick wagons [ex-Great Northern and available as a Parkside plastic kit or Triang ready-to-run] and ammonium sulphate wagons. Hornby Dublo and Trix Twin produced tinplate bogie bricks in OO, albeit for 3-rail and during the late 1960s/70s, N&C Keyser also produced a white-metal/plastic hybrid kit for the GWR bogie coal wagon.
The kit is simple enough to construct but it does not come without flaws: the floor and sole-bars on my model were 2mm too short, the truss rods rather heavily moulded and suffered greatly from flash and some of the other mouldings were just a little crude. However, careful filing and sanding and a spray of matt black remedied most of the above. The running number is correct but a little too small: I was unable to locate numerals of the correct size.

I have fitted Hornby spoked wheels with brass bearings. The bogies are quite flimsy but run freely although the wheels are just a little over-sized. The bogies are also screwed to their bolsters as the supplied plastic pins were not really up to the job. Using screws also allowed for some necessary adjustment as nothing above the bogies was really square.
Even with metal wheel sets the model is staggeringly light. I intend fitting a coal load to overcame this problem. Without a coal load, some ballast would be required underneath to ensure good running. Nevertheless, an interesting prototype.
And now, another Ratio 4-wheel coach, this one an all-Third, built to run with a rake of coaches which would have been seen on the mid-Wales lines of the ex-Cambrian Railways in the 1930s. This was an extremely straightforward build and only the buffers and wheels were changed [for metal ones of each]. The interior is detailed.


Next, not strictly a kit but a collection of parts from various sources nevertheless, is this work of complete fiction. It is just so wrong in so many ways, too, but who cares?

The build was an old idea which simply awaited the acquisition of some donor models. Once in a while its nice to stray from strict prototypes however and with a liking for the credibly [well just] obscure, this seemed an obvious choice to me.
But first, a note on the main donor vehicle, an original of which can be seen opposite. Triang only made three goods vehicles which could be considered as close to the real thing: the ex-GNR bogie brick wagon [on here in my workbench also], the BR-era bogie caustic tank wagon [actually a Triang Hornby production] and the pre-war 12-wheel Trestrol built by the LNER for the LMS. There were other Trestrols of course, but the received wisdom in RMWeb [and dare I argue?] suggests that the Triang model is based on the LMS version. It's an impressive thing, too, and just replacing the wheels and couplings alone updates it quite nicely. I went a little further, though.
The raw materials: a Triang Trestrol, a knocked-about Oxford Diecast Isle of Man Railway 2-4-0 tank and a badly broken Oxford Rail rail gun [bought for its wheels and bogies]. Also some N-gauge track, plastic card and fixings. Total cost iro £15.
The Trestrol's central beam and floor was cut away and replaced by plastic card, sprayed steel and then rusted. Two pieces of N-gauge rail were then laid longitudinally on thin strip wood and weathered before glueing to the new floor. Top hat bearings were inserted into the original bogie side-frames and the smaller Oxford rail gun wheels then put in place. The buffer shanks were cut away and the Triang buffer beam sanded completely flat to accept the entire Oxford buffer beam [removed using a very fine fret saw]. To disguise the obvious join, a strip of plastic card was glued up to it and Archer's resin decal rivets [which are excellent, if fiddley] applied to the strip [see photo below]. Bachmann couplings were then glued in place. Finally, the wheels for the screw-brakes were removed from the Oxford bogie and glued into holes drilled into the Triang ones.

The photos below show the huge improvement to the original buffer-beam brought about by splicing on the Oxford parts and using Archer’s resin rivet decals.


The Oxford tank was simply dismantled, painted and reassembled. It has been screwed to the rail bed [from underneath] and then chained down. All decals are by Pressfix and POWSides. And there you have it: a might-have-been GWR heavy Crocodile returning one of its absorbed narrow gauge locos back to somewhere in mid-Wales after a heavy repair at Caerphilly works.

Back now, and away from the world of pure fantasy, is this build of four K’s Siphon F bogie vans. Three of these kits were bought partially made for just £30 and presented an interesting challenge. The fourth was a wreck from my bits box. The starting point is shown opposite. These were Edwardian vehicles built by the GWR for the carriage of milk (and, later, sausages!). They broke new ground as the first of the bogie Siphons and only six were built. Although mostly gone by the end of the '40s, two rattled on until the mid-50s. The Keyser kit (and these opposite are from the last production in the early '70s, being entirely plastic) was an interesting choice and apart from some expensive brass, no-one has manufactured one in OO since in any format. It is a tad overlong, the body being stretched to accommodate the roof already then in production for K's rather nice Dean 40ft. passenger luggage van. The body moulding is quite nice but the underframe horrendous: sparse, inaccurate and it's difficult to understand just why it is so poor. The plastic bogies, too, are simple to the point of absurdity, but we are where we are.
Anyway, I planned just a basic detailing job on the underframe, nothing too elaborate, just enough to pass muster, some bolsters for the ends of the bogies, having fitted them with bearings and metal wheels, thought given to the couplings and a paint and lettering job. The paint to be used is Halfords' Ford Rio Brown for the body, a reasonable match with GWR brown and far better than the Peugeot Cafe Noir which I had been using (and which now seems to be out of production). Gas tanks will be knocked up from 5 amp fuses, almost exactly the correct size! I have also ordered some etched brass brake handle fittings.


The photo above shows the underframe detail fitted: gas tanks and some plumbing and V-hangers and brake handles. The battery boxes have been removed as the fitting of gas tanks rendered their presence unnecessary. Two of the bodies sprayed brown to test the new paint: it was fine. The Bogies [Keyser GWR American bogies] have also been fitted with bolsters to provide strength and plastic-card pieces glued in to enable the attachment of couplings in due course. The top body in the photo is an older production however and has a brass screw already fitted to attach the earlier white-metal bogies.
Once all of the bogies had been strengthened or rebuilt, and were found to run acceptably, couplings were added. With that done, there was little else necessary to complete the build other than paint the remaining bodies and roofs, letter the vans, varnish then and then attach the bogies. 3mm transfers [3mm as in ‘TT’] were used in place of normal 4mm as they fitted between the framing correctly. Their slightly smaller size is not noticeable. I decided to fit two of the vans with running and return instructions also, to increase visual interest. They are not absolutely prototypical but their use is not un-prototypical.
The finished vans are shown below. Only one of the four has been finished with the '34-'42 Roundel although I always thought that it looked its best on brown vehicles. The other three have the '27-'34 livery.


Around 40 or so years ago, MAJ Models produced a range of GWR and LMS coach kits. These were relatively straightforward, attractive builds and came with fully-liveried self-adhesive sides, so obviating the need for painting the final livery. I picked up one of these very old kits unmade in a club sale sometime ago and, for £15, it provided me with a 57ft. Collett Full Brake to Dia. K45, a coach I did not have.

The build was not wholly trouble-free [some age-related warping] but it worked well in the end. I attached etched brass door and grab handles to lift the otherwise flat sides and the excellent transfers are by Railtech [recommended, too].
The photo opposite shows the method of construction. The body assembled with its perspex sides but without the roof, other details and the self-adhesive sides attached. The second photo is the completed model. It is extremely free-running.

With a number of manufacturers now producing accurate models of GWR Loriots in various diagrams, I decided to build the Cambrian kit of the Loriot W as I had a suitable load for it to carry. The kit went together reasonably easily although the instructions were appalling. It would be too light to run alone without its load of a repainted Oxford Diecast Fowler Road Loco [which awaits chocking and chaining down], but it’s happy enough to sit for the photos below! The wagon needs tare details adding in due course. I’ll probably need N gauge decals for that.


And the completed ensemble is shown below, with the chimney correctly hinged down and roped to avoid fouling the gauge…..


Next, another quite old kit build, this time from Ian Kirk. The Mink D was released in one of his ‘Basic Kit’ series a good while back for the princely sum of 80p.
The mouldings were actually quite good, crisp with no flash and fitted together well. The underframe detail was sparse in the extreme however. The model was made up in the conventional way and metal wheels running in brass bearings were fitted.
Self-adhesive tyre weights were attached inside before the roof was fitted but, in reality, they were insufficient and further ballast was added later underneath. Weighting stock is always essential but, in this case, especially so because of the relatively long wheelbase and plastic construction.
The original roof could not be used as it had warped too badly. Consequently, a plastic card roof was bent up but it, too, presented difficulties as the profile of the ends did not match that of the sides. Some thin packing along the tops of the sides provided a remedy although there is a very slight bow in the centre: not noticeable when viewed in normal use however. Wire tie bars were glued in place and the original truss rod hangers [queen posts?] were cut away to be replaced with new ones to which thin brass truss rodding was attached. The kit runs smoothly and is no longer so basic.
The prototype for this covered van has been preserved.
This build will be followed by a Parkside [now Peco] Mink G, similar but longer.


